Advanced configuration
Overview
Teaching: 15 min
Exercises: 5 minQuestions
What functionality and modularity to Nextflow?
Objectives
Understand how to provide a timeline report.
Understand how to obtain a detailed report.
Understand configuration of the executor.
Understand how to use Slurm
We have got to a point where we hopefully have a working pipeline. There is now some configuration options to allow us to explore and modify the behaviour of the pipeline.
The nextflow.config was used earlier to set parameters for the Nextflow script. We can also use it to set a number of
different options.
Timeline
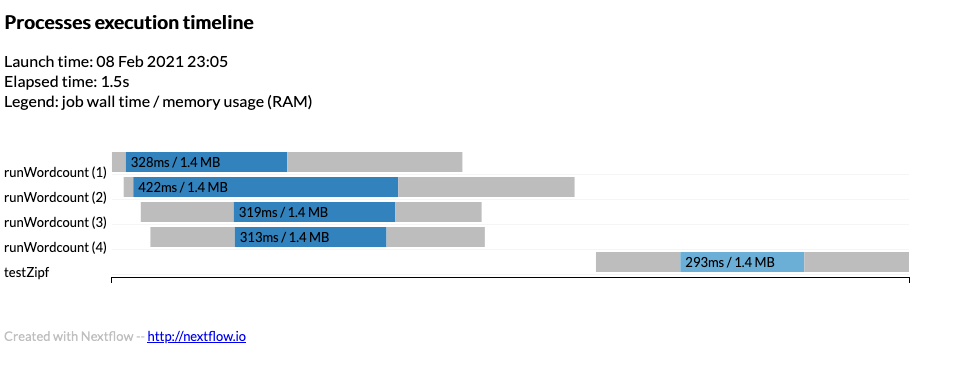
To obtain a detailed timeline report add the following to the nextflow.config
timeline {
  enabled = true
  file = "$params.outdir/timeline.html"
}
Notice the user of $params.outdir that can be defined in the params section to a default value such as
$PWD/out_dir.
The timeline will look something like:

Example timeline can be found timeline.html
Report
A detailed execution report can be created using:
report {
  enabled = true
  file = "$params.outdir/report.html"
}
Example can be found report.html
Executors
If we are using a job scheduler where user limits are in place we can define thise to stop Nextflow abusing the
scheduler. For example to report the queueSize as 100 and submit 1 job every 10 seconds we would define the executor
block as:
executor {
  queueSize = 100
  submitRateLimit = '10 sec'
}
Profiles
To use the executor block as described previously then a profile can be used to define a job scheduler. Within the
nextflow.config file define:
profiles {
  slurm { includeConfig './configs/slurm.config' }
}
and within the ./configs/slurm.config define the Slurm settings to use:
process {
  executor = 'slurm'
  clusterOptions = '-A scwXXXX'
}
Where scwXXXX is the project code to use.
This can be used on the command line:
$ nextflow run main.nf -profile slurm
Or the whole definition can be defined within the process we can define the executor and cpus
  executor='slurm'
  cpus=2
You can also define the profile on the command line but add to existing profile such as using -profile slurm when
running but setting cpus = 2 in the process. Note for MPI codes you would need to put clusterOptions = '-n 16' for
a 16 tasks to use for MPI. Be careful not to override options such as clusterOptions that define the project code.
Manifest
A manifest can describe the workflow and provide a Github location. For example
manifest {
  name = 'ARCCA/intro_nextflow_example'
  author = 'Thomas Green'
  homePage = 'www.cardiff.ac.uk/arcca'
  description = 'Nextflow tutorial'
  mainScript = 'main.nf'
  version = '1.0.0'
}
Where the name is the location on Github and mainScript is the location of the file (default in main.nf).
Try:
$ nextflow run ARCCA/intro_nextflow_example --help
To update from remote locations you can run:
$ nextflow pull ARCCA/intro_nextflow_example
To see existing remote locations downloaded:
$ nextflow list
Finally, to print information about remote you can:
$ nextflow info ARCCA/intro_nextflow_example
Labels
Labels allow to select what the process can use from the nextflow.config or in our case the options in the Slurm
profile in ./configs/slurm.config
process {
  executor = 'slurm'
  clusterOptions = '-A scw1001'
  withLabel: python { module = 'python' }
}
Defining a process with the above label 'python' and will load the python module.
Modules
Modules can also be defined in the process (rather than written in the script) with the module directive.
process doSomething {
  module = 'python'
  """
  python3 --version
  """
}
Conda
Conda is a userful software installation and management system and commonly used by various topics. There are a number of ways to use it.
Specify the packages.
process doSomething {
  conda 'bwa samtools multiqc'

  '''
  bwa ...
  '''
Specify an environment.
process doSomething {
  conda '/some/path/my-env.yaml'

  '''
  command ...
  '''
Specify a pre-existing installed environment.
process doSomething {
  conda '/some/path/conda/environment'

  '''
  command ...
  '''
It is recommended to use conda inside a profile due to there might be another way to access the software such as via docker or singularity.
profiles {
  conda {
    process.conda = 'samtools'
  }

  docker {
    process.container = 'biocontainers/samtools'
    docker.enabled = true
  }
}
Generate DAG
From the command line a Directed acyclic graph (DAG) can show the dependencies in a nice way. Run nextflow with:
$ nextflow run main.cf -with-dag flowchart.png
The flowchart.png will be created and can be viewed.
Hopefully the following page has helped you understand the options to dig deeper into your pipeline and maybe make it more portable by using labels to select what to do on a platform. Lets move onto running Nextflow on Hawk.
Key Points
Much functionality is available but had to be turned on to use it.