Work with Graphical User Interfaces (GUIs)
Overview
Teaching: 15 min
Exercises: 15 minQuestions
What is X11?
How to connect to Hawk using a GUI?
What is VNC?
Objectives
Familiarize with common SSH clients and the options to enable X11 connections.
Learn how to connect to Hawk’s VNC server.
This section describes common tools to work with graphical applications.
X11
X is a Unix window system and it specifies methods to display, move and interact with windows using a keyboard and a mouse. X’s most distributed version was version 11 (hence X11) created in 1987 and remaining mostly unchaged since then. X11’s has been used on many Linux distributions to produce several different desktop environments thanks to X11’s agnostic protocol.
Linux systems natively come with X11 support so that no extra software is required to display GUIs from a remote server. On Windows and MacOS systems, a X11 server is required that is able to understand the remote server instructions on how to interact with an application’s GUI.
Common X11 servers
On Windows, Xming and Putty are classic applications used together to connect via SSH to a remote host and render graphics. MobaXterm is another enhanced terminal for Windows. On MacOS, XQuartz is a project that aims to provide Mac systems with X11 support.
Connecting to Hawk using X11
Windows
PuTTY is a free implementation of SSH and Telnet for Windows and Unix platforms, along with an xterm terminal emulator. It is written and maintained primarily by Simon Tatham.
Xming is the leading X Window System Server for Microsoft Windows 8/7/Vista/XP (+ server 2012/2008/2003). It is fully featured, small and fast, simple to install and because it is standalone native Microsoft Windows, easily made portable (not needing a machine-specific i installation).
You can find basic instructions on how to setup Putty to connect to Hawk without X11 support in the Super Computing Wales portal. The following are additional instructions to setup Xming and enable X11 capabilities in Putty.
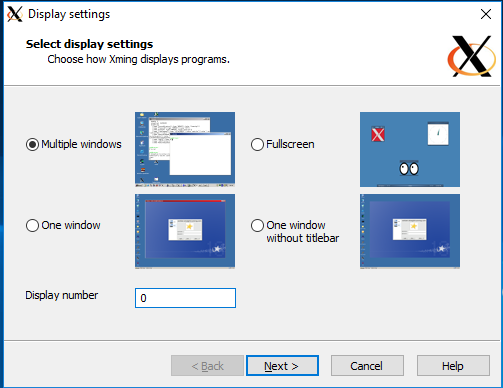 |
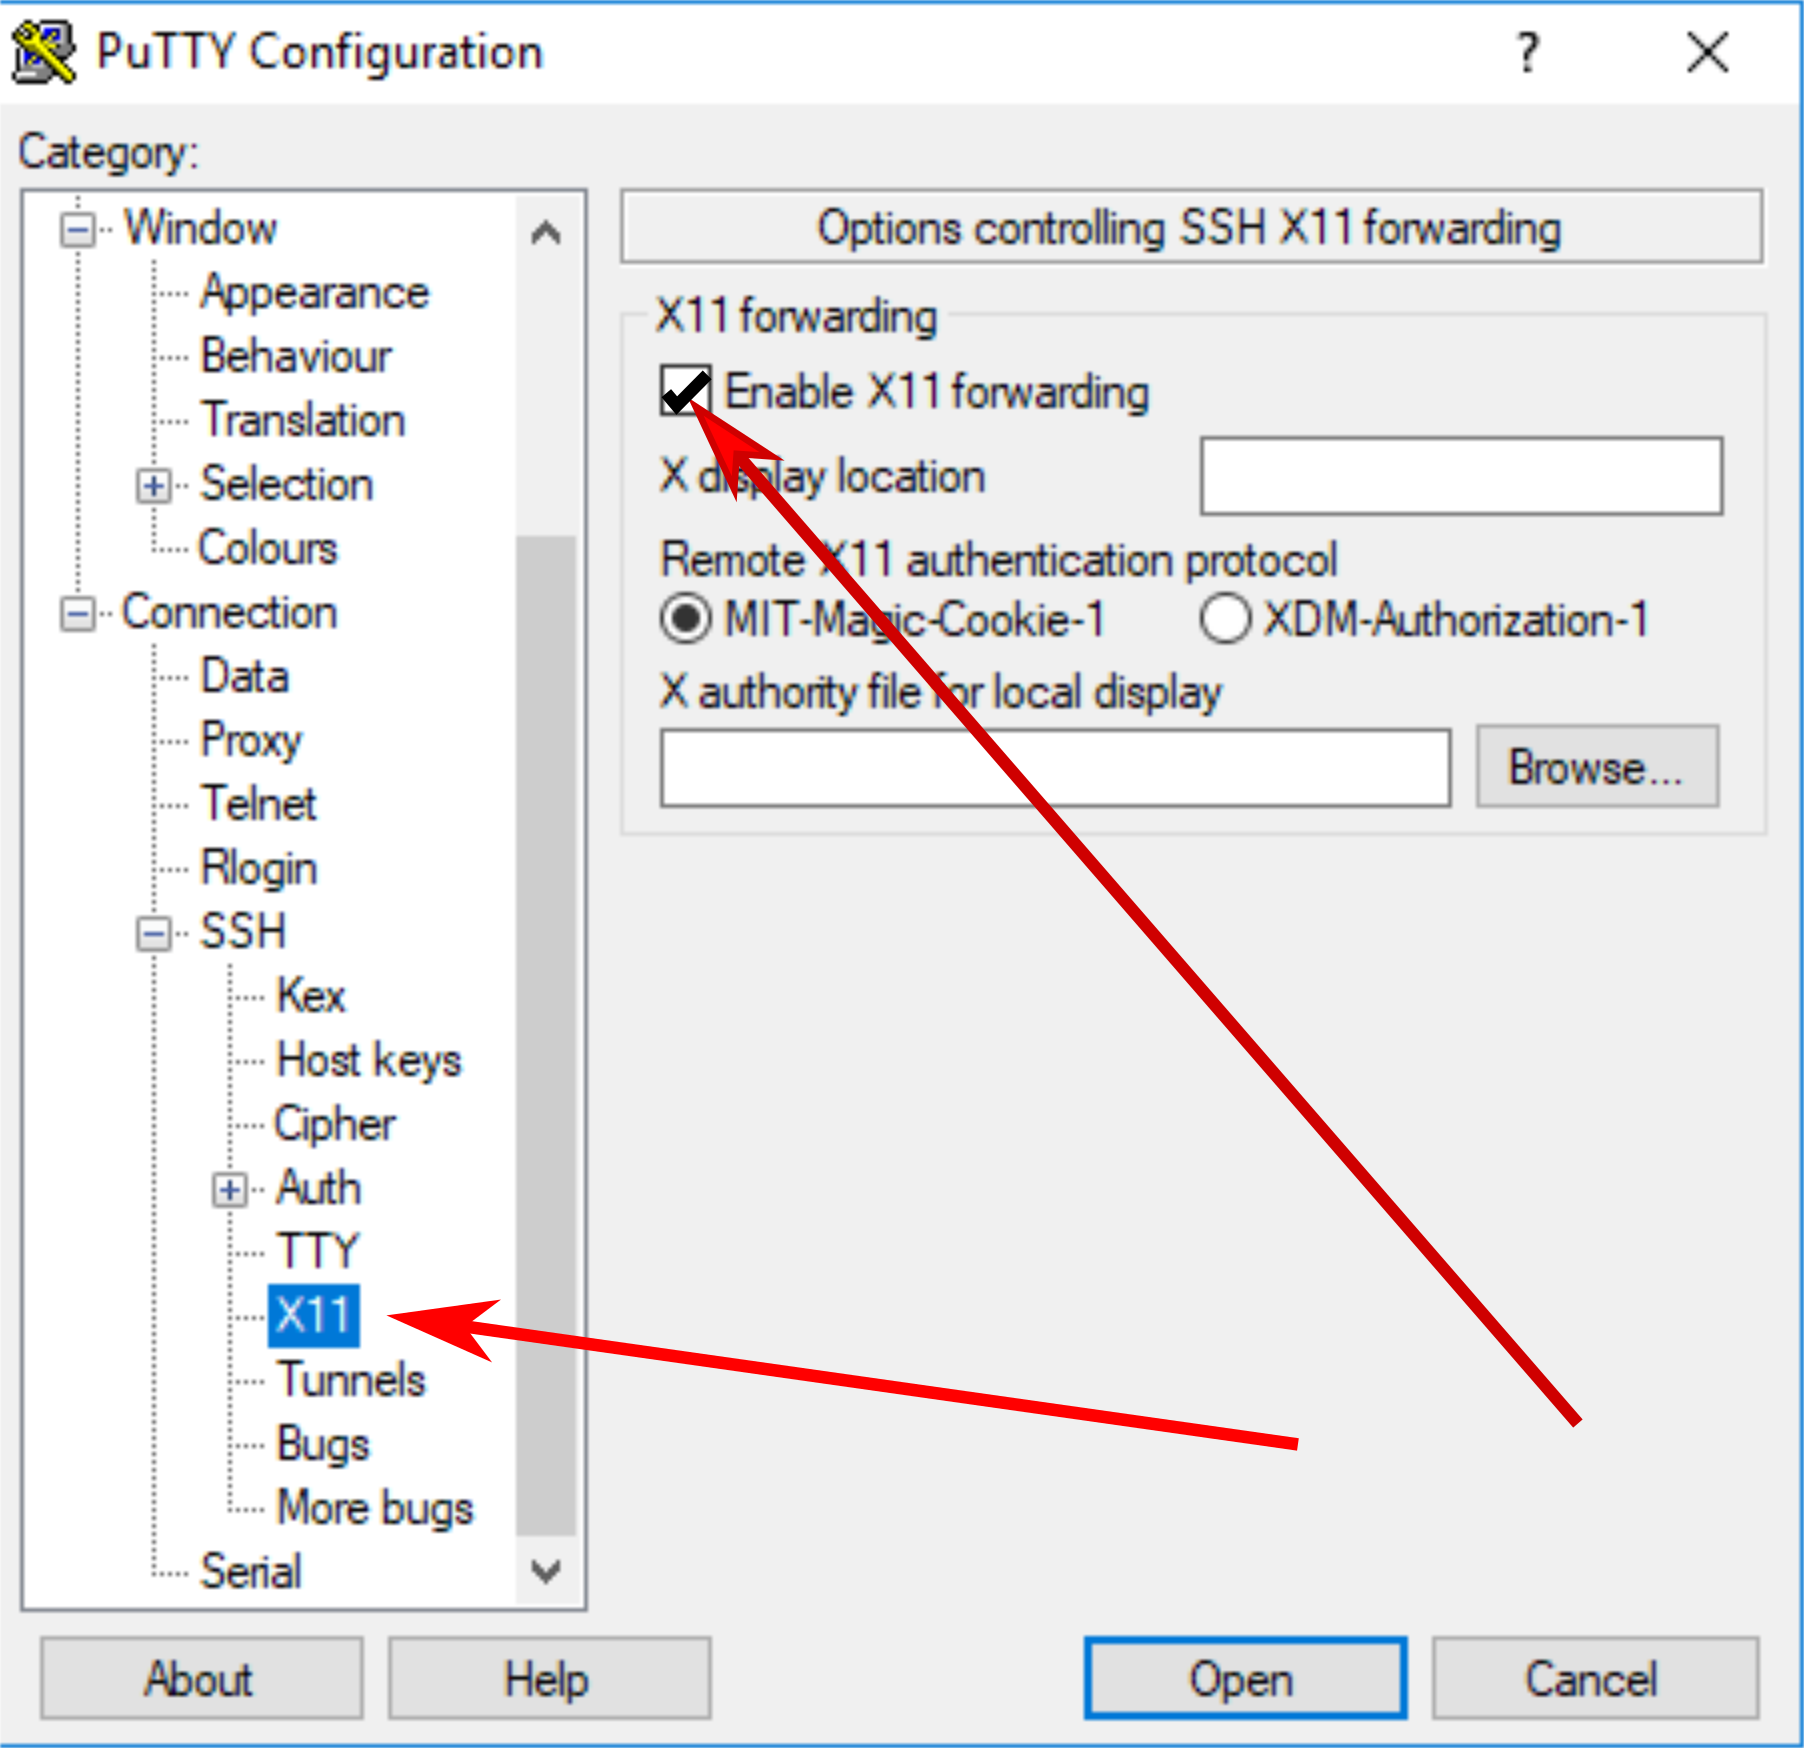 |
| After installing Xming, you can open it and accept all default settings. | Once Xming is active, go the Putty’s settings and enable X11 forwarding, then connect as usual. |
Cardiff Apps
Putty and Xming are available as part of Cardiff Apps in University owned desktop computers. This is useful if you don’t have administrative rights to install new applications.
On Windows you can use MobaXterm to transfer
files to Hawk from you local computer.
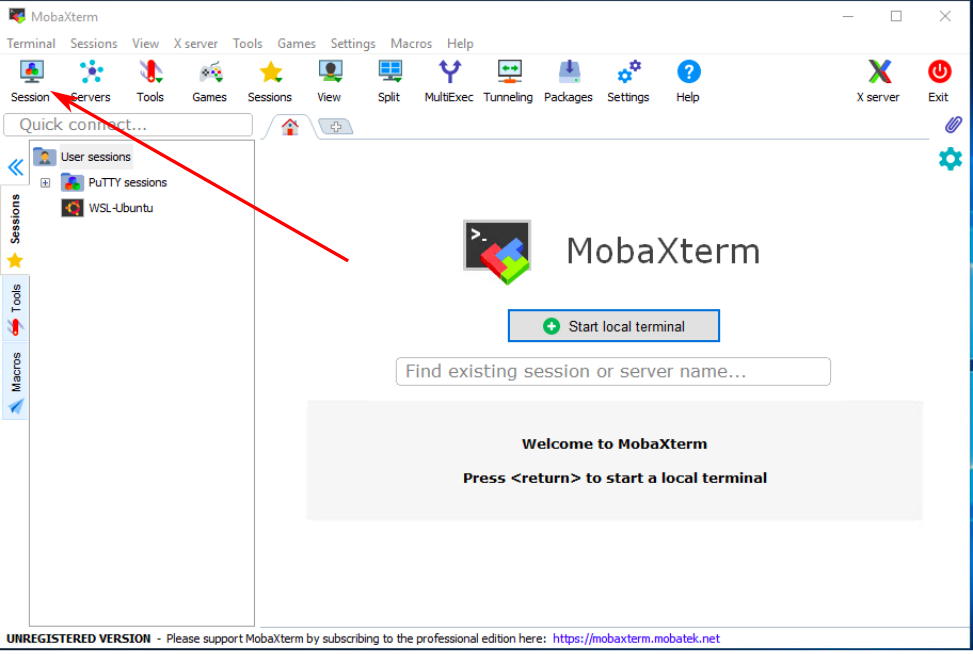
MobaXterm is a feature rich terminal for Windows that comes with an integrated SSH
client and X11 server. When opening MobaXterm you should see something like the
image below. To start a new session click on “Session”.
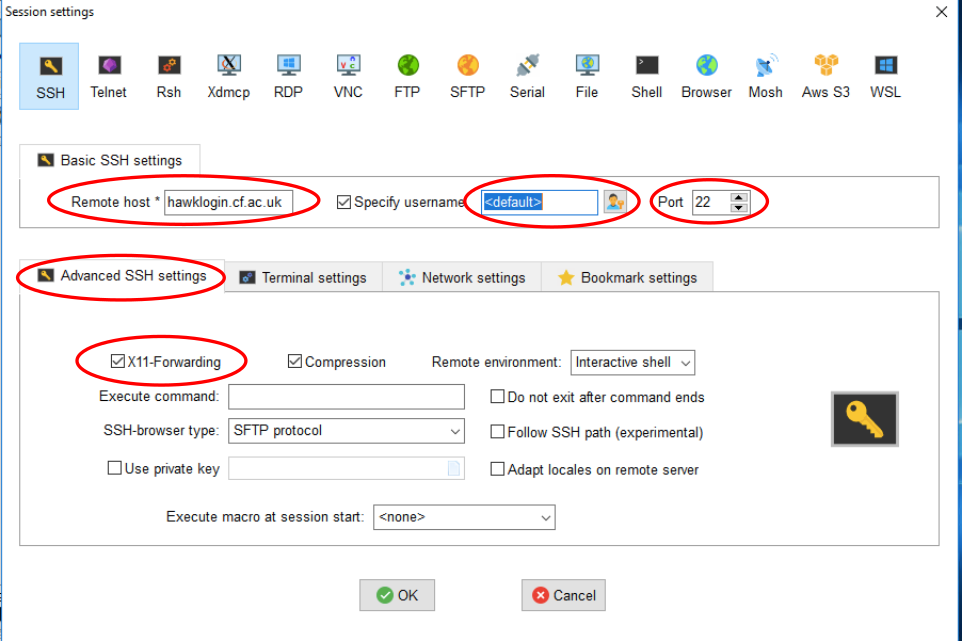
Choose SSH session and enter Hawk hostname (hawklogin.cf.ac.uk) and your username.
Double check the port number (22). X11 is enable by default in MobaXterm but you
can disable it by unticking X11-Forwarding in the “Advanced SSH settings” tab.
Click “OK” and you should be able to connect to Hawk. You can download MobaXterm from its website.
MacOS: XQuartz
XQuartz is an open source project to develop an X window system that work on MacOS. After installing XQuartz, enable X11 forwarding using SSH “-X” option:
$ ssh -X username@hawklogin.cf.ac.uk
Issues with XQuartz
We have had some user reports of XQuartz throwing error messages with applications such as Gaussian View or Comsol:
[xcb] Unknown sequence number while processing queue

[xcb] Most likely this is a multi-threaded client and XInitThreads has not been
called

[xcb] Aborting, sorry about that.
If you experience any such problem, please get in contact with us.
Testing a X11 connection
Linux comes with a couple of toy applications that can be used to easily test if your X11 connection is working as expected. In the terminal connected to Hawk try the following command:
$ xeyes
If working correctly, you should see a new window open with a pair of eyes following your mouse movements.

VNC
VNC is a Virtual Network Computing desktop-sharing system that allows to remotely control another computer. The main differences with X11 are:
- With VNC the graphical processing runs on the remote server transferring only a screenshot to the local machine. With X11, the application sends the instructions to the local machine and behaves as if the application were run locally. This can be problematic, for example, when trying to visualize simulation results with big data files.
- With VNC your application survives disconnecting from the server. For example, if you need to close your laptop and change location, you can reconnect to the VNC server and continue working with the application. This is not possible with X11, since when the X11 server dies, the windows disappear.
On Hawk we have a couple of methods to access a VNC server:
- a basic VNC server running on a Virtual Machine which is recommended when running with relatively ligth applications like editing files and results visualizations. This method has the advantage of mantaining a VNC running for longer (useful when interrupting work momentarily) but has the disadvantage of very limited computational resources.
- a VNC service based on OnDemand, on the other hand, provides the user with a remote desktop setup in a HPC node(s) with all its computational power but has the drawback of relying on SLURM interactive sessions which puts a limit to the time the VNC desktop will last (and could potentially lead to long queue times while waiting for the interactive session).
The following are instructions on how to access a VNC desktop using these two methods.
To connect to a VNC server via a virtual machine you need to
- create a session in the server and,
- connect via SSH tunnelling with a VNC client.
For users who do not need long-running VNC servers and happy for sessions to reset between disconnects then there is a general purpose VNC service on port 5901 which allows you to login to a remote desktop.
Create a VNC session
- Login to Hawk:
$ ssh c.user@hawklogin.cf.ac.uk
- On Hawk, login to VNC server (enter your Hawk password when prompted):
$ ssh clvnc1- Run vncserver. First time will ask to set a VNC password to access sessions (optionally you can set a view only password as well).
$ vncserver- To run an X session – you need to find port number, for this add 5900 to DISPLAY number obtained from below command – e.g. 5901 in this example,
$ vncserver -list
TigerVNC server sessions:
X DISPLAY #     PROCESS ID
:1              22063
The following steps are system dependent:
Connect a VNC client (MacOS).
For this you need to connect to Hawk using a SSH tunnel, some applications such as MobaXterm has this feature integrated. In this example we will use another popular VNC client, TigerVNC.
- Download and install TigerVNC from their official website.
- Open a terminal and use SSH port forwarding to use local port to access port on remote server, e.g. use local port 9000 to connect to clvnc1 port from step 4 (e.g. 5901): <pre style="color: silver; background: black;">$ ssh -L 9000:clvnc1:(port number) c.user@hawklogin.cf.ac.uk </pre>
- Run TigerVNC and connect to localhost:9000
- Type VNC password set in step 3.
- You should now have a VNC Linux desktop.
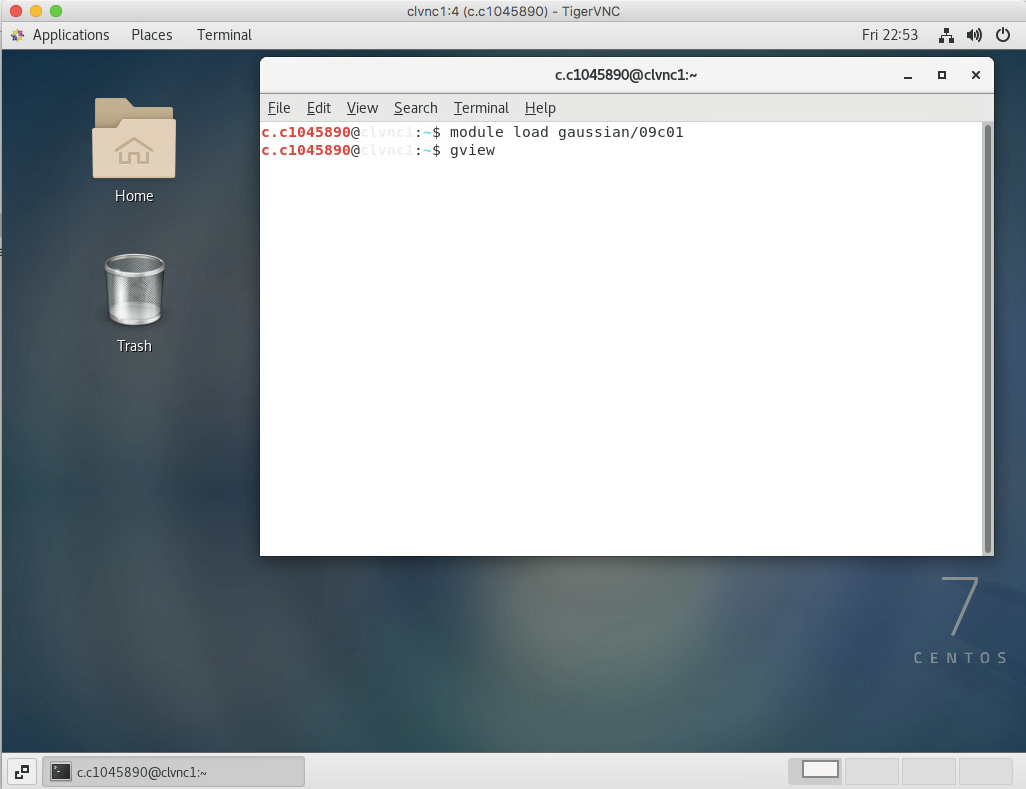
- To open an GUI application (e.g. gview), run a terminal window within VNC’s desktop (Applications -> System Tools -> Terminal). Within the terminal load the required module (e.g. module load gaussian/09c01). Run the desired application (e.g. gview)
- Once finished just close window.
- If completely finished close down VNC server by logging back into clvnc1 and running (where screen number is the number obtained in step 4)
$ vncserver -list $ vncserver -kill :(screen number)- Logout of VNC server to return to Hawk.
$ exit

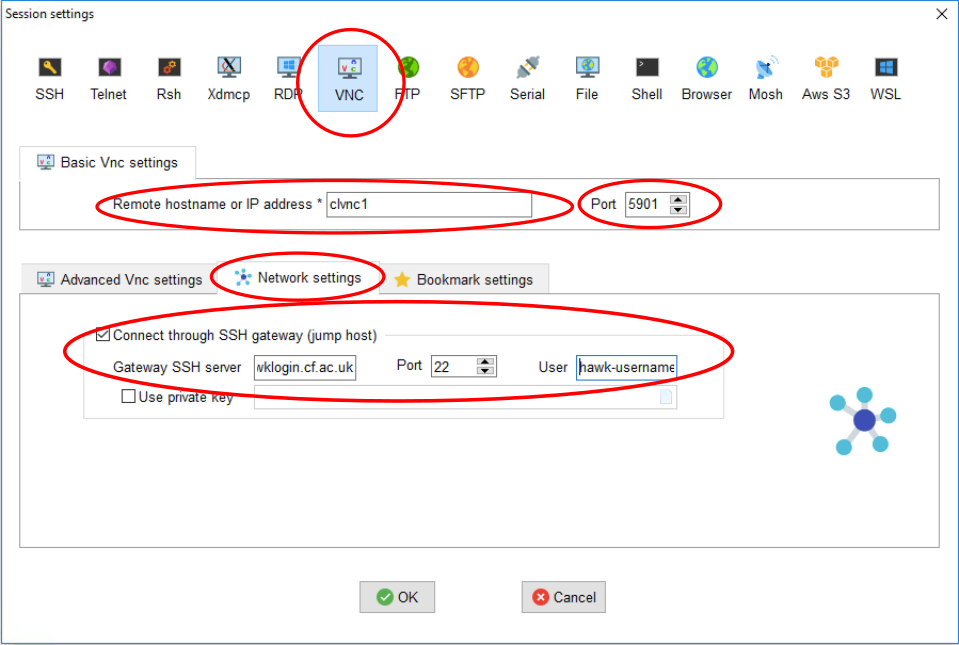
Connect a VNC client (Windows).
On Windows, MobaXterm has an integrated VNC client that works well.
- Download and install MobaXterm from their official website.
- Open MobaXterm and head to Session->VNC. You should see the following window:
- On the Basic VNC settings, set clvnc1 as the Remote Hostname and set port to the port number obtained in step 4 (e.g. 5901).
- On the Network settings tab, tick “Connect through SSH gateway” and set hawklogin.cf.ac.uk as the “Gateway SSH server”, port 22 and use your Hawk username.
- Click OK and you will be prompted for your Hawk password (you can optionally let MobaXterm save it), then you will be prompted by the password set on step > 3 above (you can also optionally let MobaXterm to save it).
- You should now have a VNC Linux desktop.
- To open an GUI application (e.g. gview), run a terminal window within VNC’s desktop (Applications -> System Tools -> Terminal). Within the terminal load the required module (e.g. module load gaussian/09c01). Run the desired application (e.g. gview)
- Once finished just close window.
- If completely finished close down VNC server by logging back into clvnc1 and running (where screen number is the number obtained in step 4)
$ vncserver -list $ vncserver -kill :(screen number)- Logout of VNC server to return to Hawk.
$ exit
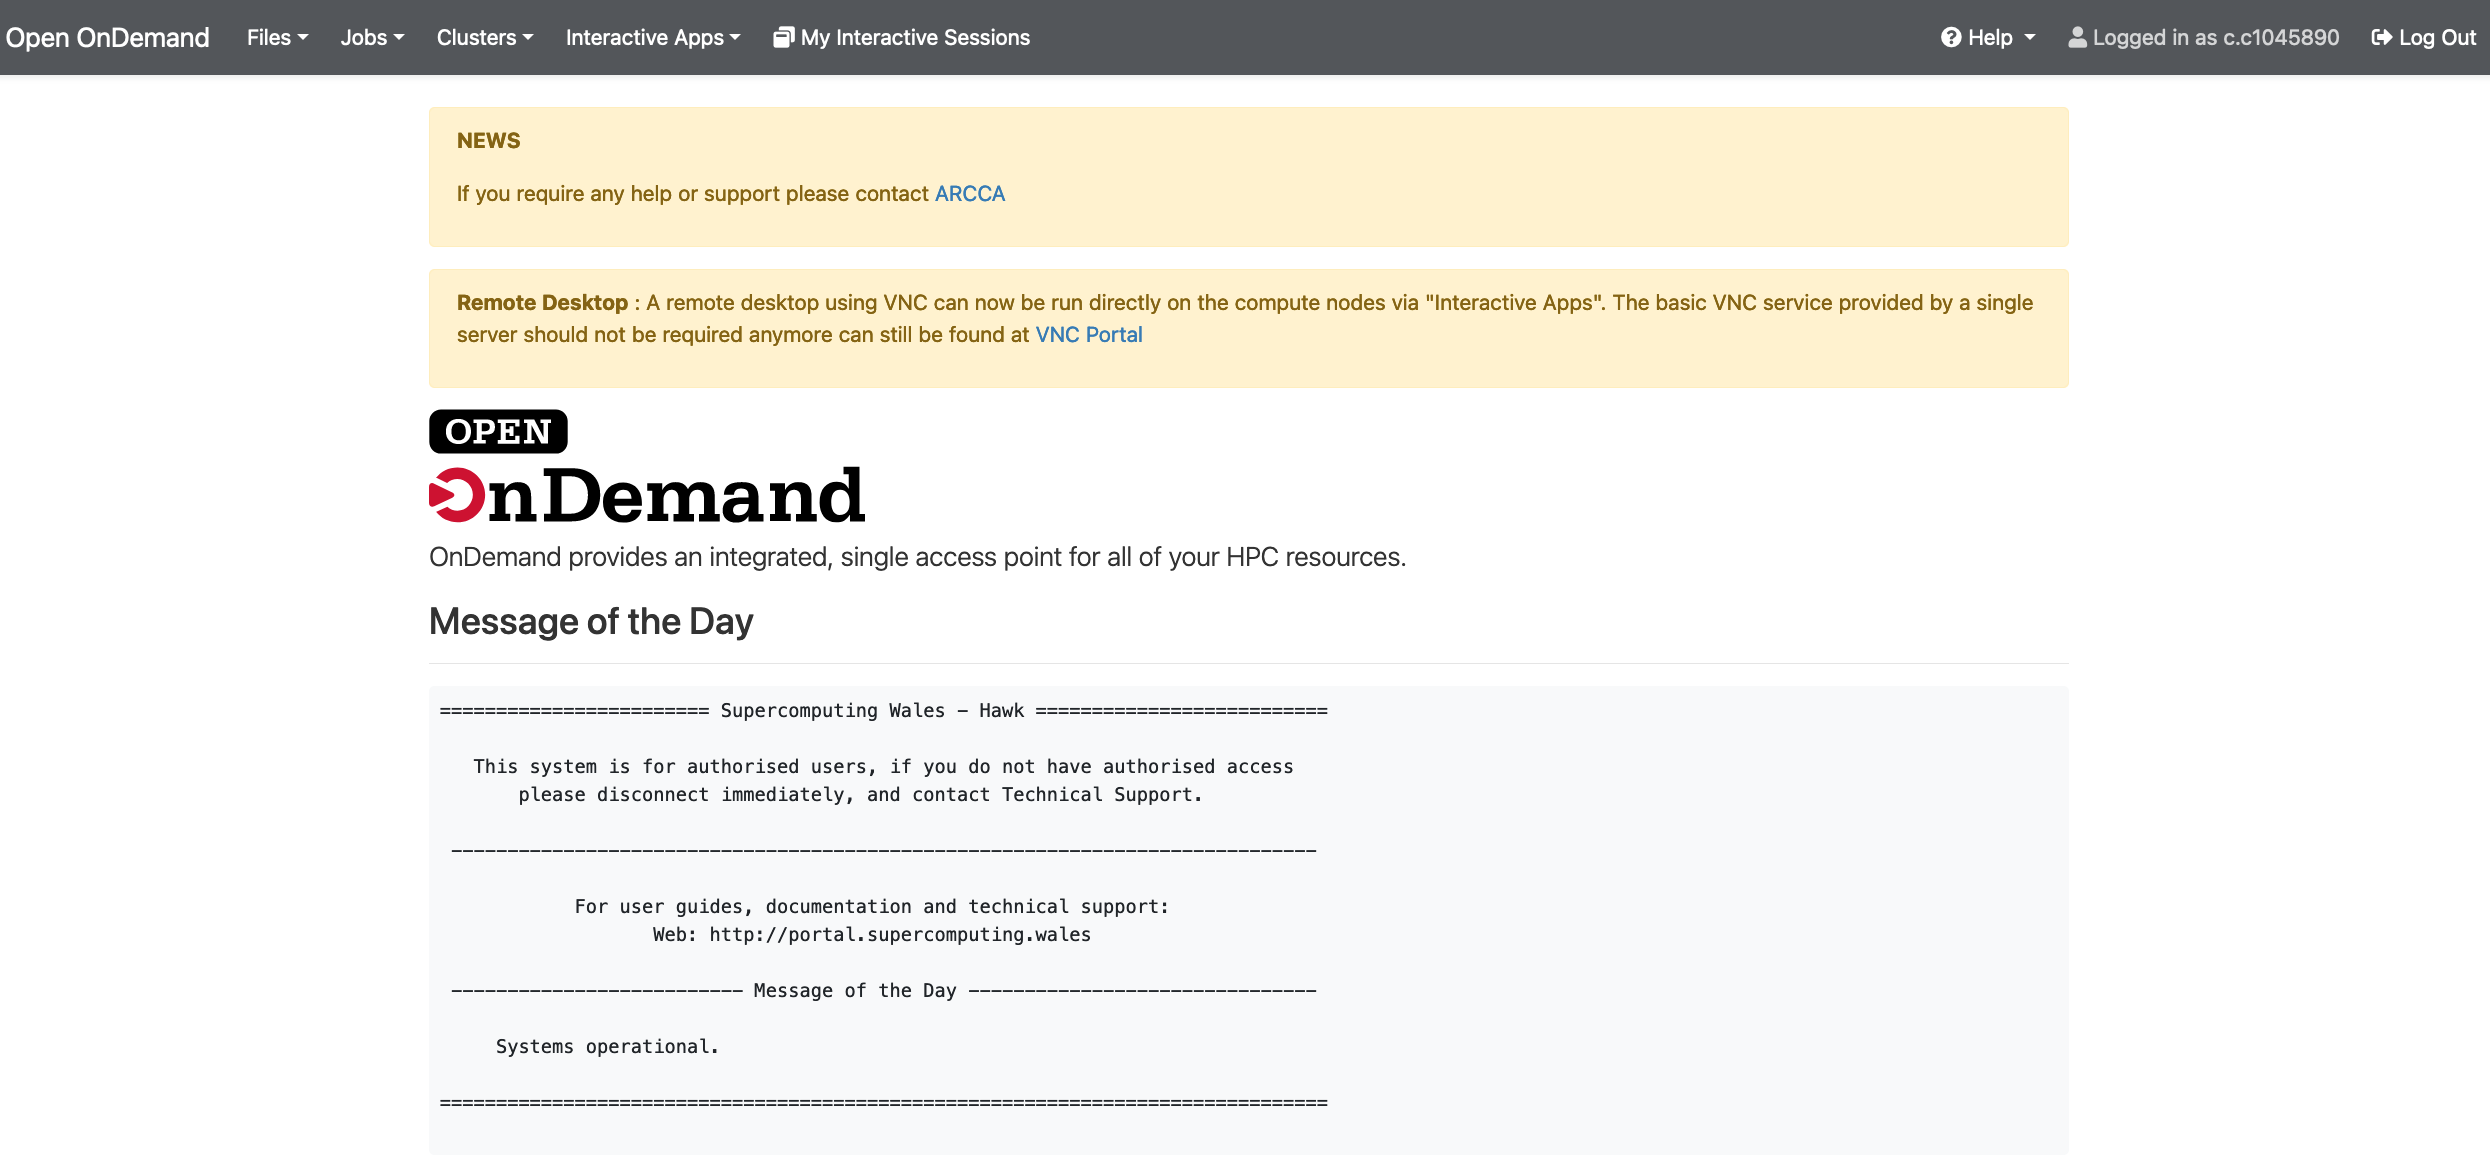
- Go to ARCCA OnDemand portal (this requires access to Cardiff University VPN ).
-
Enter your details: Hawk username and password. Once logged in you should land on a page with useful information including the usual Message of the Day (MOD) commonly seen when loggin in to Hawk via the terminal.

-
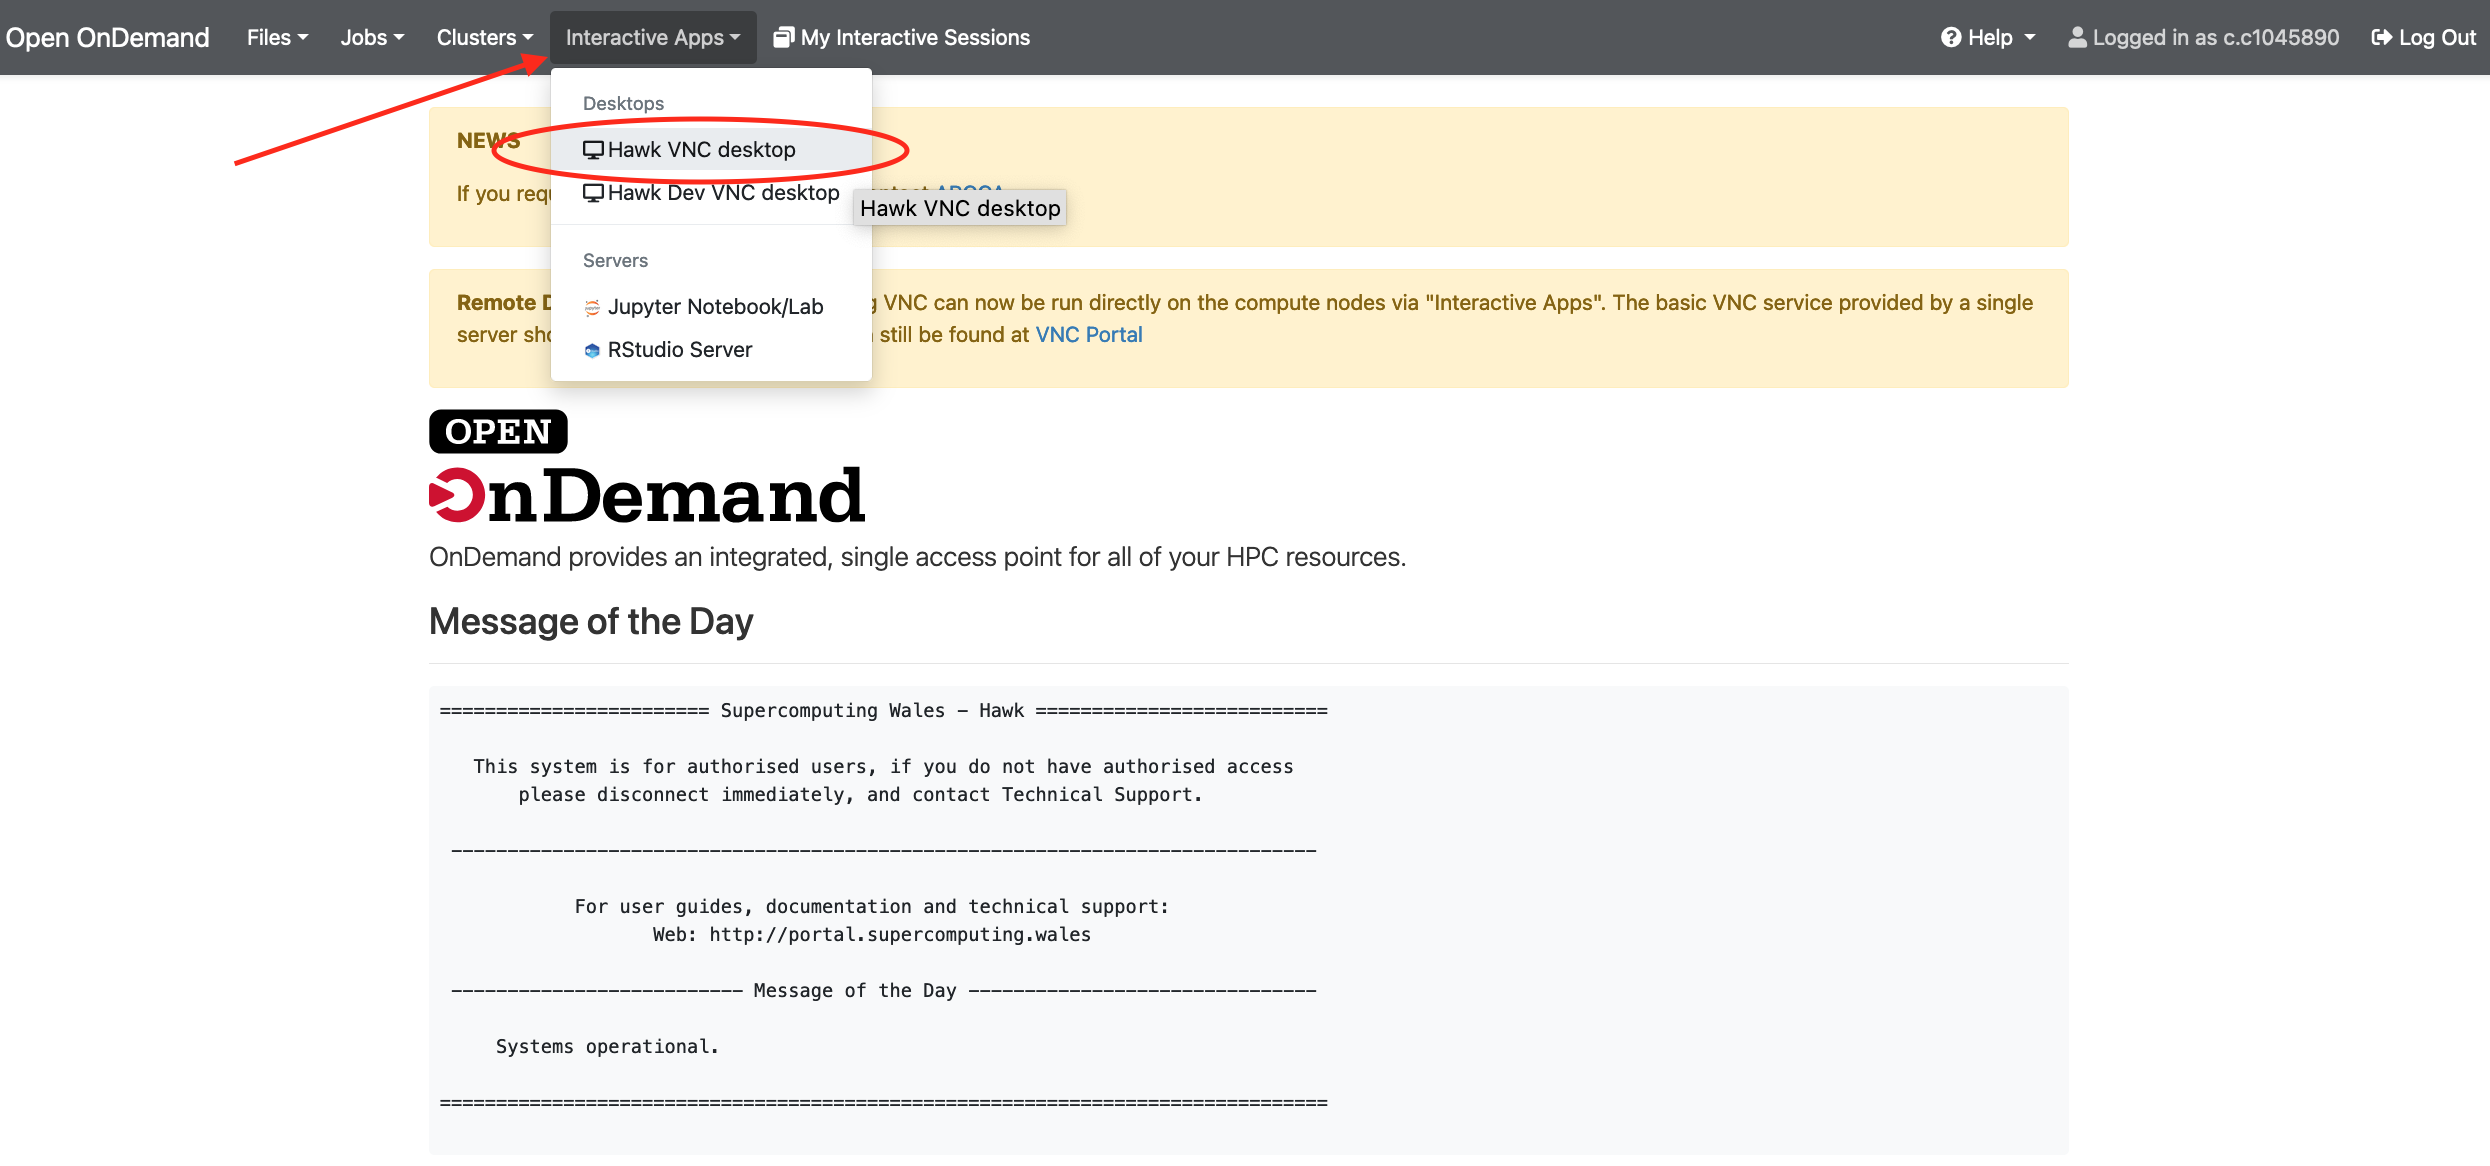
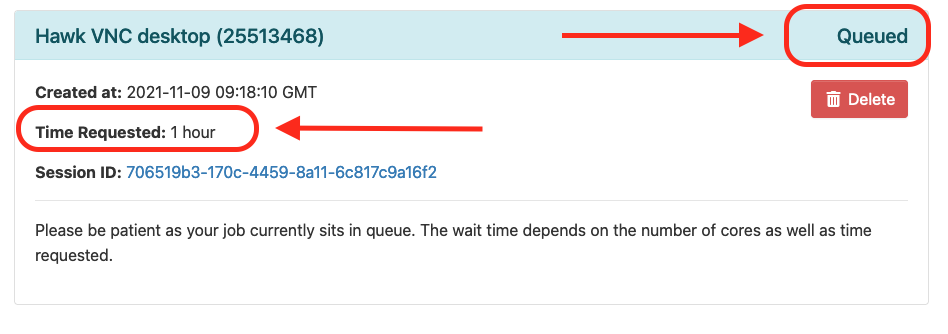
Go to “Interactive Apps” in the top menu and select “Hawk VNC Desktop”. This will bring you to a form where you can specify for how much time the desktop is required, number of CPUs, partition, etc. You can also choose to receive an email once the desktop is ready for you. Click the Launch button to submit the request.

-
After submission you request will be placed on the queue and will wait for resources, hopefully for a short period, but this depends on the number of cores as well as time requested, so please be patient. At this point you can close the OnDemand website and come back at a later point to check progress or wait for the email notification if the option was selected.
Once your request is granted you should be able to see a Running message, the amount of resources granted and the time remaining.
Click Launch Hawk VNC Desktop to launch the desktop in a new web browser tab.

-
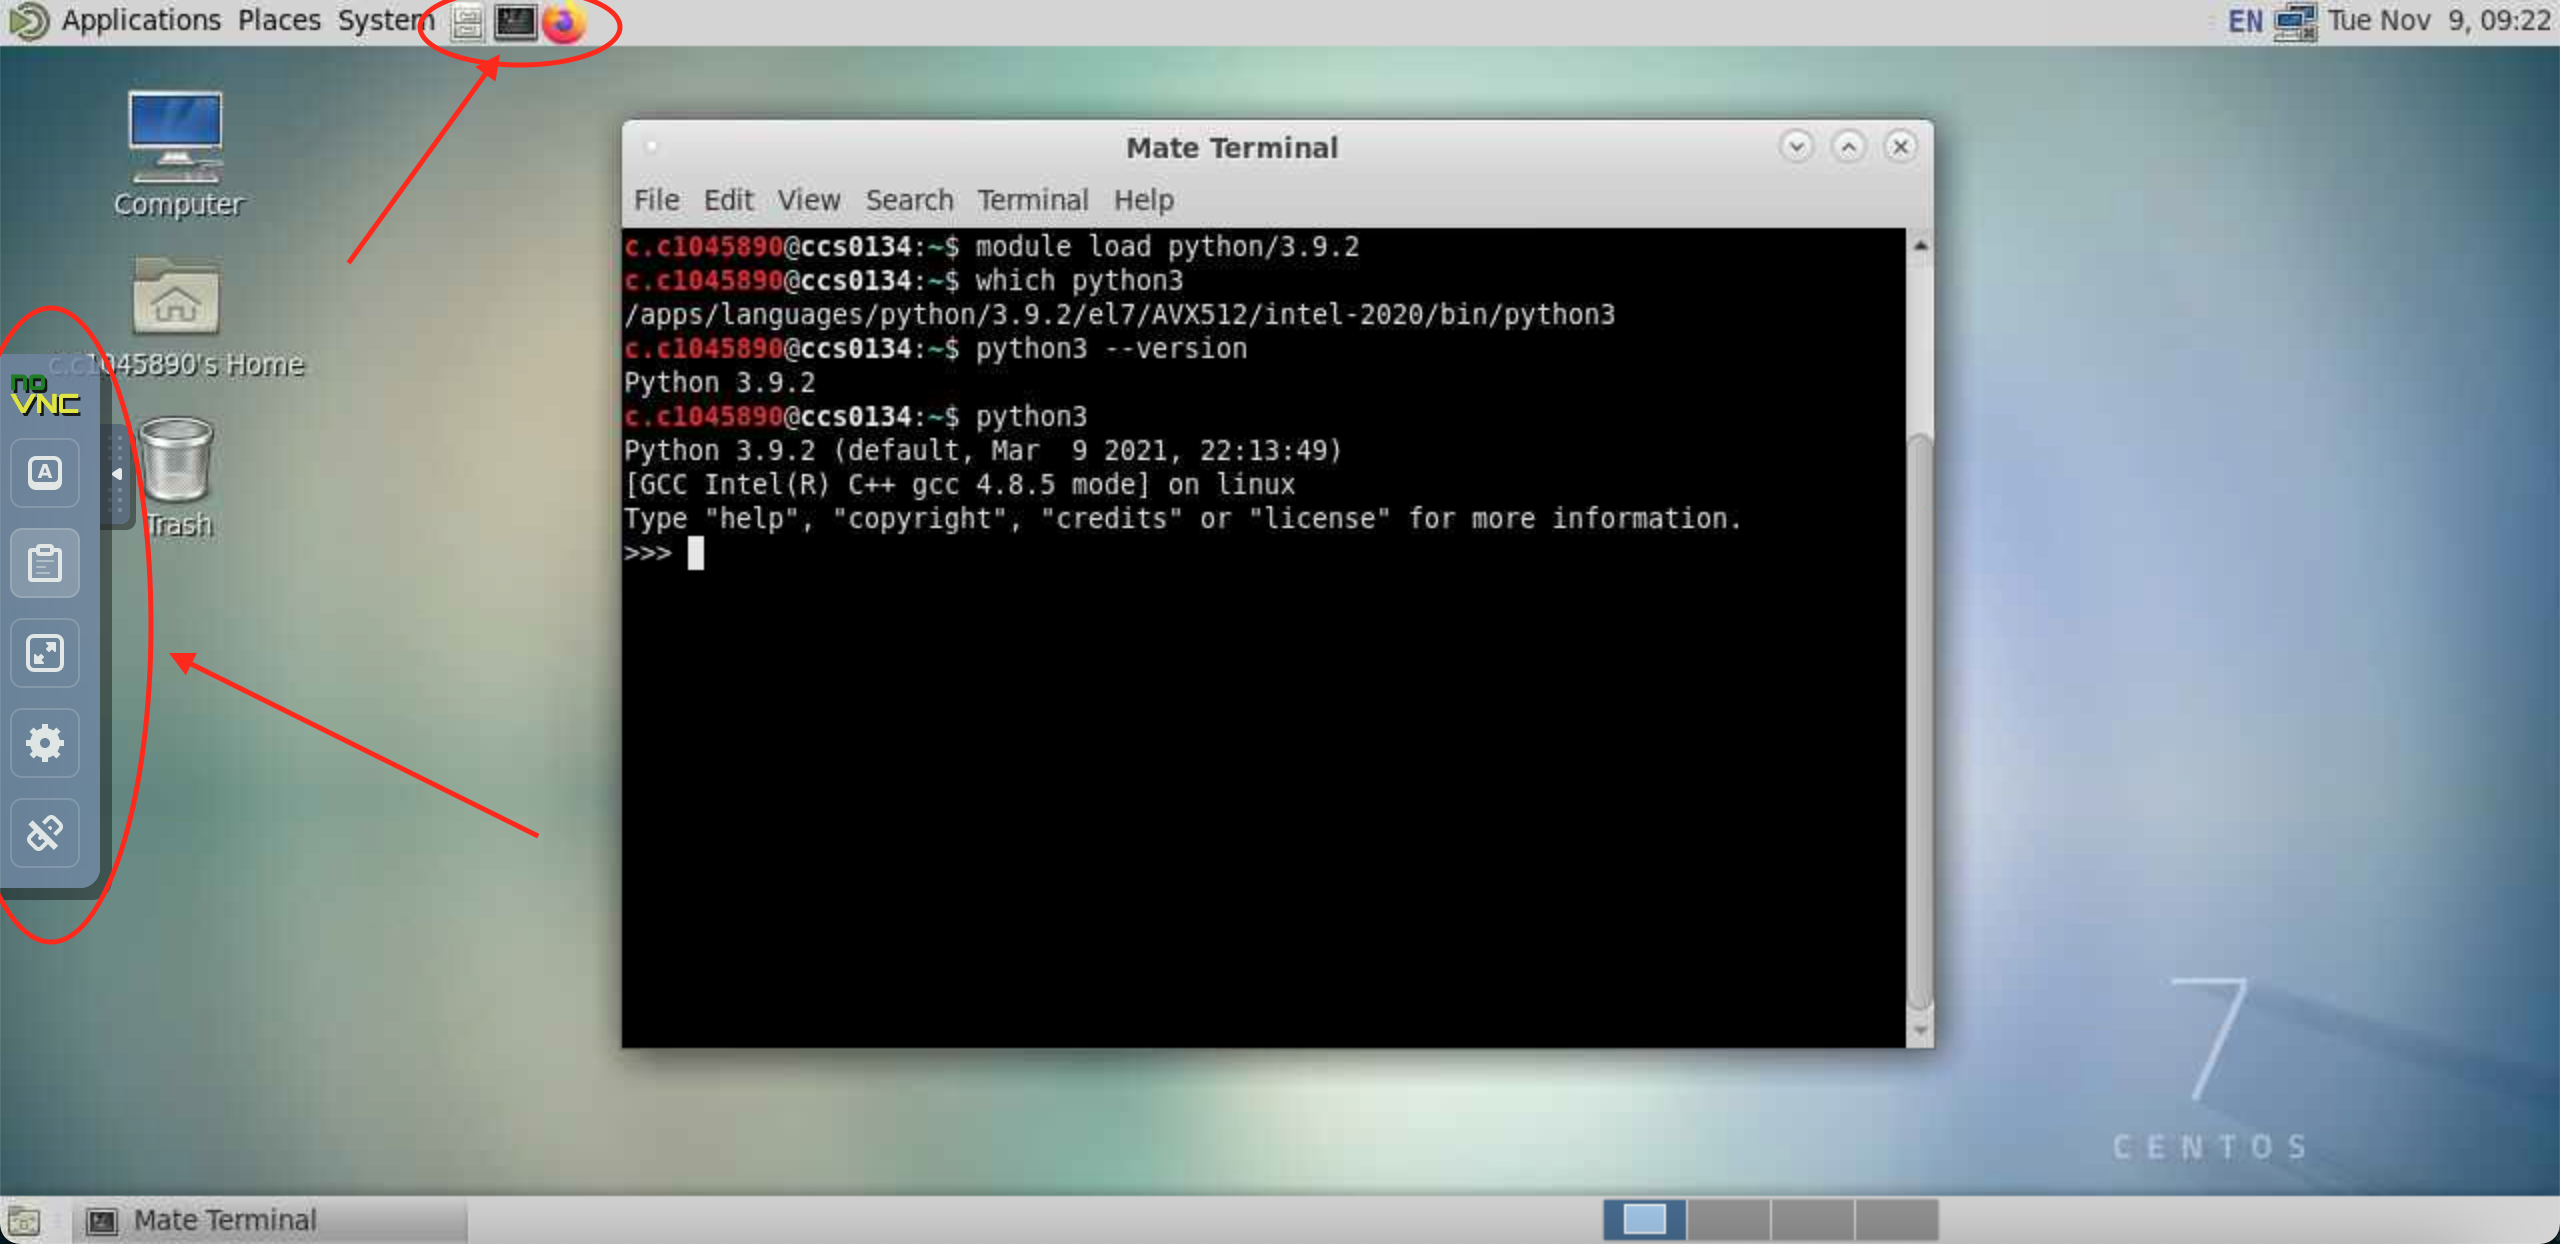
The VNC desktop can be used as any regular Operating System (in this case i Linux), in which you can click on icons to open folders (there is a direct access icon to your home directory in the deskop), open files to edit them and more importantly, open applications that require a GUI.
To load specific software, open a new terminal as shown in the images below and load any desired package. You can run the program from the command line and the GUI will be displayed in the desktop.
On the left there is a hidden menu that you can expand by clicking on it. It has a few useful tools including a clipboard to copy-paste text between the remote desktop and your local machine.

-
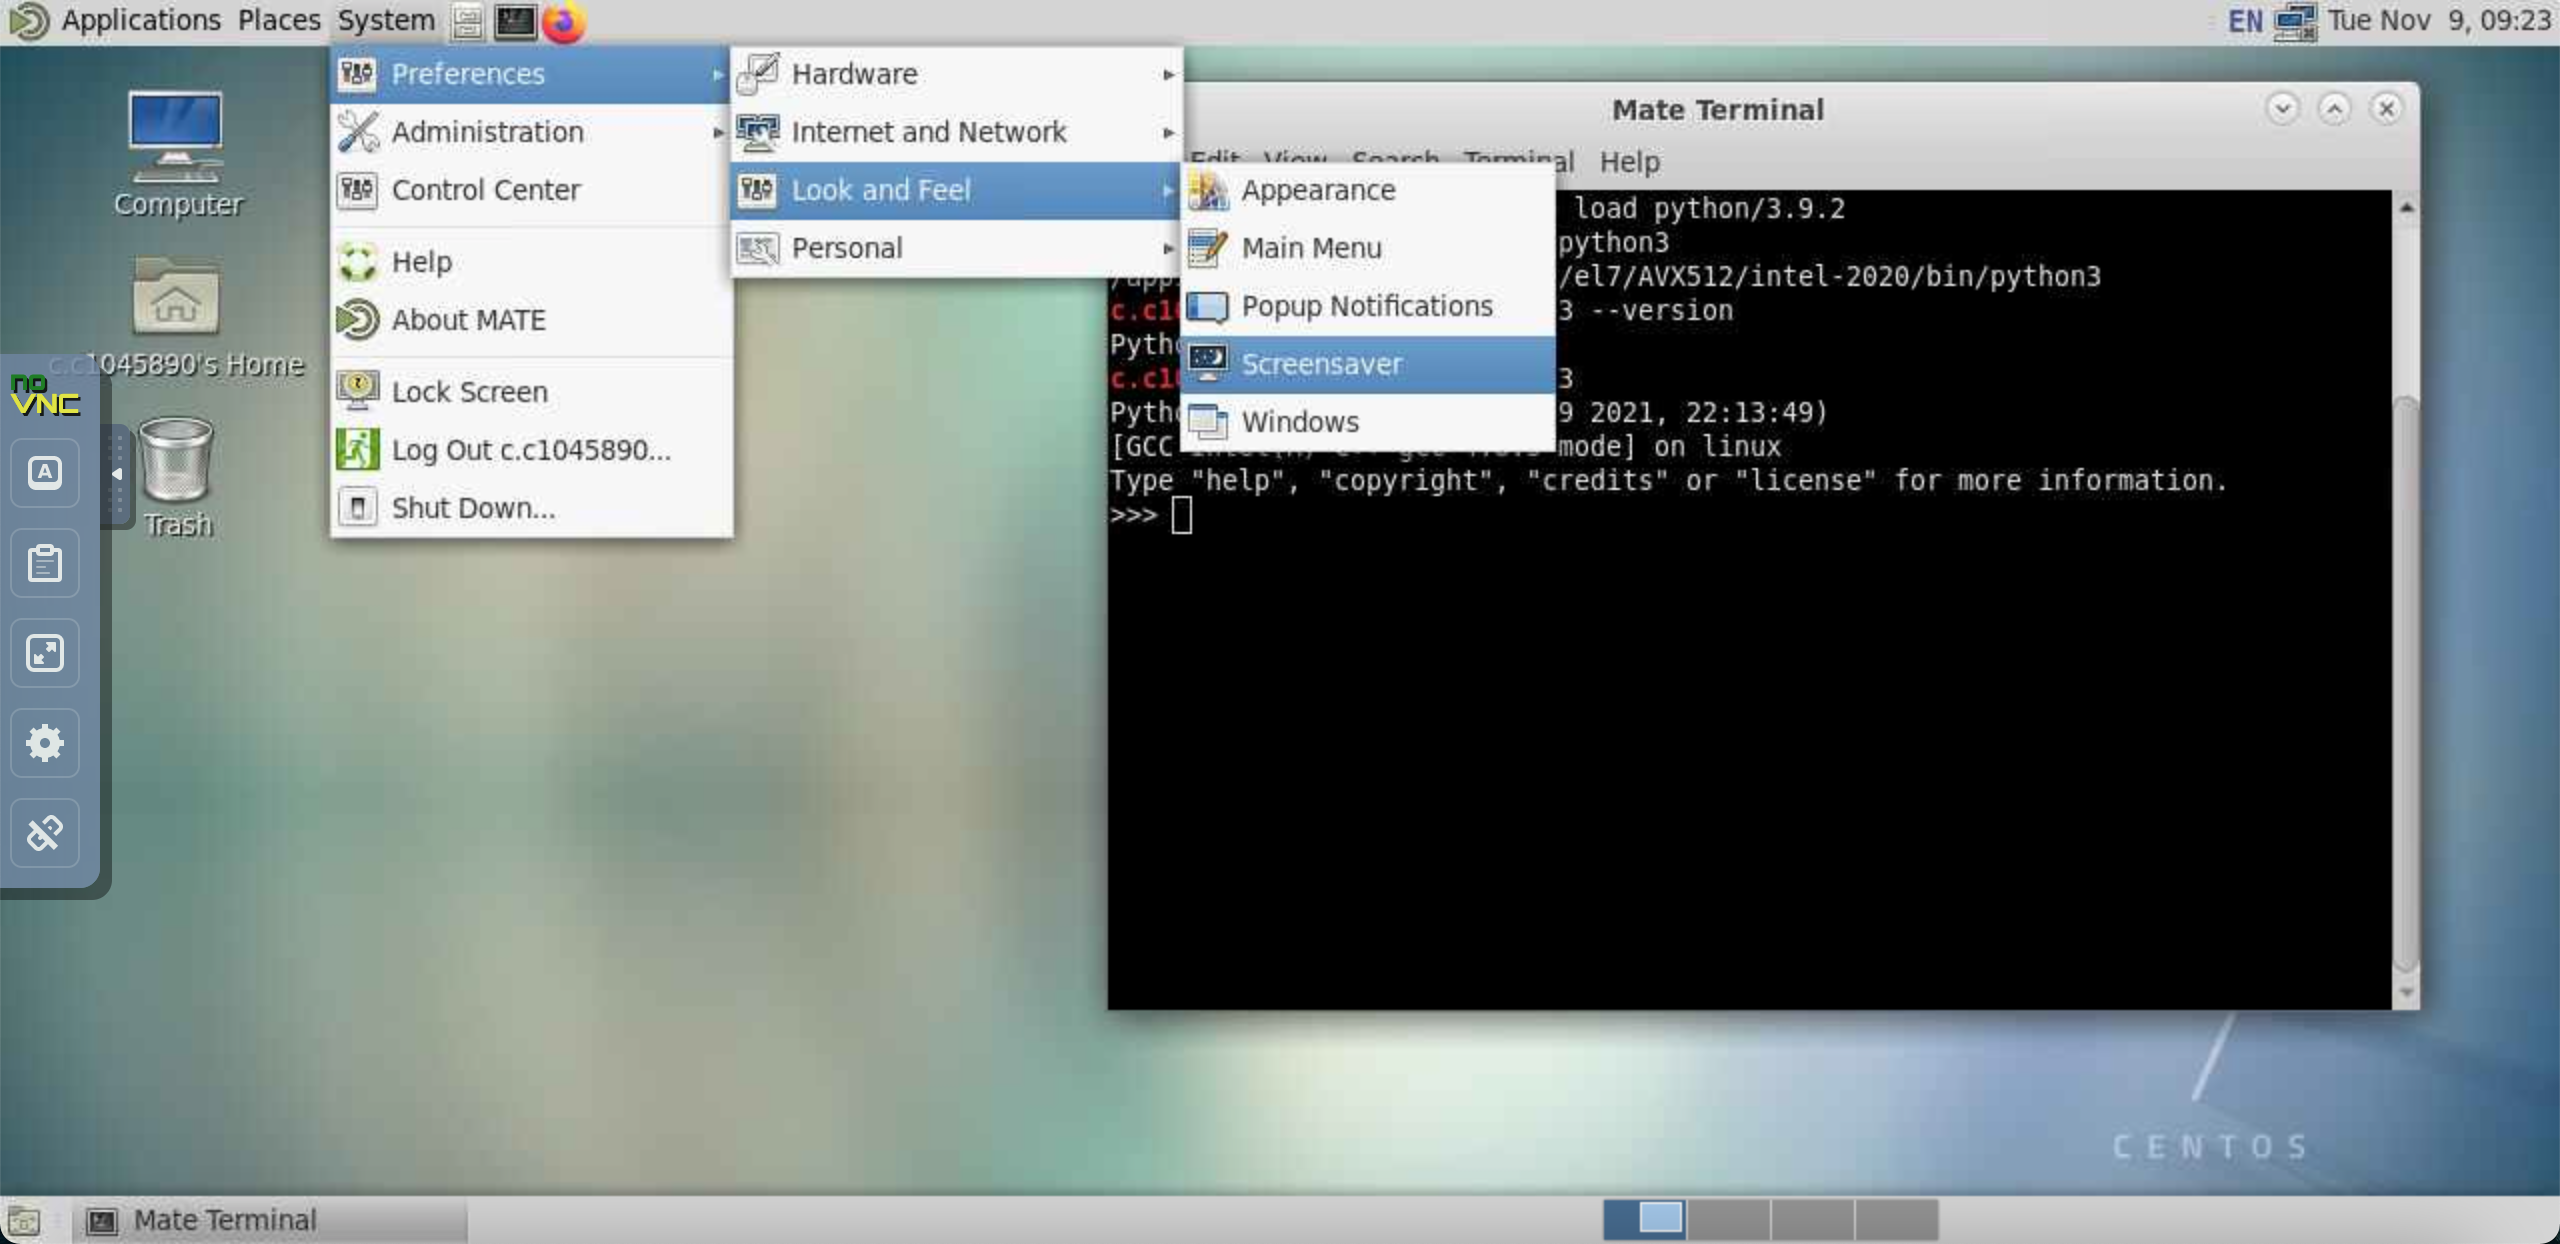
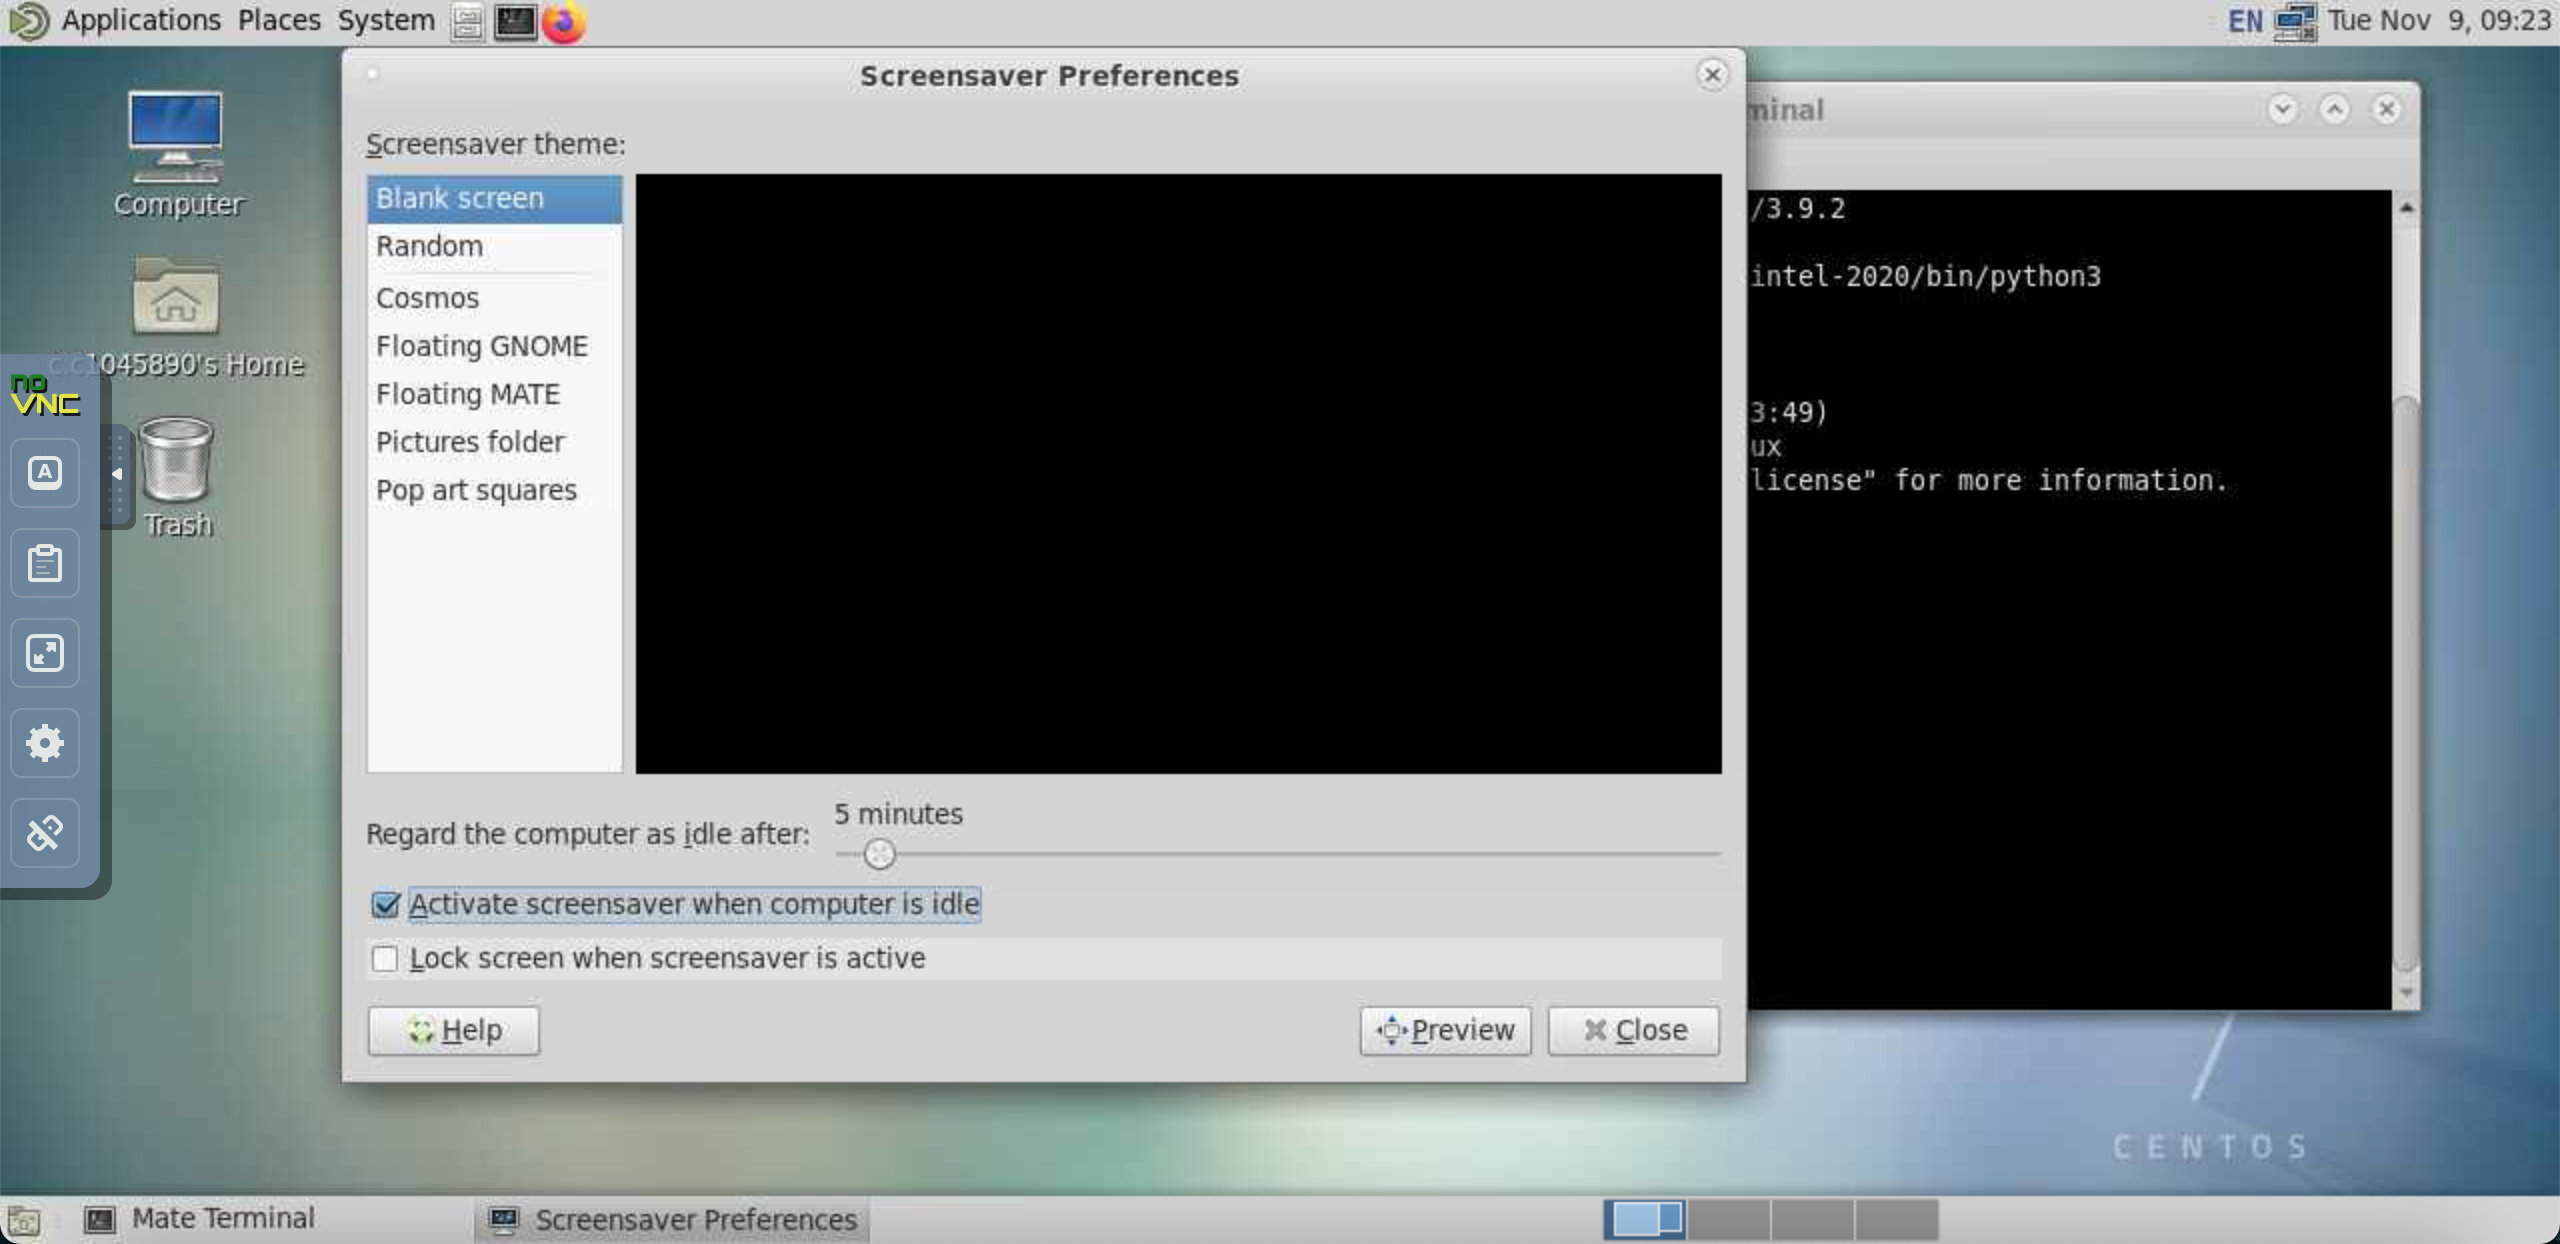
An additional pointer. Make sure that Lock screen when screensaver is active is disabled. If unsure, follow the steps in the image below to check.
Key Points
It is possible to use Graphical User Interfaces when working on Hawk.
X11 is a system that enables the display of graphical windows from a remote server
Almost all popular SSH clients support X11
Hawk provides VNC capabilities that enables the use of a remote Linux desktop.
Common Linux CLI Text Editors
Overview
Teaching: 10 min
Exercises: 10 minQuestions
What are some of the most common Linux text editors
Objectives
Identify Linux text editors available on Hawk
Basic commands to edit text files
This section describes three of the most common Command Line Interface text editors for Linux: Nano, Gedit, Vim and Emacs. Text editors can be divided in two main groups, those friendly with new users and with basic features and those feature-rich with a steep learning curve. Nano and Gedit belong to the first group and are recommended for users who only need to perform minor editions in text files, while Vim and Emacs are suggested for users who plan to spend a long time working on the command line and with text files (e.g. programmers).
Nano
![]() A basic and dependable Command Line Interface (CLI) text editor, Nano is arguably the simplest one of the ones covered in this lesson. To start Nano on Hawk:
A basic and dependable Command Line Interface (CLI) text editor, Nano is arguably the simplest one of the ones covered in this lesson. To start Nano on Hawk:
$ nano
This should display a “new buffer” in the terminal waiting for text input. The terminal window should look something like this:
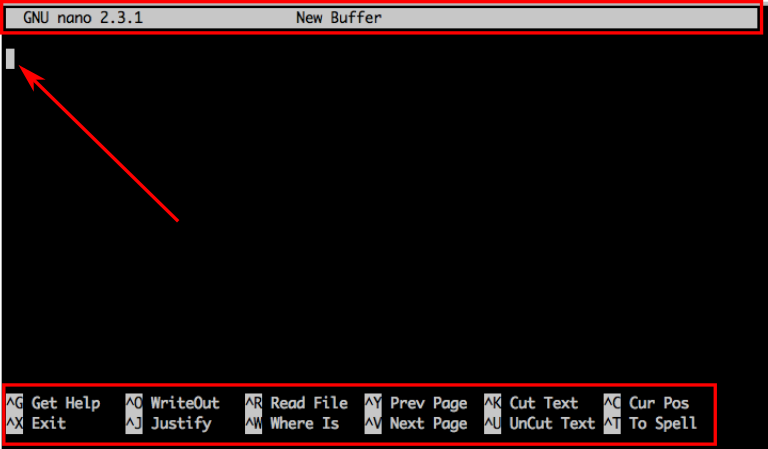 With a top line showing Nano’s version and current filename, a white rectangle showing the position of the cursor, and a bottom menu with common commands.
The caret symbol “^” represents the control key Ctrl. So “^X” means that you should press Ctrl+X to quit nano. As you type commands, the menu displayed at the bottom of your screen will update with the currently available options. To cancel a command use Ctrl+C.
Sort the rows…
Lets try nano with an example.
Open the file called nano-rows.txt and try sorting the rows.
Save in a new file nano-sorted-rows.txt
Gedit
![]() The GNOME desktop text editor. Gedit is another basic Linux text editor, the main difference with Nano is that it is a graphical editor so you will need to use X11 (see lesson 1) to work with it. When opening Gedit it will open a new window that resembles Windows’ notepad.
The GNOME desktop text editor. Gedit is another basic Linux text editor, the main difference with Nano is that it is a graphical editor so you will need to use X11 (see lesson 1) to work with it. When opening Gedit it will open a new window that resembles Windows’ notepad.

Sort the rows… again
Lets try Gedit with the same example.
Open the file called unsorted-rows.txt and try sorting the rows.
Save in a new file gedit-sorted-rows.txt. How was different from Nano? Did you get any odd warnings in your terminal while working with gedit?
Vim
![]() VI iMproved is a powerful and nearly omnipresent text editor. To open vim:
VI iMproved is a powerful and nearly omnipresent text editor. To open vim:
$ vim
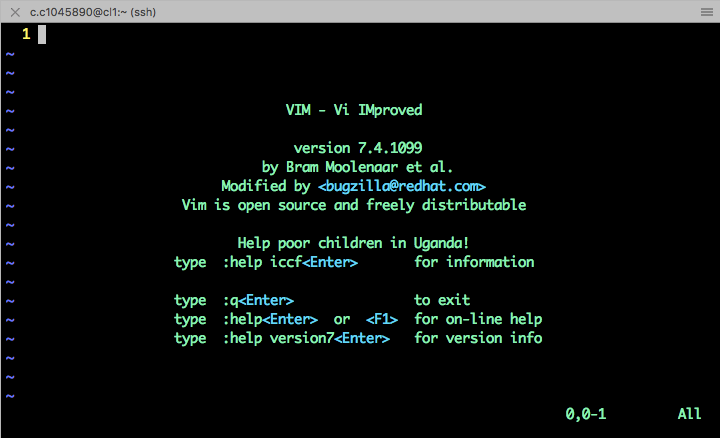 This will display a black screen with Vim’s version, Authors, and few basic commands, including how to quit Vim (:+q+Return) and how to get help (:+help+Return). Vim power becomes apparent when the task at hand involves slightly more complex or repetitive text operations.
Vim has two main modes of operation “Normal” and “Editing” mode. Normal mode is the default when you open Vim. In this mode Vim can accept commands, like quit. To edit a file, press i (Vim will let you know you are in edit mode with an “–INSERT–” message at the bottom of the screen). To return to normal mode, press Esc.
This will display a black screen with Vim’s version, Authors, and few basic commands, including how to quit Vim (:+q+Return) and how to get help (:+help+Return). Vim power becomes apparent when the task at hand involves slightly more complex or repetitive text operations.
Vim has two main modes of operation “Normal” and “Editing” mode. Normal mode is the default when you open Vim. In this mode Vim can accept commands, like quit. To edit a file, press i (Vim will let you know you are in edit mode with an “–INSERT–” message at the bottom of the screen). To return to normal mode, press Esc.
Copy and paste
Open unsorted-rows.txt. Make sure you are on normal mode and type v to enter the “Visual” mode and use your keyboard arrows to select text. Then type y to copy or c to cut. Move the cursor to the position where you want to paste the text and type p.
Try doing this again, but this time enter the Visual Block mode with Ctrl+v. What did you notice?
Short summary of Vim commands.
| Command | Description | Command | Description |
|---|---|---|---|
| :+q+Return | Quit | u | undo |
| :+q+!+Return | Quit without saving | Esc | Return to normal mode |
| :+help+Return | Get help | v | Enter visual mode |
| :+w+Return | Save | Ctrl+v | Enter Visual Block mode |
| 0 | Move to beginning of line | g+g | Move to beginning of file |
| $ | Move to end of line | Shift+g | Move to end of file |
Sort the rows… with a twist
Lets try Vim with yet again the same example.
Open the file called unsorted-rows.txt and try sorting the rows but this time, try moving the numbers in front of the word ‘job’.
A tutor for you …
If Vim is available in your platform, it is most likely that vimtutor is also available. Vimtutor is at its core a text file with some useful exercises designed to help you master Vim. To start it:
$ vimtutor
Emacs
![]() Is another powerful text editor. While Vim has the fastest start-up time of the two advanced text editor discussed in this lesson, and is more widespread, Emacs has, arguably, a more feature-rich environment extending beyond simply word processing and potentially wrapping around everything you do (with some people going as far as stating that Emacs is a “way of life”).
Is another powerful text editor. While Vim has the fastest start-up time of the two advanced text editor discussed in this lesson, and is more widespread, Emacs has, arguably, a more feature-rich environment extending beyond simply word processing and potentially wrapping around everything you do (with some people going as far as stating that Emacs is a “way of life”).
To try Emacs, open it in the command line with:
$ Emacs
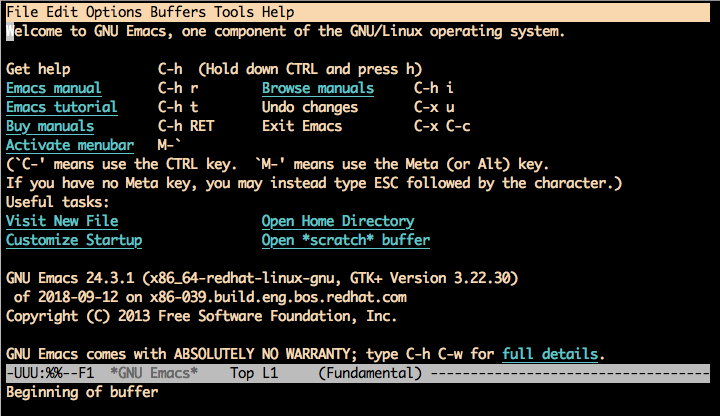 This will display a black screen with some useful information including its version, licence and some basic commands. More importantly, Emacs let us know about its command grammar where ‘C-‘ means use the Ctrl key and ‘M-‘ is the Alt key. This is specially helpful to know when searching for help online about Emacs commands.
Try opening again “unsorted-rows.txt” and do some changes.
Short summary of Emacs commands.
| Command | Description | Command | Description |
|---|---|---|---|
| Ctrl+x+Ctrl+c | Exit Emacs | Ctrl+s | Search string |
| Ctrl+x+u | undo changes | Ctrl+g | Cancel command |
| Ctrl+h | Get help | v | Enter visual mode |
| Ctrl+x+s | Save | Ctrl+v | Enter Visual Block mode |
| Ctrl+a | Move to beginning of line | Esc+< | Move to beginning of file |
| Ctrl+e | Move to end of line | Esc+> | Move to end of file |
Key Points
Nano, Vim and Emacs are the most common CLI Linux text editors
Gedit is also a common text editor with a graphical interface
Command line text editors might have a steep learning curve but are powerful
If you plan to spend a lot of time working on text files on Linux, it is worth mastering a CLI text editor.
Capture errors in shell scripts
Overview
Teaching: 10 min
Exercises: 10 minQuestions
How the shell helps to keep you safe?
Objectives
How to prevent common errors when working with Bash scripts
This section describes some Bash options useful when working with scripts in Linux. These are specially important in the context of SLURM job scripts since they help to prevent time consuming errors (e.g. a job waiting in the queue for hours and then crashing in the first minutes or seconds of execution due to variable typo), or more dangerously, undesired data deletion.
The Shell
 The Shell is a Linux program for command interpretation, it takes commands from the keyboard and sends them to the operating system
for execution. Users interact with the shell when working on a terminal. In the old days of Linux, it was the only
user interface available. There are several Shells available, the one used in Hawk is Bash (Bourne Again Shell).
The Shell is a Linux program for command interpretation, it takes commands from the keyboard and sends them to the operating system
for execution. Users interact with the shell when working on a terminal. In the old days of Linux, it was the only
user interface available. There are several Shells available, the one used in Hawk is Bash (Bourne Again Shell).
Bash shell is a programming language, and as such, it has its own syntax rules and lots of options and features. In this lesson we will only focus on two of them:
- how to trap undefined variables
- how to trap error messages
Trapping undefined variables
Bash has a built-in command set which control shell attributes. In particular, we are interested in set -u. From the manual:
-u      Treat  unset  variables  and  parameters other than the special
        parameters "@" and "*" as an error  when  performing  parameter
        expansion.   If  expansion is attempted on an unset variable or
        parameter, the shell prints  an  error  message,  and,  if  not
        interactive, exits with a non-zero status.
When used within a shell script, set -u will trigger and error if an undefined variable is found.
Define your variables.
- Run lesson_3/trap_1.sh – what do you notice?
- Run lesson_3/trap_2.sh – is this an improvement?
Exit on non-zero exit status
The second useful Bash feature is set -e. From the manual:
-e      Exit immediately if a pipeline (which may consist of  a  single
        simple  command),   a subshell command enclosed in parentheses,
        or one of the commands executed  as  part  of  a  command  list
        enclosed  by braces (see SHELL GRAMMAR above) exits with a non-
        zero status.  The shell does not exit if the command that fails
        is  part  of  the command list immediately following a while or
        until keyword, part of  the  test  following  the  if  or  elif
        reserved words, part of any command executed in a && or || list
        except the command following the final && or ||, any command in
        a  pipeline  but  the last, or if the command's return value is
        being inverted with !.  A trap on  ERR,  if  set,  is  executed
        before the shell exits.  This option applies to the shell envi‐
        ronment and each subshell environment separately  (see  COMMAND
        EXECUTION  ENVIRONMENT  above), and may cause subshells to exit
        before executing all the commands in the subshell.
In short, Bash will stop the program execution if an unhandled error in found. The common way to handle errors in Bash is through conditionals.
Catch the error
- Run lesson_3/trap_3.sh – what is now happening?
- Run lesson_3/trap_4.sh – how is this helping?
Syntax highlighting
A side note on syntax highlighting. It is very useful and some text editors provide it as default (Vim, Emacs). Nano also provide it for a few languages:
To activate it for Bash, create a .nanorc file in your home directory with the following line:
include /usr/share/nano/sh.nanorcOpen any of the previous bash examples, see the difference?
Handling errors
As seen before, undefined variables are easy to fix, but how can errors be fixed? Any error in a program that occurs within an if condition is not trapped by set -e since it is being handled.
if mkdir $MYPATH
then
  echo “INFO: Directory created.”
else
  echo “ERROR: Failed to create directory.”
  exit 1
fi
Any program in a Boolean expression is not trapped since it is also being handled.
mkdir $MYPATH || ( echo “ERROR: Failed to created directory.” && exit 1 )
Handle the error
- Run lesson_3/error_1.sh – what do you notice?
- Run lesson_3/error_2.sh – is this an improvement?
Functions
As in any programming language splitting up your tasks makes reading it easier. A shell function is like running a mini version of a script inside another script. For example:
create_directory ()
{
  if mkdir $1
  then
    echo “INFO: Created directory $1”
  else
    echo “ERROR: Failed to created $1”
  fi
}
Shell functions
- Run lesson_3/function_1.sh – what is wrong with this script?
- Run lesson_3/function_2.sh – how is this helping?
How does this help SLURM
- Load the modules before any use of trapping and undefined variables.
- Define functions for specific issues
- Create working directory
- Run a particular pre-processing step
- Process output files
- Make sure SLURM jobs exits soon after error.
- If directory is not creatable
- Input file not found
- Reduces incorrect runs and reduces jobs that do not produce useful output.
Key Points
Bash has built-in options that allow to check before executing if variables are set in a script.
Trapping errors early is very important and can save time and effort in the long run.
Writing maintainable shell scripts makes it easier to come back and read your code.
Best practices
Overview
Teaching: 15 min
Exercises: 15 minQuestions
Dos, don’ts and general advice
Objectives
Become familiar with best practices in SCW systems
Understand quota allocation
Understand partitions purpose
This section introduces best practices when working on SCW systems. You can find more information in the SCW portal.
Login nodes
Do NOT run long jobs in the login nodes. Remember that login nodes (cl1, cl2, cla1) are shared nodes used by all users. Short testing, compilation, file transfer, light debugging are typically ok. Large MPI jobs are definitely not. If we detect heavy jobs running on the system the application will be terminated without notice.
Who is at home?
To help you realize the shared nature of the login nodes, try running this command:
$ whoWhat is this showing you?
Consequences of breaking the rules
By default each user is limited to the concurrent use of at most 8 processor cores and 200GB of memory. However, should heavy usage (defined as more than 75% of the allocation for continuous time 3 minutes) be made of this allocation then the user’s access will be reduced for a penalty period of time. There are three penalty levels that are reached if the user mantains the offending behaviour. The user’s access reduced by a fraction of the default quota by a defined period of time, both increase as the user moves through penalty levels. You can find more details in the SCW portal.
The user will receive an email notification if a violation of the usage policy has happened providing details about the offending application and current penalty level.
If you are not sure about why you are receiving this notifications or need further help do not hesitate to contact us.

Your .bashrc
Linux allows you to configure your work environment in detail. This is done by reading text files on login. Typically a user would edit .bashrc to finetune module loading, adding directories to PATH, etc. This is ok in personal systems but on SCW .bashrc is managed centrally. What this means is that in principle you can edit .bashrc but your changes might get lost without warning in case there is a need to reset this file. In turn we encourage users to edit .myenv which is also read on login and should have the same effect as editing .bashrc.
My application insist on editing .bashrc
Some applications include instructions on how to add changes to .bashrc. If this is your case, try doing the changes on .myenv, if this doesn’t work please get in contact with us and we will help you find the best solution.
Running jobs
Whenever possible:
- Estimate the time and resources that your job needs. This will reduce the time necessary to grant resources.
- Try to avoid submitting a massive number of small jobs since this creates an overhead in resource provision. Whenever possible, stack small jobs in single bigger jobs.
- Avoid creating thousands of small files. This has a negative impact on the global filesystem. Better to have a smaller number or larger files.
- Run a small test case (dev partition) before submitting a large job, to make sure it works as expected.
- Use –exclusive, only if you are certain that you require the resources (cpus, memory) of a full node.
- Disadvantages: takes longer for your job to be allocated resources, potentially inefficient if you are using less cpus/memory than provided.
- Use checkpoints if your application allows it. This will let you restart your job from the last successful state rather that rerunning from the beginning.
Partitions
Partitions in the context of SCW systems refer to groups of nodes with certain capabilities/features in common. You can list the partitions available to you with the following command:
$ sinfo
PARTITION   AVAIL  TIMELIMIT  NODES  STATE NODELIST
compute\*       up 3-00:00:00    133  alloc ccs[0001-0009,0011-0134]
compute\*       up 3-00:00:00      1   idle ccs0010
compute_amd    up 3-00:00:00     52  alloc cca[0001-0002,0005-0016,0018-0019,0021-0025,0027-0031,0036,0039-0041,0043-0064]
compute_amd    up 3-00:00:00     12   idle cca[0003-0004,0017,0020,0026,0032-0035,0037-0038,0042]
highmem        up 3-00:00:00      5   comp ccs[1001-1003,1009,1014]
highmem        up 3-00:00:00      2    mix ccs[1023,1025]
highmem        up 3-00:00:00     19  alloc ccs[1004-1008,1010-1013,1015-1022,1024,1026]
gpu            up 2-00:00:00     10    mix ccs[2002-2007,2009,2011-2013]
gpu            up 2-00:00:00      3  alloc ccs[2001,2008,2010]
gpu_v100       up 2-00:00:00      9    mix ccs[2101-2103,2105,2108-2110,2112,2115]
gpu_v100       up 2-00:00:00      6  alloc ccs[2104,2106-2107,2111,2113-2114]
htc            up 3-00:00:00      1  down\* ccs3004
htc            up 3-00:00:00      2   comp ccs[1009,1014]
htc            up 3-00:00:00     17    mix ccs[1023,1025,2009,2011-2013,2103,2105,2108-2110,2112,2115,3010,3012,3019,3024]
htc            up 3-00:00:00     43  alloc ccs[1010-1013,1015-1022,1024,1026,2008,2010,2104,2106-2107,2111,2113-2114,3001-3003,3005-3009,3011,3013-3018,3020-3023,3025-3026]
dev            up    1:00:00      2   idle ccs[0135-0136]
In the output above the user has access to several partitions and should submit jobs depending on the application requirements since each partition is ideally designed for different kind of jobs.
| Partition | Meant for | Avoid |
|---|---|---|
| compute | Parallel and MPI jobs | Serial (non-MPI) jobs |
| compute_amd | Parallel and MPI jobs using AMD EPYC 7502 | Serial (non-MPI) jobs |
| highmem | Large memory (384GB) jobs | Jobs with low or standard memory requirements |
| gpu | GPU (CUDA) jobs - P100 | Non-GPU jobs |
| gpu_v100 | GPU (CUDA) jobs - V100 | Non-GPU jobs |
| htc | High Throughput Serial jobs | MPI/parallel jobs |
| dev | Testing and development | Production jobs |
Testing your script
Notice the dev entry in the sinfo output above? This is the development partition and is meant to perform short application tests. Runtime is limited to 1 h and you can use up to 2 nodes. This is typically enough to test most parallel applications. Please avoid submitting production jobs to this queue since this impact negatively on users looking to quickly test their applications.
Scratch
If your compute jobs on the cluster produce intermediate results, using your scratch directory can be beneficial:
- The scratch filesystem has a faster I/O speed than home.
- It has a higher default quota (5 Tb) so you can store bigger input files if necessary.
Remember to instruct your scripts to clean after themselves by removing unnecessary data, this prevents filling up your quota. Remember that unused files on scratch might be removed without previous notice.
Your quota
On SCW systems there are two types of quotas: storage and files. Storage quota is measured in bytes (kb, Mb, Tb) while file quota is measured in individual files (independent of their size). You can check your current quota with the command myquota:
[new_user@cl1 ~]$ myquota
HOME DIRECTORY c.medib
     Filesystem   space   quota   limit   grace   files   quota   limit   grace
chnfs-ib:/nfshome/store01
                    32K  51200M  53248M               8    100k    105k

SCRATCH DIRECTORY c.medib
     Filesystem    used   quota   limit   grace   files   quota   limit   grace
       /scratch      4k      0k      5T       -       1       0 3000000       -
On account approval all users are allocated a default home quota of 50 Gb and 100 K files. In the example above, the user has 32 Kb of data currently on home, if the user were to go beyond 51200 Mb, it would enter a grace period of 6 days to reduce the storage footprint. After this grace period or if hitting 53248 Mb, the user wouldn’t be able to create any more files. Something similar applies to file quota.
On scratch, new users are allocated a default quota of 5 Tb and 3M files. The main difference with home quota is that in scratch there is no grace period (that is what the 0 under quota tries to signify) but for all intents and purposes behaves in the same manner as home.
My application used to work …
As you can imagine, several errors arise from programs not being able to create files and the error messages quite often are unrelated to this fact. A common case is an application that used to work perfectly well and suddenly throws an error even if running the same job. As a first step in troubleshooting, it is worth checking that your quota hasn’t being reached.
Checking your usage
If you are worried about hitting your quota, and want to do some clean-up but are wondering which might be the problematic directories, Linux has an utility that can help you.
Try running this command in your home directory:
[new_user@cl1 ~]$ du -h --max-depth=1What does it shows you? Now try this command?
[new_user@cl1 ~]$ du --inodes --max-depth=1What is it showing you now? Is it useful?
Tip: you can always find out more about du in its man page (man du).
Backups
Please note that although we try to keep your data as safe as possible, at the moment we do not offer backups. So please make sure to have a backup of critical files and transfer important data to a more permanent storage.
Did you know that Cardiff University offer a Research Data Store? Cardiff researchers can apply for 1Tb of storage (more storage can be provided depending on certain criteria). Find out more on the intranet.
Key Points
Do NOT run long jobs in the login nodes
Check your quota regularly
Submit jobs to appropriate partitions
Requesting resources
Overview
Teaching: 15 min
Exercises: 15 minQuestions
How to use SLURM environment variables?
How to obtain information about jobs and partitions?
Objectives
To learn how to use SLURM environment variables
Familiarize with some SLURM commands to extract information from jobs and partitions
How to request resources
Setting the correct resource requirements will help to ensure a faster turnaround time on the supercomputer. For this, users need to interact with SLURM, the supercomputer’s job scheduler, that is in charge of allocating resources to jobs from all users.
There are two ways to request resources:
- Interactive access
- Prepare and submit a job script
Interactive jobs
Sometimes is useful to request a node for an interactive session that allows you to use it as if you would be in a login node. The srun command allows you to do this, it will add your resource request to the queue and once allocated it will start a new bash session on the granted nodes.
Requesting an interactive job (1)
Try the following command
$ srun -n 1 -p c_compute_mdi1 --account=scw1148 --reservation=training --pty bashWhat happened? Since the command is using a special reservation for this training session, the time to allocate resources should have been small and you should have been taken to a new node (from cl1 to ccs0076, for example). Once inside the work node, you can run your applications as if you were in the login node but without the restrictions. While we are here try this command and put attention to the output:
$ env | grep SLURMThis should show you all the environment variables that match “SLURM”. These are automatically set based on the resources requested. How many cpus are you using? What is the directory where you executed the command? How would this output change if you use -n 2 when running
srun?To exit the node type exit.
Requesting an interactive job (2)
Now, try the following command:
$ srun -n 1 -p compute --account=scwXXXX --pty bashDon’t forget to replace scwXXXX with your own scw project code. What did you notice? If you were lucky, you might have landed in a new node as in the previous case, most likely you received a message like:
$ job 16717287 queued and waiting for resourceswhich indicates that your request has been put in the queue and you can sit and wait for it to be allocated. Since we don’t want to do that right now, go ahead and press Ctrl+C to cancel the request.
Job scripts
#!/bin/bash --login
#SBATCH -J my.job
#SBATCH -o %x.o.%J
#SBATCH -e %x.e.%J
#SBATCH --ntasks=5
#SBATCH --ntasks-per-node=5
#SBATCH -p c_compute_mdi1
#SBATCH --time=00:05:00
#SBATCH --reservation=training
#SBATCH --account=scw1248

# some commands specific to your job
# for example:
env | grep SLURM
sleep 120
echo “Hello World!”
In the above Bash script pay attention to the #SBATCH entries, these are calls to sbatch, the program in charge to submit batch jobs to SLURM. This is where users specify how much resource to request. In this example the script is requesting: 5 tasks, 5 tasks to be run in each node (hence only 1 node), resources to be granted in the c_compute_mdi1 partition and maximum runtime of 5 minutes.
The table below show some common sbatch commands (also shared with srun except for –array):
| Command name | Command short name | Description |
|---|---|---|
| --job-name= | -J | Job name |
| --output= | -o | Output filename |
| --error= | -e | Error filename |
| --ntasks= | -n | How many task to be invoked in total |
| --ntasks-per-node= | How many tasks to be invoked in each node | |
| --partition= | -p | Request a specific partition (or partitions) for resource allocation |
| --time= | -t | Set time limit. Format: DD-HH:MM:SS |
| --account= | -A | Your SCW project account to charge the resources used by this job |
| --mem= | Specify memory required per node. | |
| --mem-per-cpu= | Specify minimum memory required per cpu. Mutually exclusive with --mem and --mem-per-gpu | |
| --mem-per-gpu= | Specify minimum memory required per allocated GPU. Mutually exclusive with --mem and --mem-per-cpu | |
| --array= | -a | Submit a job array |
| --mail-type= | Notify user by email when certain event types occur. Valid type values are NONE, BEGIN, END, FAIL, REQUEUE, ALL | |
| --mail-user= | User email account | |
| --exclusive= | Request exclusive access to resources | |
Partition selection
Partition selection usually takes one option, e.g.
#SBATCH --partition=gpubut it can also take multiple values such as accessing all the GPU partitions,#SBATCH --partition=gpu,gpu_v100, where if you do not care which type of GPU to use (P100 vs V100) then it will find the next available GPU node. This can also be used with dedicated researcher partitions such asc_gpu_comsc1to use either your dedicated partitions or the shared partitions.
Submitting a job script (1)
Try running lesson_6/job_script_1.sh
$ sbatch job_script_1.shNow look at the output files. Are the SLURM variables the same as in the interactive case?
Filename pattern
Did you notice the %x and %J in the previous batch script?
#SBATCH -o %x.o.%J
#SBATCH -e %x.e.%J
These are replacement symbols that help you tag your output scripts. Some of the symbols available include:
| Symbol | Description |
|---|---|
| %x | Job name given by --job-name |
| %J | Job ID |
| %u | username |
| %A | Job array's master allocation number |
| %a | Job array ID (index) number. |
In our simple example script this has the effect of uniquely tagging the output and error files as (for example) my.job.o.16717342 and my.job.e.16717342 avoiding rewriting the file in case we were to submit the same job without saving our logs.
Environment variables
As seen previously, SLURM defines several environment variables when we submit a job. These can be used within a job to tag files, directories, make decisions based on resources available and more. The following script shows how to query these variables:
#!/bin/bash --login
#SBATCH -J my.job
#SBATCH -o %x.o.%J
#SBATCH -e %x.e.%J
#SBATCH --ntasks=5
#SBATCH --ntasks-per-node=5
#SBATCH -p c_compute_mdi1
#SBATCH --time=00:05:00
#SBATCH --reservation=training
#SBATCH --account=scw1148

# some commands specific to your job
# for example:
env | grep SLURM

sleep 120

WORKDIR=/scratch/$USER/training.${SLURM_JOBID}
rm -rf $WORKDIR
mkdir $WORKDIR
cd $WORKDIR

OUTFILE=output.txt
touch $OUTFILE

echo “Hello World!” >> ${OUTFILE}
echo Submit dir is: $SLURM_SUBMIT_DIR >> ${OUTFILE}
echo Nodelist is: $SLURM_JOB_NODELIST >> ${OUTFILE}
echo Job id is: $SLURM_JOBID >> ${OUTFILE}

echo Number of nodes: $SLURM_JOB_NUM_NODES >> ${OUTFILE}
echo Number of tasks per node: $SLURM_NTASKS_PER_NODE >> ${OUTFILE}
echo Number of cpus: $SLURM_NPROCS >> ${OUTFILE}
Submitting a job script (2)
Try submitting lesson_6/job_script_2.sh.
$ sbatch job_script_2.shHow are we tagging our work directory? Would it be useful to prevent deleting any output files created within this directory when running the script again?
Managing jobs
SLURM has several commands to help you interact with the cluster partitions and with your running jobs. Some of these are:
| Command | Description | Example |
|---|---|---|
| `squeue` | view information about jobs located in the Slurm scheduling queue | squeue -u $USER |
| `sinfo` | view information about Slurm nodes and partitions | sinfo -p compute |
| `scontrol` | view or modify Slurm configuration and state | (for a running job) scontrol show job JOBID |
| `sacct` | displays accounting data for all jobs and job steps in the Slurm job accounting log or Slurm database | (for a completed job) sacct -j JOBID --format=jobid,elapsed,ncpus,ntasks,state |
| `scancel` | Used to signal jobs or job steps that are under the control of Slurm. | (for a running job) scancel JOBID |
Looking for free nodes?
sinfogives us information about the cluster partitions. We can parse its output to look for idle nodes:$ sinfo | grep idleAnd with a bit of luck we will find some. Would this information be useful if trying to submit an interactive job?
When is my job going to start?
You can use
scontrolto find out many details about a submitted job, including an estimated starting time. Try submitting lesson_6/job_script_3.sh take a note of the JOBID and use this command to get job information:$ scontrol show job JOBIDLook for StartTime (it might take a few minutes for SLURM to assign a place in the queue to the job). What do you notice? Are the resources requested reasonable for this job?
Key Points
srunis used to run an interactive job.
sbatchis used to queue a job script for later execution.SLURM defines several environment variables that can be used within job scripts
Use replacement patterns to uniquely identify your log files
SLURM has several commands to help you interact with jobs and partitions
Efficient job scripts
Overview
Teaching: 15 min
Exercises: 15 minQuestions
How can we parallelize multiple tasks with SLURM and GNU Parallel?
What is Quality of Service
Objectives
Understand what are array jobs
Understand what are dependency jobs
Understand how to use GNU Parallel to run multiple tasks in parallel
Job Arrays
SLURM and other job schedulers have a convenient feature known as Job arrays that allow repetitive tasks to be run lots of times. The structure of an array job script is very similar to a regular one with the addition of –array and the possibility of use new replacement patterns and environment variables. Take a look to the script below:
#!/bin/bash
#SBATCH --job-name=array-example
#SBATCH -o %x.o.%A.%a
#SBATCH -e %x.e.%A.%a
#SBATCH --partition=c_compute_mdi1
#SBATCH --ntasks=1
#SBATCH --time=00:05:00
#SBATCH --array=1-4
#SBATCH --reservation=training
#SBATCH --account=scw1148

# some commands specific to your job
# for example:
module purge
module load python
module list

env | grep SLURM

sleep 30

echo "This is task $SLURM_ARRAY_TASK_ID of $SLURM_ARRAY_TASK_COUNT"
./example.py ${SLURM_ARRAY_TASK_ID}

OUTDIR=output_array
mkdir -p $OUTDIR
mv fig${SLURM_ARRAY_TASK_ID}.png $OUTDIR
This script submits 4 independent jobs using 1 cpu each that will run for up to 5 minutes. Notice that the output and error filenames use new replacement patters %A (the job array’s master allocation ID) and %a (job array index number) that allow us to uniquely identify our jobs log files. Each of these jobs will perform exactly the same instructions (execute a python script example.py) but with a varying argument defined by our job task ID. Our python script is a simple program to create a probability distribution, plot it and save it as an image file using the job ID number as identifier. At the end, these image files are moved to a new output_array directory.
Running an array job…
Try running lesson_6/array_job.q
$ sbatch array_job.qLook at the output files and put attention to the environment variables defined by SLURM. Can you spot new ones? How many figures were created? You can use this script as a template to fit more complicated cases.
GNU Parallel jobs
GNU parallel is a shell tool that allows to run programs in parallel in one or more computers. It takes a list of items (files, lines, commands) and split them to be run in parallel. A feature of GNU parallel is that the output from the commands is the same as you would have get from running the commands sequentially. Combined with srun, GNU parallel becomes a powerful method of distributing a large amount of jobs in a limited number or workers.
Might be easier to explain it with an example. Consider the following script:
#!/bin/bash
#SBATCH -J parallel-example
#SBATCH -o %x.o.%J
#SBATCH -e %x.e.%J
#SBATCH --ntasks=4
#SBATCH -p c_compute_mdi1
#SBATCH --time=00:05:00
#SBATCH --reservation=training
#SBATCH --account=scw1148

module purge
module load python
module load parallel
module list

sleep 30

# Define srun arguments:
srun="srun -n1 -N1 --exclusive"
# --exclusive     ensures srun uses distinct CPUs for each job step
# -n1 -N1         allocates a single core to each task

# Define parallel arguments:
parallel="parallel -N 1 --delay .2 -j $SLURM_NTASKS --joblog parallel_joblog --resume"
# -N 1              is number of arguments to pass to each job
# --delay .2        prevents overloading the controlling node on short jobs
# -j $SLURM_NTASKS  is the number of concurrent tasks parallel runs, so number of CPUs allocated
# --joblog name     parallel's log file of tasks it has run
# --resume          parallel can use a joblog and this to continue an interrupted run (job resubmitted)

# Run the tasks:
$parallel "$srun ./example.py {1}" ::: {1..4}
# in this case, we are running a script named example.py, and passing it a single argument
# {1} is the first argument
# parallel uses ::: to separate options. Here {1..4} is a shell expansion defining the values for
# the first argument, but could be any shell command so parallel will run the example.py script
# for the numbers 0 through 3
#
# as an example, the first job will be run like this:
#    srun -N1 -n1 --exclusive ./example.py arg1:0
This job script creates only one job that runs for up to 5 minutes with 4 CPUs. Within the script we define two shortcut bash variables parallel and srun with instructions and arguments for GNU parallel and srun. The meaning of the different options is documented in the script. Put special attention to the argument {1..4} in parallel, this defines the set of arguments passed to our python script.
Run a GNU parallel script (1)
Try running the above script:
$ sbatch gnu_parallel_job.qDo you get the same output as before? Take a look to the parallel_joblog file just created.
Job history
GNU parallelkeeps track of what jobs have been submitted in a joblog file. This alllows us to resubmit (–resume option) a job in case there was an interruption (error, time limit, etc).
So far, it seems like we get the same output as we did with our array job script. So why bother with GNU parallel since it seems more complicated?
Run a GNU parallel script (2)
Open gnu_parallel_job.q and modify the sequence argument in the parallel variable from {1..4} to {1..80} and try running it again:
$ sbatch gnu_parallel_job.qLong list the files in your directory and pay attention to the time stamps the figures just created, what do you notice? Where the first 4 figures produced again? Try obtaining the same output with the array job script.
Dependency jobs
Another useful SLURM tool is the possibility of creating dependency jobs that allow us to build pipelines. The script below uses our previous scripts to submit an array job in a first instance and then a GNU Parallel job that will wait until the first job finishes.
In this example, our jobs are independent of each other, but provide with a template useful in several cases where a job rely on the output produce by another job, and while the jobs could be in principle combined in a single script, it is very often the case that the jobs have different requirements (CPUs, memory, GPUs, etc) one might be a heavy MPI job using several nodes, while the second could be an array job processing the output from the first, in this case it might be more efficient submitting the jobs independently as a pipeline.
#!/bin/bash
first=$(sbatch array_job.q | cut -d' ' -f4)
echo "submitted first job with id $first"
second=$(sbatch --dependency=afterok:$first --account=scw1148 gnu_parallel_job.q | cut -d' ' -f4)
echo "submitted second job with id $second"
#
# Potentially more jobs...
# third=$(sbatch --dependency=afterok:$second --account=scw1148 some-other-job.q | cut -d' ' -f4)
#
In the above script, we use SLURM option -d or “–dependency” to specify that a job is only allowed to start if another job finished. Some of the possible values that this option accepts are:
| Value | Description |
|---|---|
| after | Begin execution after all jobs specified have finished or have been cancelled. |
| afterany | This job can begin execution after the specified jobs have terminated. |
| afternotok | This job can begin execution after the specified jobs have terminated in some failed state. |
| afterok | This job can begin execution after the specified jobs have successfully executed |
Running a dependency job…
Go ahead and try running
./submit_dependency_job.shDoes it work? Try changing afterok to afternotok, what is the effect?
Quality of Service
On Hawk, partitions have an associated Quality of Service (QoS) feature that assigns a set of limits to try to keep things fair for everyone. This defines the maximum number of queued and running jobs a user can have and the maximum number of nodes and CPUs that can be requested at the same time.
For example, on htc users can queue up to 40 jobs and run 10 at the same time and cannot request more that 10 nodes or 400 CPUs at the same time.
If you submit more than 10 jobs to htc, some of them will have the following message QOSMaxJobsPerUserLimit
16720251       htc   my.job new-user PD       0:00      1 (QOSMaxJobsPerUserLimit)
16720252       htc   my.job new-user PD       0:00      1 (QOSMaxJobsPerUserLimit)
16720253       htc   my.job new-user PD       0:00      1 (QOSMaxJobsPerUserLimit)
16720218       htc   my.job new-user  R       0:44      1 ccs3020
16720219       htc   my.job new-user  R       0:44      1 ccs3020
16720220       htc   my.job new-user  R       0:44      1 ccs3020
which indicates that you have 10 jobs running at the same time and that the remaining are waiting due to the partition’s limits. If you continue submitting jobs, you will receive the following message:
sbatch: error: Batch job submission failed: Job violates accounting/QOS policy (job submit limit, user's size and/or time limits)
This is just SLURM letting you know that you have exceeded the number of jobs you are allowed to queue. As you can see, this error can also be triggered in other circumstances, like requesting a run time higher than the maximum allowed. If you need to queue or run more jobs at the same time, get in contact with us and we will try to help you.
Key Points
SLURM array jobs can be used to parallelize multiple tasks in a single script
GNU Parallel can be used similarly to array jobs but has additional features like resubmission capabilities
SLURM allow us to create jobs pipelines with its –dependency option
Hawk has a Quality of Service feature on partitions that sets limits to users on how many jobs can queued, run at the same time, maximum number of CPUs and nodes
Working with GPUs
Overview
Teaching: 10 min
Exercises: 10 minQuestions
What type of GPU devices are available on SCW systems?
How to modify a job script to request GPUs?
Objectives
Identify types of GPUs available on SCW systems
Obtain knowledge on how to modify job scripts to request GPU devices
Running a GPU simple job script
Available GPU devices
There are currently two types of GPU devices available to our uses on two partitions, gpu and gpu_v100 which offer P100 and V100 generation NVIDIA cards respectively.
| Partition name | Number of nodes |
|---|---|
| gpu | 13 |
| gpu_v100 | 15 |
| All GPU nodes have 2 GPU devices | |
The main difference between these devices is on the availability of Tensor cores on the V100. Tensor cores are a new type of programmable core exclusive to GPUs based on the Volta architecture that run alongside standard CUDA cores. Tensor cores can accelerate mixed-precision matrix multiply and accumulate calculations in a single operation. This capability is specially significant for AI/DL/ML applications that rely on large matrix operations.
| Characteristic | Volta | Pascal |
|---|---|---|
| Tensor cores | 640 | 0 |
| Cuda cores | 5120 | 3584 |
| Memory (Gb) | 16 | 16 |
Requesting GPUs
Slurm controls access to the GPUs on a node such that access is only granted when the resource is requested specifically (i.e. is not implicit with processor/node count), so that in principle it would be possible to request a GPU node without GPU devices but this would bad practice. Slurm models GPUs as a Generic Resource (GRES), which is requested at job submission time via the following additional directive:
#SBATCH --gres=gpu:2
This directive instructs Slurm to allocate two GPUs per allocated node, to not use nodes without GPUs and to grant access.
On your job script you should also point to the desired GPU enabled partition:
#SBATCH -p gpu  # to request P100 GPUs
# Or
#SBATCH -p gpu_v100 # to request V100 GPUs
It is then possible to use CUDA enabled applications or the CUDA toolkit modules themselves, modular environment examples being:
module load CUDA/9.1
module load gromacs/2018.2-single-gpu
GPU compute modes
NVIDIA GPU cards can be operated in a number of Compute Modes. In short the difference is whether multiple processes (and, theoretically, users) can access (share) a GPU or if a GPU is exclusively bound to a single process. It is typically application-specific whether one or the other mode is needed, so please pay particular attention to example job scripts. GPUs on SCW systems default to ‘shared’ mode.
Users are able to set the Compute Mode of GPUs allocated to their job through a pair of helper scripts that should be called in a job script in the following manner:
To set exclusive mode:
clush -w $SLURM_NODELIST "sudo /apps/slurm/gpuset_3_exclusive"
And to set shared mode (although this is the default at the start of any job):
clush -w $SLURM_NODELIST "sudo /apps/slurm/gpuset_0_shared"
To query the Compute Mode:
clush -w $SLURM_NODELIST "nvidia-smi -q|grep Compute"
Compiling with CUDA libraries
CUDA libraries are not accessible from general compute nodes (compute, htc, highmem) but they are on dev and login nodes for the purpose of testing and compilation. Trying to load CUDA libraries on these partitions would result in the following error:
ERROR: CUDA is not available. GPU detected is unknown
What this means is that you are capable of building your CUDA application on the login nodes and test basic functionality on dev, but to test actual GPU work you will need to submit your job to gpu or gpu_v100.
Current CUDA versions available on our systems are:
$ module avail CUDA
-------------------------- /apps/modules/libraries ---------------------------
CUDA/10.0 CUDA/10.1 CUDA/8.0  CUDA/9.0  CUDA/9.1  CUDA/9.2
The latest NVIDIA driver version on the GPU nodes is 418.39 for CUDA 10.1 which backwards compatible with prior versions of CUDA.
Running a GPU job
Here is a job script to help you submit a “hello-world” GPU job:
#!/bin/bash --login
#SBATCH --job-name=gpu.example
#SBATCH --error=%x.e.%J
#SBATCH --output=%x.o.%J
#SBATCH --partition=gpu_v100
#SBATCH --time=00:10:00
#SBATCH --ntasks=40
#SBATCH --ntasks-per-node=40
#SBATCH --gres=gpu:2
#SBATCH --account=scw1148

clush -w $SLURM_NODELIST "sudo /apps/slurm/gpuset_3_exclusive"

module purge
module load keras/2.3.1
module list

test=imdb
input_dir=$SLURM_SUBMIT_DIR
WDPATH=/scratch/$USER/gpu.example.${test}.$SLURM_JOBID
rm -rf ${WDPATH}
mkdir -p ${WDPATH}
cd ${WDPATH}
cp ${input_dir}/${test}.py ${WDPATH}

start="$(date +%s)"
time python -u -i ${test}.py
stop="$(date +%s)"
finish=$(( $stop-$start ))
echo gpu test ${test} $SLURM_JOBID Job-Time $finish seconds
echo Keras End Time is `date`
The above example is taken from “Deep Learning with Python” by Francois Chollet and explores a Deep Learning Two-class classification problem. In specific, the purpose of the model is to classify movie review as positive or negative based on the context of the reviews.
Running a GPU job…
Try running the above example.
$ sbatch gpu.example.qDoes it work? Try submitting it to a non-GPU node. Is there a big difference in timing? Take into account that this is a very model. However, in real research problems, using GPU enabled applications have the potential to reduce significantly computational time.
Key Points
SCW systems offer P100 and V100 generation GPU devices
GPUs are treated as a consumable resource and need to be requested explicitly
CUDA libraries are only available on GPU partitions, dev and login nodes
Installing packages
Overview
Teaching: 15 min
Exercises: 15 minQuestions
How do I install a package for framwork/language X?
Can I use the operating system package manager?
Objectives
Install packages for a wide range of languages such as Python, R, Anaconda, Perl
Use containers to install complete software packages with dependencies in a single image with Singularity.
Installing packages for common frameworks/languages is very useful for a user on HPC to perform. Fortunately we allow downloads from the Internet so this is quite easy to achieve (some HPC systems can be isolated from the Internet that makes things harder). There will be many ways to install packages for programs, for example Perl can be just the operating system version of Perl or part of a bigger packages such as ActiveState Perl. ActiveState has its own package system rather than using the default package system in Perl. However we aim to provide the user in this section to be able to understand how packages work and install for common languages.
Once installed on the login node, the SLURM job scripts can be written to take advantage of the new package or software. You do not need to install the package again!
Check versions
Versions of software modules can be checked with
module av, for example for Python$ module av pythonSpecifying the version of the software also makes sure changes to default version will not impact your jobs. For example default python loaded with
module load pythoncould install packages into one location but if the default version changed it will not automatically reinstall those packages.
Python
Python is becoming the de-facto language across many disciplines. It is easy to read, write and run. Python 3 should be preferred over the now retired Python 2. On Hawk a user can load Python from a module
$ module load python/3.7.0
Python versions
Calling Python can be performed using just
pythonor with the version number such aspython3or even more exactpython3.7. To be sure you are calling Python 3 we recommend running withpython3rather than the unversionedpython. What is the difference on Hawk?Solution
$ python --versionwill print
Python 2.7.5
Python 3.7.0 is now loaded into your environment, this can be checked with
$ python3 --version
$ Python 3.7.0
Installing a package
To install a package we recommend using the pip functionality with a virtual environment. Using the previously recommdended --user option can cause problems due to not being isolated and conflict with other packages. Pip provides many packages of Python and handles
dependencies between the packages. For a user on Hawk it may require 2 steps.
To create a virtual environment and update Pip (updating Pip resolves odd behaviour especially when detecting available platform downloads) run:
$ python3 -m venv my_env
$ ./my_env/bin/activate
$ pip install --upgrade pip
Then install a package with:
$ pip install <package>
Pip versions
Pip (just like Python) also is versioned with
pipjust being a default version in the OS or virtual environment. Whilstpip3will call the Python 3 version of Pip. This is important to match overwise it will install packages in the wrong location.
Also to add another option Python3 comes with pip as a module sopython3 -m pipcan also be a valid way and is now recommended as the future way to call pip. What versions are available on Hawk?Solution
There is no default OS
pipbutpipandpipare supplied by the module.$ pip --version $ pip3 --versionBoth print
pip 20.0.2 from /apps/languages/python/3.7.0/el7/AVX512/intel-2018/lib/python3.7/site-packages/pip (python 3.7)
Where <package> is the name of the package. The packages can be found using the Python Package Index or
PyPI.
Example
To install a rather unhelpful hello-world package into a virtual environment, activate your virtual environment and run
$ pip install pip-hello-world
This will install the package in your $HOME directory.
This package can be tested with the following Python script
from helloworld import hello
c = hello.Hello()
c.say_hello()
The script will produce
'Hello, World!'
Virtual environments in detail
Python supports a concept called virtual environments. These are self-contained Python environments that allows you to install packages without impacting other environments you may have. For example:
$ python3.7 -m venv pyenv-test
$ source pyenv-test/bin/activate
$ pip3 install pip-hello-world
$ python3.7
$ deactivate
Everything is contained with the directory
pyenv-test. There was also no need to specify--user. For beginners this can be quite confusing but is very useful to master. Once finished you candeactivatethe environment`.
R
R is a language for statisticians. It is very popular language to perform statistics (its primary role). Package
management for R is inbuilt rather than using a separate program to perform it.
On Hawk, R can be loaded via the module system with
$ module load R/3.5.1
Example
Running R, the following command will install the jsonlite package
install.packages(“jsonlite”)
# (If prompted, answer Yes to install locally)
# Select a download mirror in UK if possible.
Where jsonlite is the package name you want to install. Information can be found at
CRAN
In this case the package will be installed at $HOME/R/x86_64-pc-linux-gnu-library/3.5/
Anaconda
Anaconda is a fully featured software management tool that provides many packages for many different languages. Anaconda allow dependencies between software packages to be installed.
Since Anaconda keeps updating we can load the module on Hawk with
$ module load anaconda
$ source activate
This should load a default version of Anaconda. Specific versions can be loaded as well.
Example
A package can then be installed with
$ conda search biopython
$ conda create --name snowflakes biopython
This first checks there is a biopython package and then creates an environment snowflakes to store the package in.
The files are stored in $HOME/.conda
This package can then be activated using
$ conda info --envs
$ conda activate snowflakes
$ python
$ source deactivate
This first lists all environments you have installed. Then activates the environment you would like and then you can
run python. Finally you can deactivate the environment.
Newer versions of Anaconda may change the procedure.
Anaconda directory
Every package you download is stored in
$HOME/.condaand also lots of other files are created for every package. Overtime this directory can have many files and will reach the quota limit for files. We recommend usingconda clean -ato tidyup the directory and reduce the number of files.
Perl
Perl has been around for a long-time but becoming uncommon to see being used on HPC. On Hawk we recommend using the operating system Perl command so no module is required.
$ perl --version
To manage packages we can use the cpanm utility. This can be installed in your home directory with
$ mkdir -p ~/bin && cd ~/bin
$ curl -L https://cpanmin.us/ -o cpanm
$ chmod +x cpanm
Then setup cpanm with
$ cpanm --local-lib=~/perl5 local::lib
$ eval $(perl -I ~/perl5/lib/perl5/ -Mlocal::lib)
$ perl -I ~/perl5/lib/perl5/ -Mlocal::lib
# Add output from perl command above to $HOME/.myenv
This will install Perl packages in $HOME/perl5.
Example
Install the Test::More package.
$ cpanm Test::More
Then run the following Perl script
use Test::More;
print $Test::More::VERSION ."\n";
Which should produce something like
1.302175
Singularity
Singularity is a container solution for HPC where alternatives such as Docker are not suitable. Singularity can pretend to be another operating system but inherits all the local privilege you have on the host system. On Hawk we do not want anyone to be able to run software as another user - especially root. Also containers are immutable so you save files inside containers - $HOME and /scratch are mounted within the image.
Singulairity is available as a module with:
$ module load singularity
The latest version should be preferred due to containing the latest versions of the code that may include security and performance fixes.
Singularity can then be used, initially users will want to download existing containers but eventually you can build you own - maybe via the Singularity Hub
MPI and GPUs
Singularity supports using MPI and GPUs. MPI can be tricky especially with OpenMPI but GPUs are supported using the
--nvcommand line option that loads the relevent GPU libraries into the container from the host operating system.
Example
To download a container from Singularity Hub then you can run:
$ singularity pull shub://vsoch/hello-world
This will pull down an image file hello-world_latest.sif. This can be run with:
$ singularity run hello-world_latest.sif
This produces the following output:
RaawwWWWWWRRRR!! Avocado!
Docker Hub can also be used for Docker containers such as
$ singularity pull docker://ubuntu
You can then run a Ubuntu application on Redhat, e.g.
$ singularity exec ubuntu_latest.sif cat /etc/os-release
A useful site for GPUs is NGC that hosts containers for software optimised for GPUs. Instructions are on the website.
Containers
Containers allows a user to build once and run anywhere (if same processor type). A recipe file can be created to store the exact steps used to create the image. This can make sure any code is reproducible by others. It is useful for packages that assume a user has root access to their machine and install OS level packages for dependencies.
Others?
There may be other software package managers that you want to investigte. Please get in touch with us if you need help.
For example, the Spack is a software manager to make it easy to install packages. Finally there is
also the traditional autoconf and make approach. For example you can build software with:
$ ./configure --prefix=$HOME/my_package
$ make
$ make install
This will install my_package in your $HOME directory.
Experimenting with software packages is encouraged to find new and novel ways to perform your research.
Key Points
Users can control their own software when needed for development.
Accessing webtools
Overview
Teaching: 15 min
Exercises: 15 minQuestions
How do I run a webtool for framwork/language X?
Objectives
Run webtools via OpenOndemand service.
Run webtools software directly via Slurm
Access those webtools from a browser.
OpenOndemand
OpenOndemand.org is a community that supports the use of the OpenOndemand software and on Hawk this software is available (currently only on-campus and via VPN) at ARCOndemand. This service provides a web interface to common functionality on the cluster. Introductory video is available Introduction to ARCOndemand
The aim of OpenOndemand is to make software easy to use. Most popular tools are Rstudio, Jupyter, Matlab and Linux Desktops that are available all via the browser running on a compute node with the resources you need to run the job. You can also perform 3D visualisation via use of VirtualGL to access the GPU on the compute nodes.
Below are some points about specific application in OpenOndemand
Rstudio
Rstudio is a useful tool to program and access R. Whilst we recommend running the GUI via ARCOndemand it is possible to load the module within a Slurm job to get access to the same version of R as used via ARCOndemand.
$ module load rstudio-server
Rstudio versions
There are a number of versions such as Rstudio and Rstudio Server, Rstudio is a desktop app whilst Rstudio Server is a web browser.
To run R as found inside Rstudio we can use (this wraps the required code to set it up).
$ rstudio-server-R
When this runs we see:
R version 4.1.2 (2021-11-01) -- "Bird Hippie"
Copyright (C) 2021 The R Foundation for Statistical Computing
Platform: x86_64-pc-linux-gnu (64-bit)

R is free software and comes with ABSOLUTELY NO WARRANTY.
You are welcome to redistribute it under certain conditions.
Type 'license()' or 'licence()' for distribution details.

  Natural language support but running in an English locale

R is a collaborative project with many contributors.
Type 'contributors()' for more information and
'citation()' on how to cite R or R packages in publications.

Type 'demo()' for some demos, 'help()' for on-line help, or
'help.start()' for an HTML browser interface to help.
Type 'q()' to quit R.

>
Rstudio keeps its R environments in a different place $HOME/R-Rstudio which is bound to $HOME/R when run inside its environment (using containerisation).
Therefore you can develop using ARCOndemand but also run R as expected inside a Slurm when needed (e.g. scaling up to a larger job).
Jupyter
Jupyter is a common Python web tool to aid in development.
To install packages which are available inside Jupyter please use:
$ module load anaconda
$ source activate
$ conda create -n my_env
$ conda activate my_env
$ conda install jupyterlab
This sets up a base environment which Jupyter will see when run inside ARCOndemand service.
Long running jobs inside Jupyter do not work well (once disconnected from server the calculation will stop. This can be used with
%%capture stored_output
import time
time.sleep(30)
print("Hi")
Then accessed later using:
stored_output.show()
# Hi
Desktops
Desktops are easily setup within ARCOndemand. If using a GPU node to run 3D visualisations then vglrun can be used. Please get in contact with ARCCA to get further help with this feature.
Key Points
OpenOndemand is a powerful way to access GUIs.
Accessing Hawk compute nodes directly requires some care but can be powerful in running some tools.