Work with Graphical User Interfaces (GUIs)
Overview
Teaching: 15 min
Exercises: 15 minQuestions
What is X11?
How to connect to Hawk using a GUI?
What is VNC?
Objectives
Familiarize with common SSH clients and the options to enable X11 connections.
Learn how to connect to Hawk’s VNC server.
This section describes common tools to work with graphical applications.
X11
X is a Unix window system and it specifies methods to display, move and interact with windows using a keyboard and a mouse. X’s most distributed version was version 11 (hence X11) created in 1987 and remaining mostly unchaged since then. X11’s has been used on many Linux distributions to produce several different desktop environments thanks to X11’s agnostic protocol.
Linux systems natively come with X11 support so that no extra software is required to display GUIs from a remote server. On Windows and MacOS systems, a X11 server is required that is able to understand the remote server instructions on how to interact with an application’s GUI.
Common X11 servers
On Windows, Xming and Putty are classic applications used together to connect via SSH to a remote host and render graphics. MobaXterm is another enhanced terminal for Windows. On MacOS, XQuartz is a project that aims to provide Mac systems with X11 support.
Connecting to Hawk using X11
Windows
PuTTY is a free implementation of SSH and Telnet for Windows and Unix platforms, along with an xterm terminal emulator. It is written and maintained primarily by Simon Tatham.
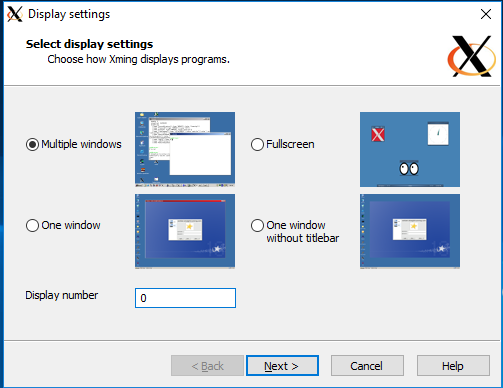
Xming is the leading X Window System Server for Microsoft Windows 8/7/Vista/XP (+ server 2012/2008/2003). It is fully featured, small and fast, simple to install and because it is standalone native Microsoft Windows, easily made portable (not needing a machine-specific i installation).
You can find basic instructions on how to setup Putty to connect to Hawk without X11 support in the Super Computing Wales portal. The following are additional instructions to setup Xming and enable X11 capabilities in Putty.
 |
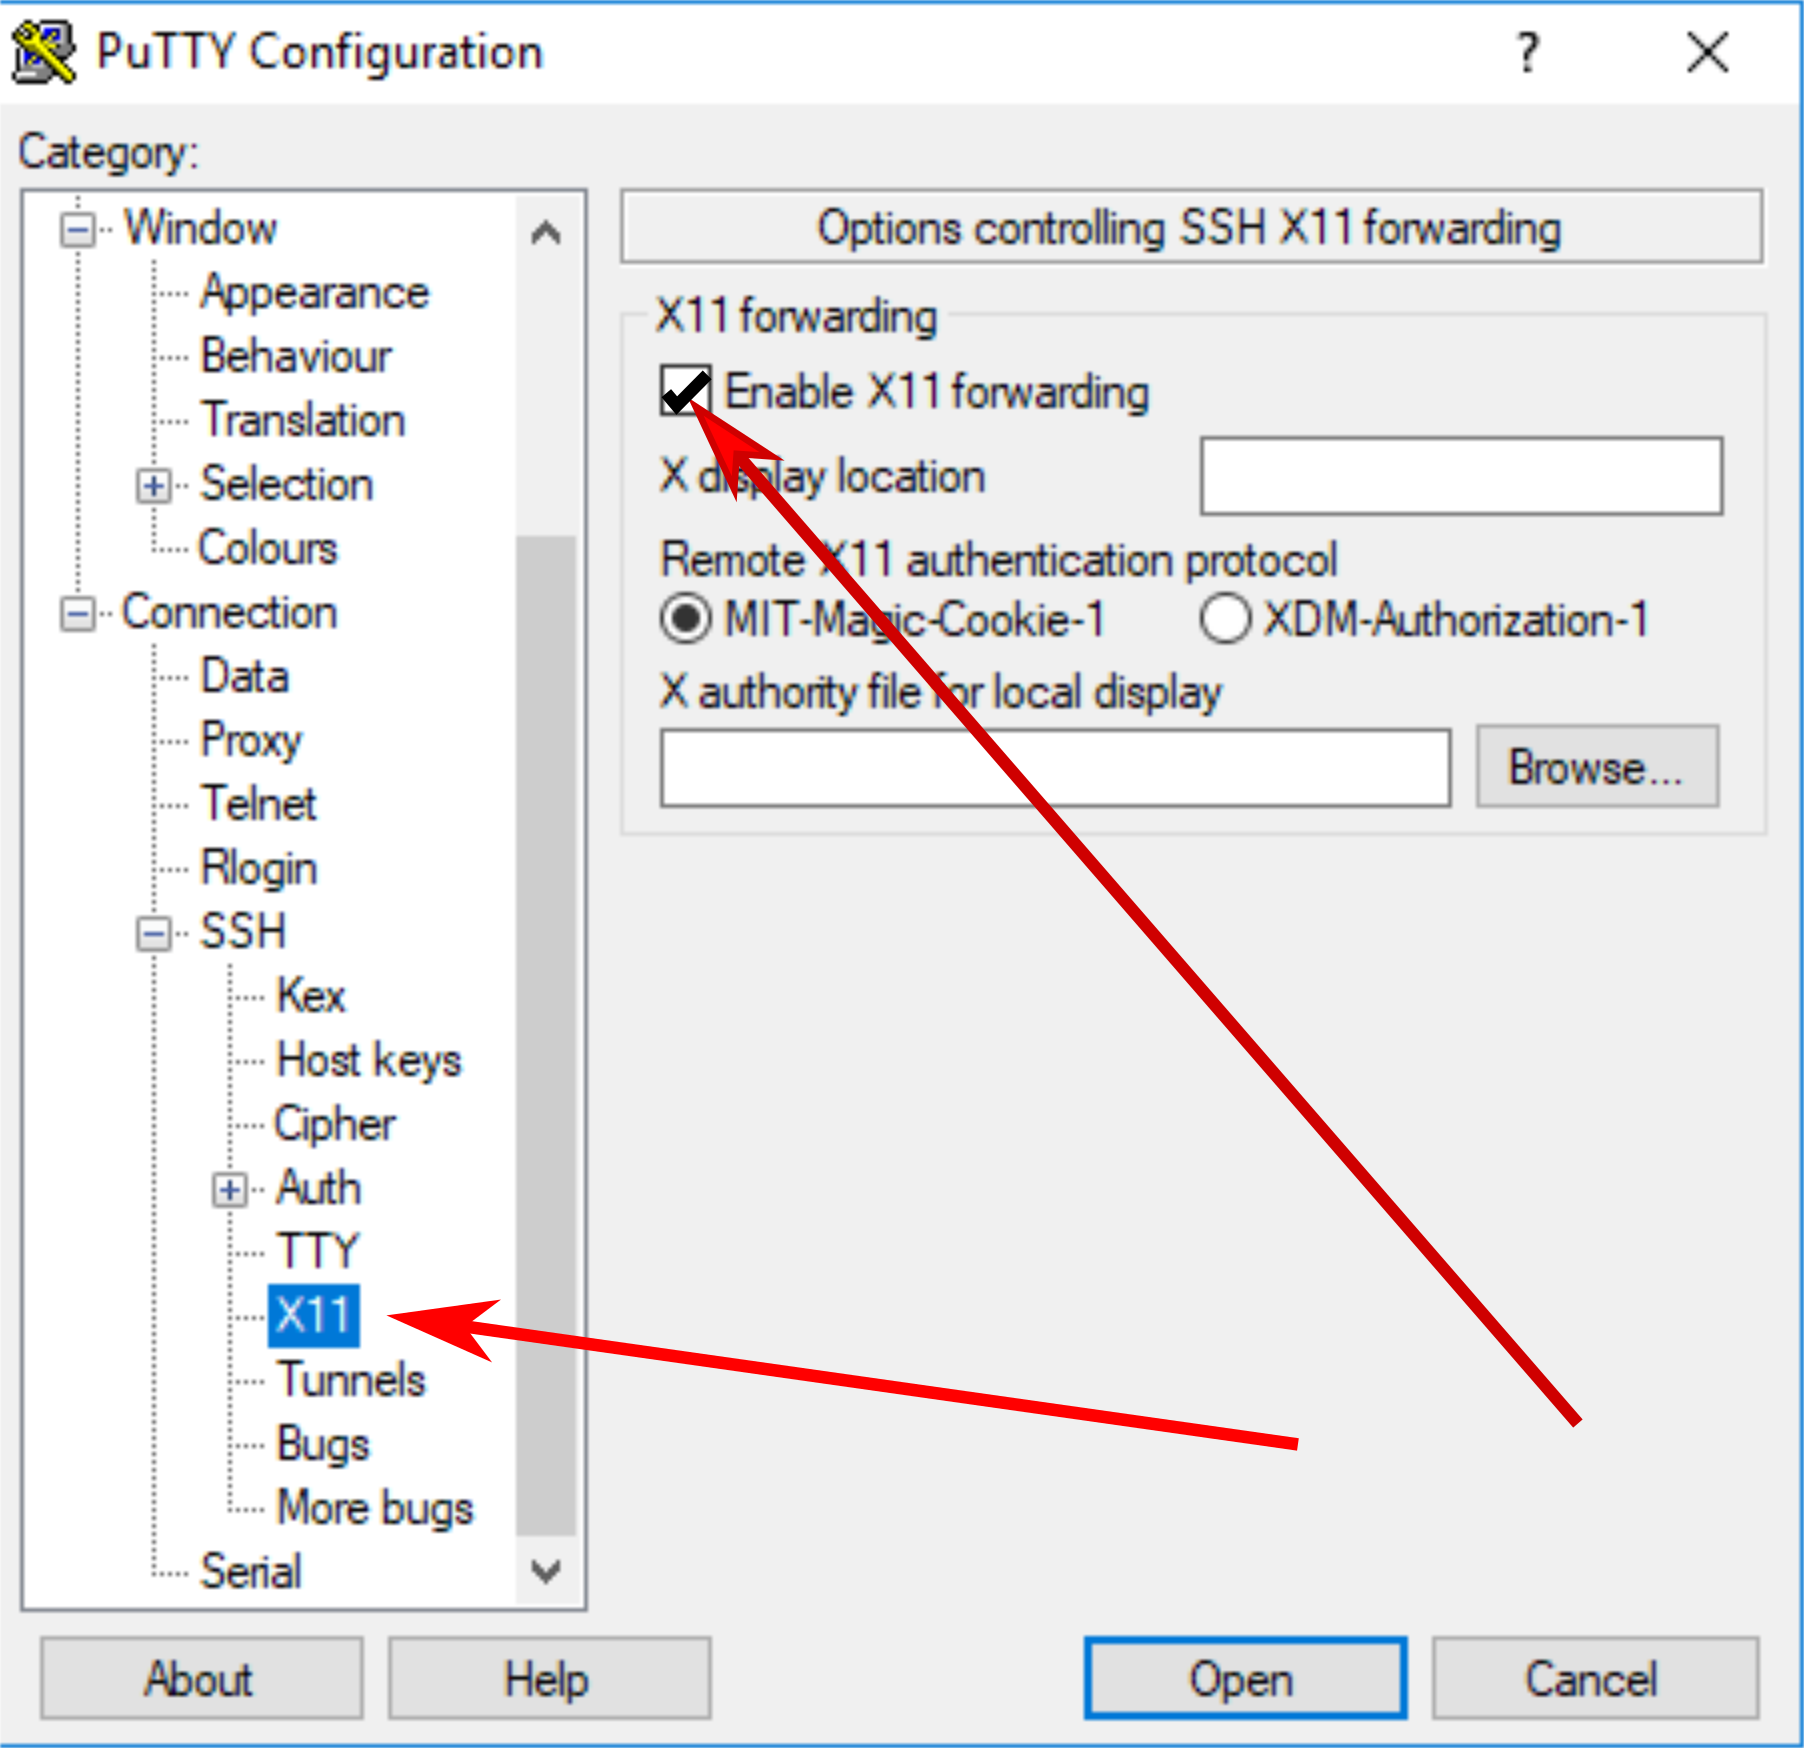 |
| After installing Xming, you can open it and accept all default settings. | Once Xming is active, go the Putty’s settings and enable X11 forwarding, then connect as usual. |
Cardiff Apps
Putty and Xming are available as part of Cardiff Apps in University owned desktop computers. This is useful if you don’t have administrative rights to install new applications.
On Windows you can use MobaXterm to transfer
files to Hawk from you local computer.
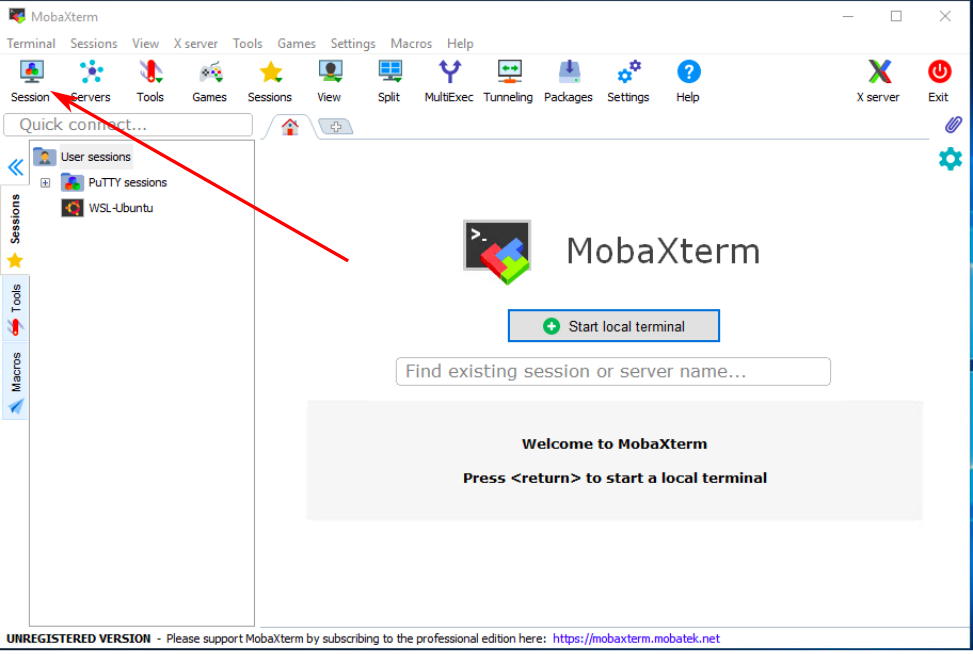
MobaXterm is a feature rich terminal for Windows that comes with an integrated SSH
client and X11 server. When opening MobaXterm you should see something like the
image below. To start a new session click on “Session”.
Choose SSH session and enter Hawk hostname (hawklogin.cf.ac.uk) and your username.
Double check the port number (22). X11 is enable by default in MobaXterm but you
can disable it by unticking X11-Forwarding in the “Advanced SSH settings” tab.
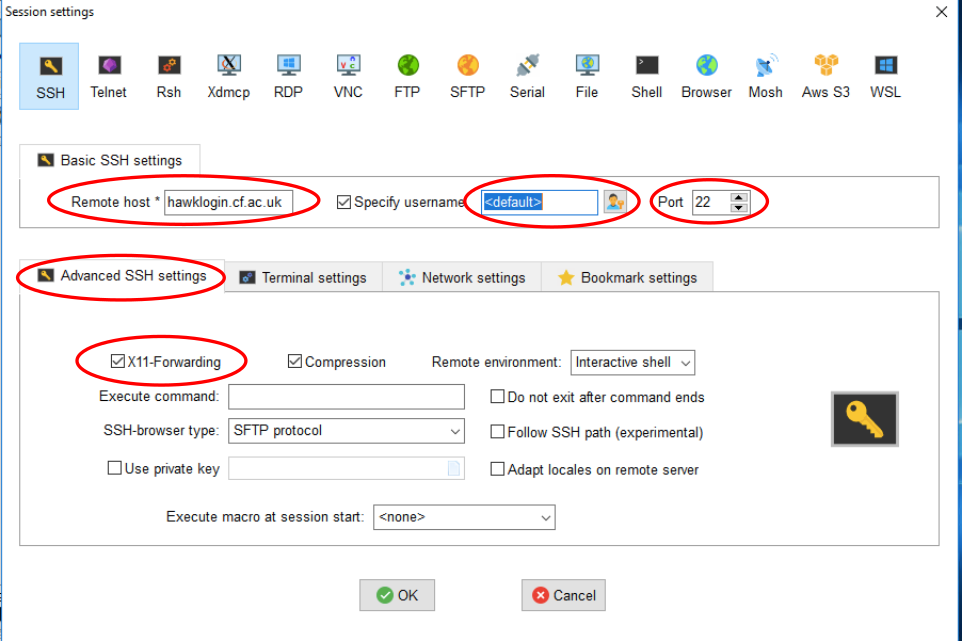
Click “OK” and you should be able to connect to Hawk. You can download MobaXterm from its website.
MacOS: XQuartz
XQuartz is an open source project to develop an X window system that work on MacOS. After installing XQuartz, enable X11 forwarding using SSH “-X” option:
$ ssh -X username@hawklogin.cf.ac.uk
Issues with XQuartz
We have had some user reports of XQuartz throwing error messages with applications such as Gaussian View or Comsol:
[xcb] Unknown sequence number while processing queue

[xcb] Most likely this is a multi-threaded client and XInitThreads has not been
called

[xcb] Aborting, sorry about that.
If you experience any such problem, please get in contact with us.
Testing a X11 connection
Linux comes with a couple of toy applications that can be used to easily test if your X11 connection is working as expected. In the terminal connected to Hawk try the following command:
$ xeyes
If working correctly, you should see a new window open with a pair of eyes following your mouse movements.

VNC
VNC is a Virtual Network Computing desktop-sharing system that allows to remotely control another computer. The main differences with X11 are:
- With VNC the graphical processing runs on the remote server transferring only a screenshot to the local machine. With X11, the application sends the instructions to the local machine and behaves as if the application were run locally. This can be problematic, for example, when trying to visualize simulation results with big data files.
- With VNC your application survives disconnecting from the server. For example, if you need to close your laptop and change location, you can reconnect to the VNC server and continue working with the application. This is not possible with X11, since when the X11 server dies, the windows disappear.
On Hawk we have a couple of methods to access a VNC server:
- a basic VNC server running on a Virtual Machine which is recommended when running with relatively ligth applications like editing files and results visualizations. This method has the advantage of mantaining a VNC running for longer (useful when interrupting work momentarily) but has the disadvantage of very limited computational resources.
- a VNC service based on OnDemand, on the other hand, provides the user with a remote desktop setup in a HPC node(s) with all its computational power but has the drawback of relying on SLURM interactive sessions which puts a limit to the time the VNC desktop will last (and could potentially lead to long queue times while waiting for the interactive session).
The following are instructions on how to access a VNC desktop using these two methods.
To connect to a VNC server via a virtual machine you need to
- create a session in the server and,
- connect via SSH tunnelling with a VNC client.
For users who do not need long-running VNC servers and happy for sessions to reset between disconnects then there is a general purpose VNC service on port 5901 which allows you to login to a remote desktop.
Create a VNC session
- Login to Hawk:
$ ssh c.user@hawklogin.cf.ac.uk
- On Hawk, login to VNC server (enter your Hawk password when prompted):
$ ssh clvnc1- Run vncserver. First time will ask to set a VNC password to access sessions (optionally you can set a view only password as well).
$ vncserver- To run an X session – you need to find port number, for this add 5900 to DISPLAY number obtained from below command – e.g. 5901 in this example,
$ vncserver -list
TigerVNC server sessions:
X DISPLAY #     PROCESS ID
:1              22063
The following steps are system dependent:
Connect a VNC client (MacOS).
For this you need to connect to Hawk using a SSH tunnel, some applications such as MobaXterm has this feature integrated. In this example we will use another popular VNC client, TigerVNC.
- Download and install TigerVNC from their official website.
- Open a terminal and use SSH port forwarding to use local port to access port on remote server, e.g. use local port 9000 to connect to clvnc1 port from step 4 (e.g. 5901): <pre style="color: silver; background: black;">$ ssh -L 9000:clvnc1:(port number) c.user@hawklogin.cf.ac.uk </pre>
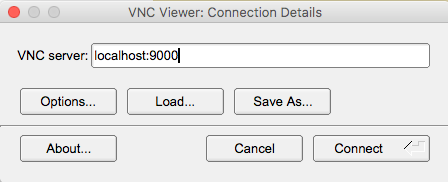
- Run TigerVNC and connect to localhost:9000
- Type VNC password set in step 3.
- You should now have a VNC Linux desktop.
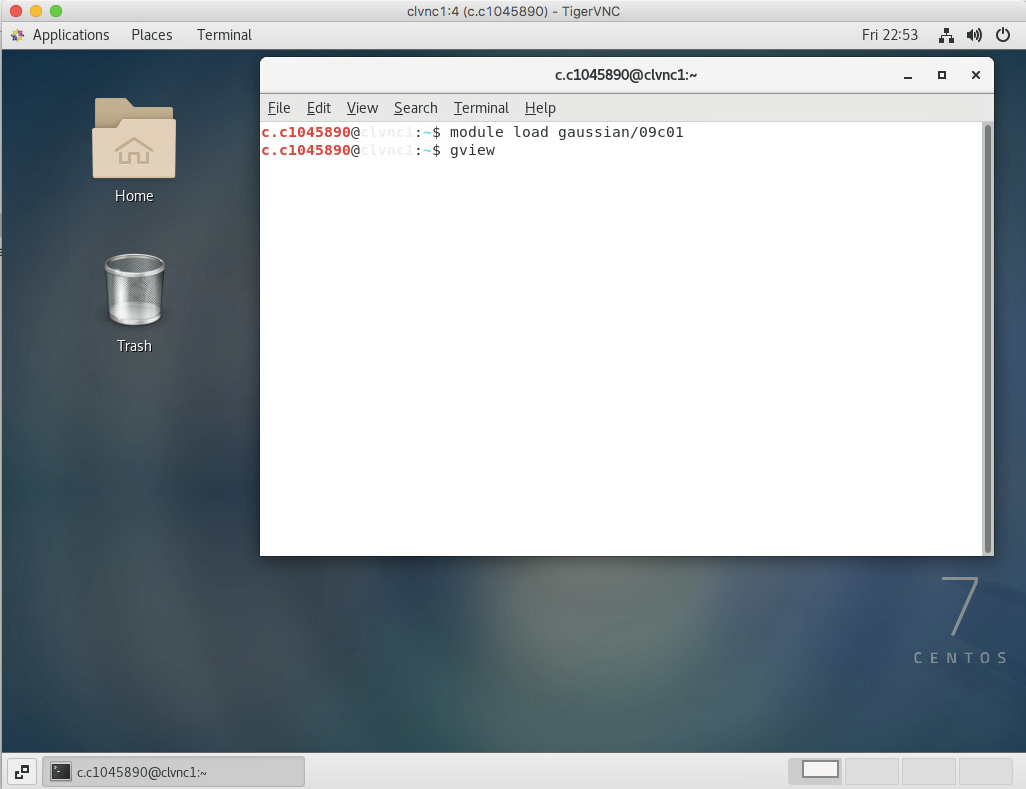
- To open an GUI application (e.g. gview), run a terminal window within VNC’s desktop (Applications -> System Tools -> Terminal). Within the terminal load the required module (e.g. module load gaussian/09c01). Run the desired application (e.g. gview)
- Once finished just close window.
- If completely finished close down VNC server by logging back into clvnc1 and running (where screen number is the number obtained in step 4)
$ vncserver -list $ vncserver -kill :(screen number)- Logout of VNC server to return to Hawk.
$ exit
Connect a VNC client (Windows).
On Windows, MobaXterm has an integrated VNC client that works well.
- Download and install MobaXterm from their official website.
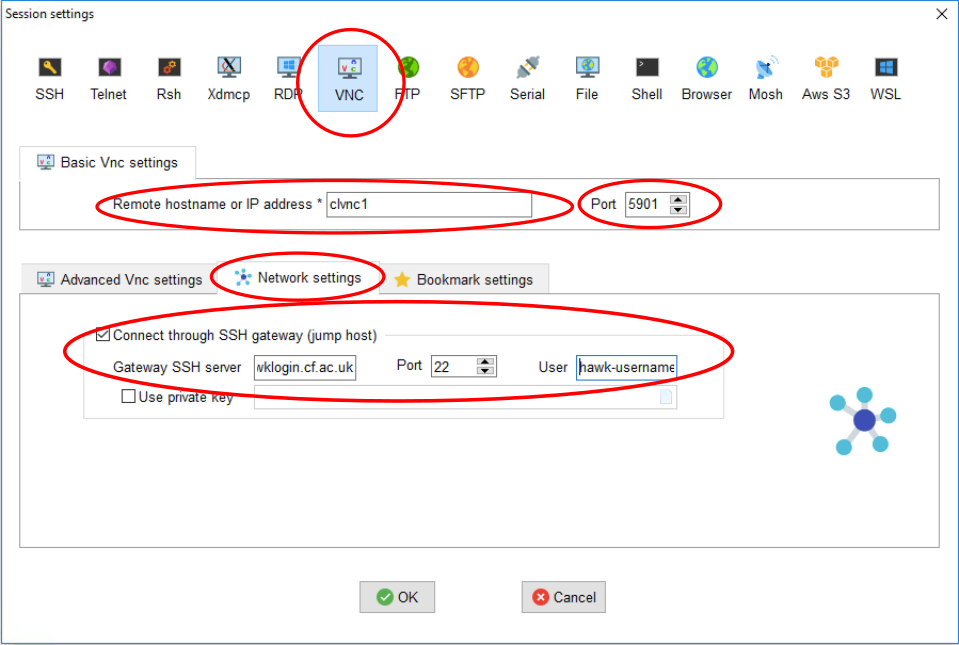
- Open MobaXterm and head to Session->VNC. You should see the following window:
- On the Basic VNC settings, set clvnc1 as the Remote Hostname and set port to the port number obtained in step 4 (e.g. 5901).
- On the Network settings tab, tick “Connect through SSH gateway” and set hawklogin.cf.ac.uk as the “Gateway SSH server”, port 22 and use your Hawk username.
- Click OK and you will be prompted for your Hawk password (you can optionally let MobaXterm save it), then you will be prompted by the password set on step > 3 above (you can also optionally let MobaXterm to save it).
- You should now have a VNC Linux desktop.
- To open an GUI application (e.g. gview), run a terminal window within VNC’s desktop (Applications -> System Tools -> Terminal). Within the terminal load the required module (e.g. module load gaussian/09c01). Run the desired application (e.g. gview)
- Once finished just close window.
- If completely finished close down VNC server by logging back into clvnc1 and running (where screen number is the number obtained in step 4)
$ vncserver -list $ vncserver -kill :(screen number)- Logout of VNC server to return to Hawk.
$ exit
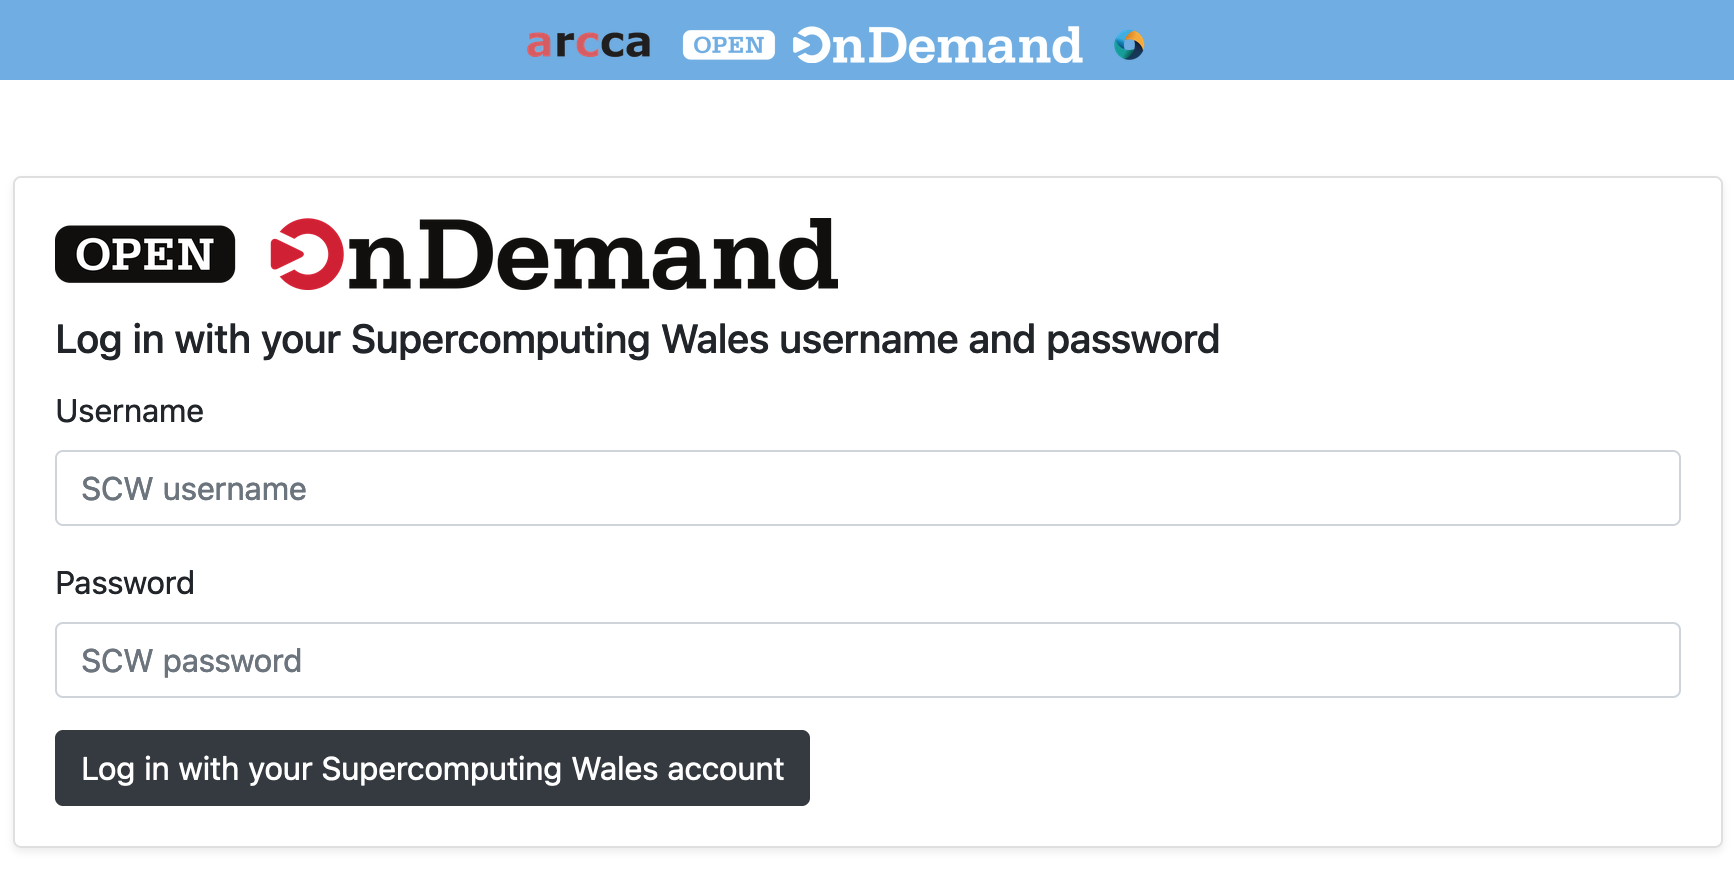
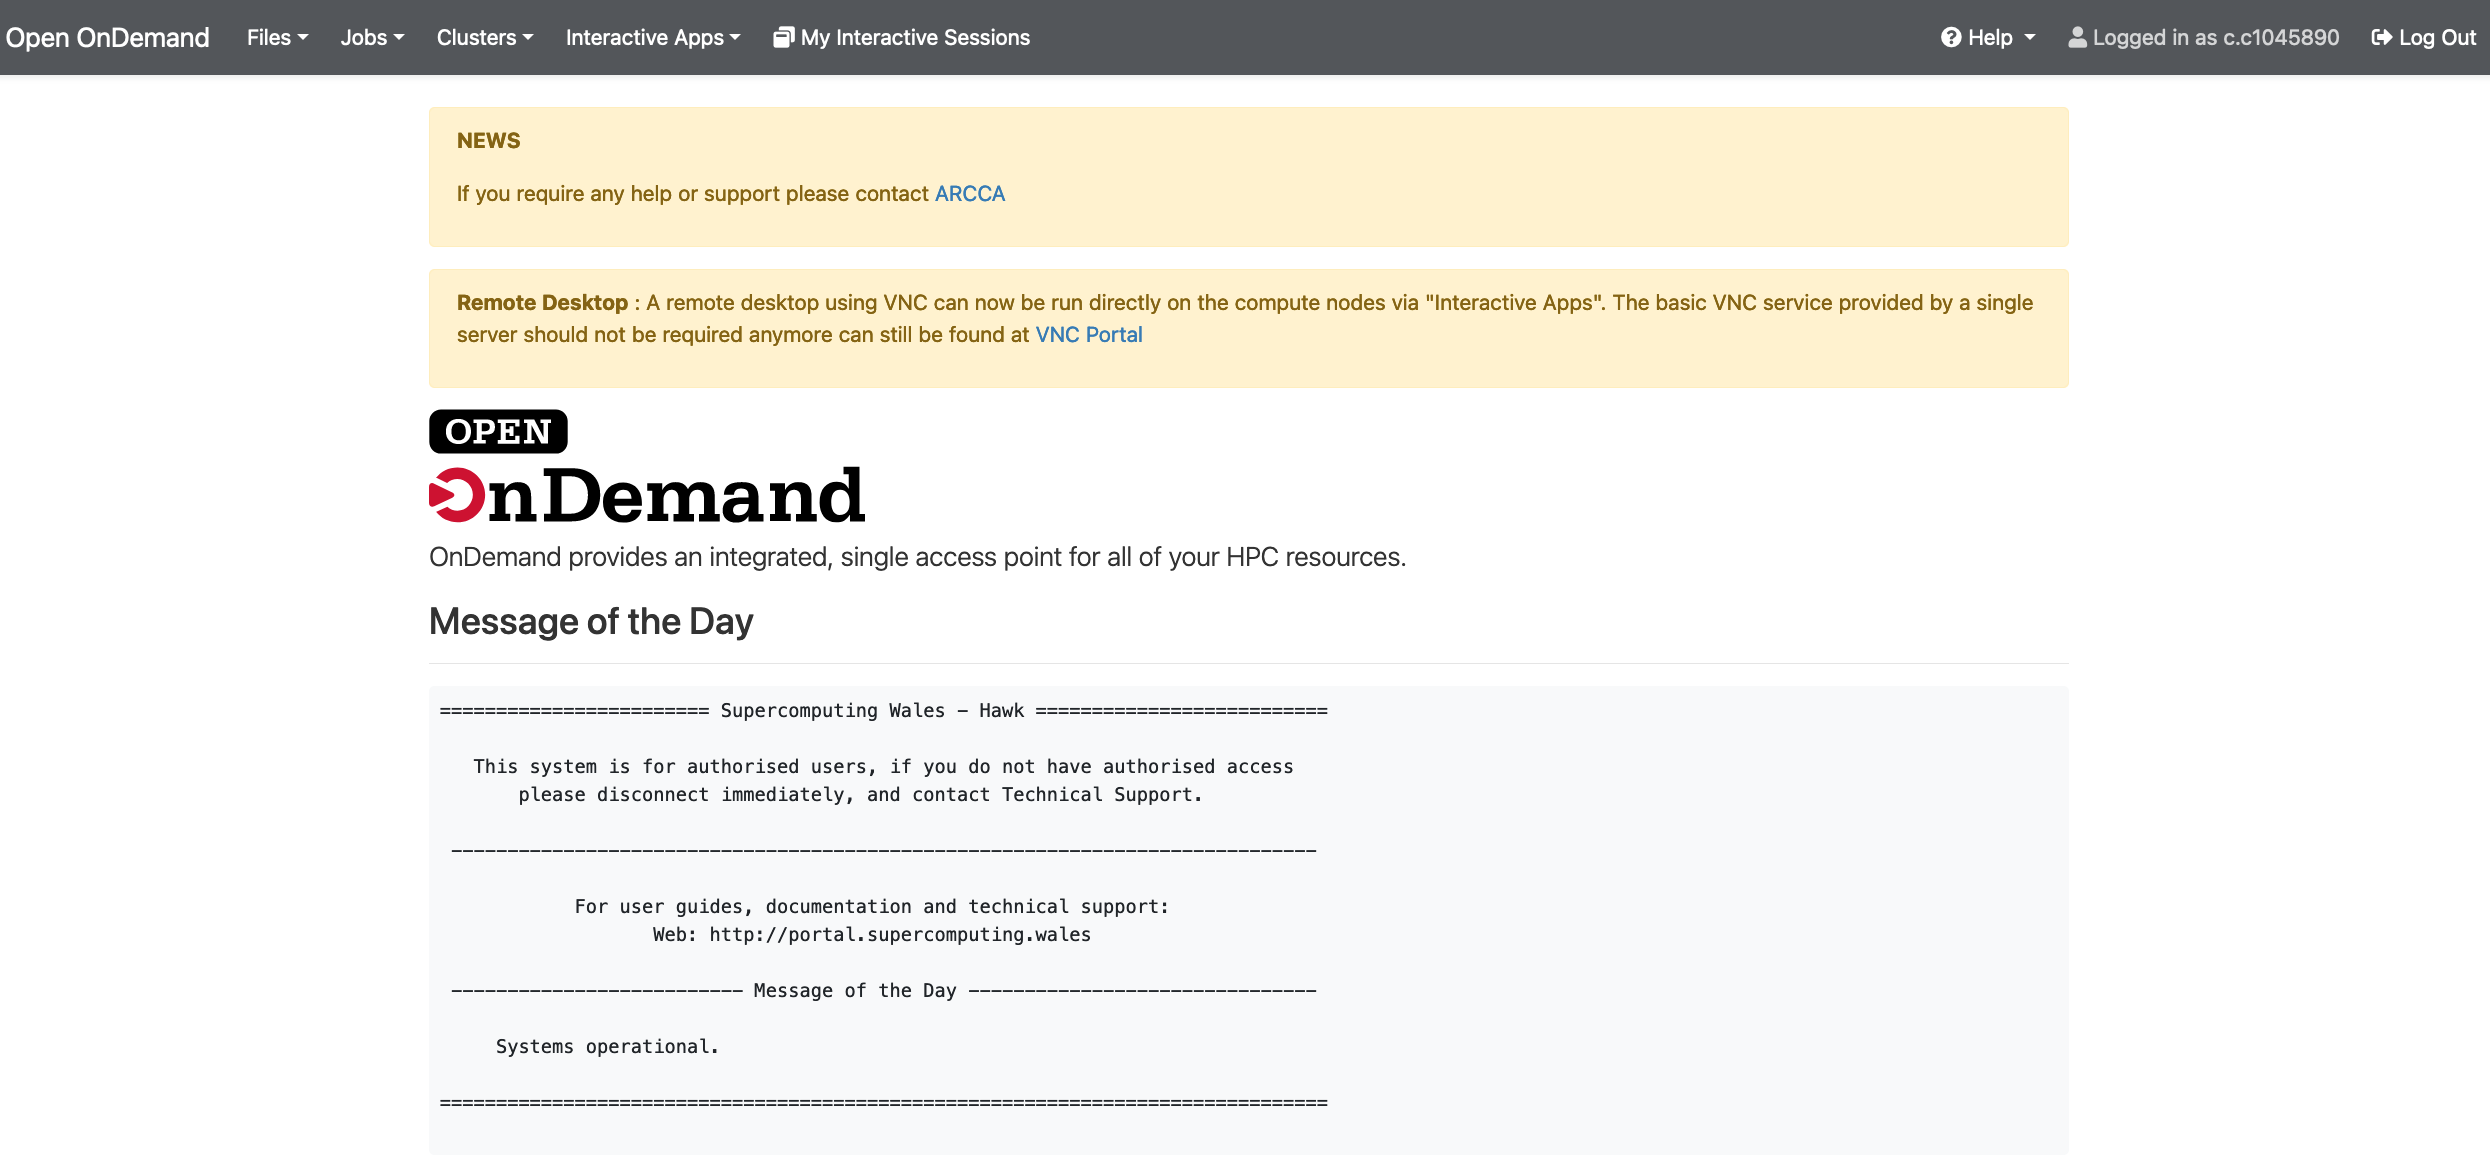
- Go to ARCCA OnDemand portal (this requires access to Cardiff University VPN ).
-
Enter your details: Hawk username and password. Once logged in you should land on a page with useful information including the usual Message of the Day (MOD) commonly seen when loggin in to Hawk via the terminal.
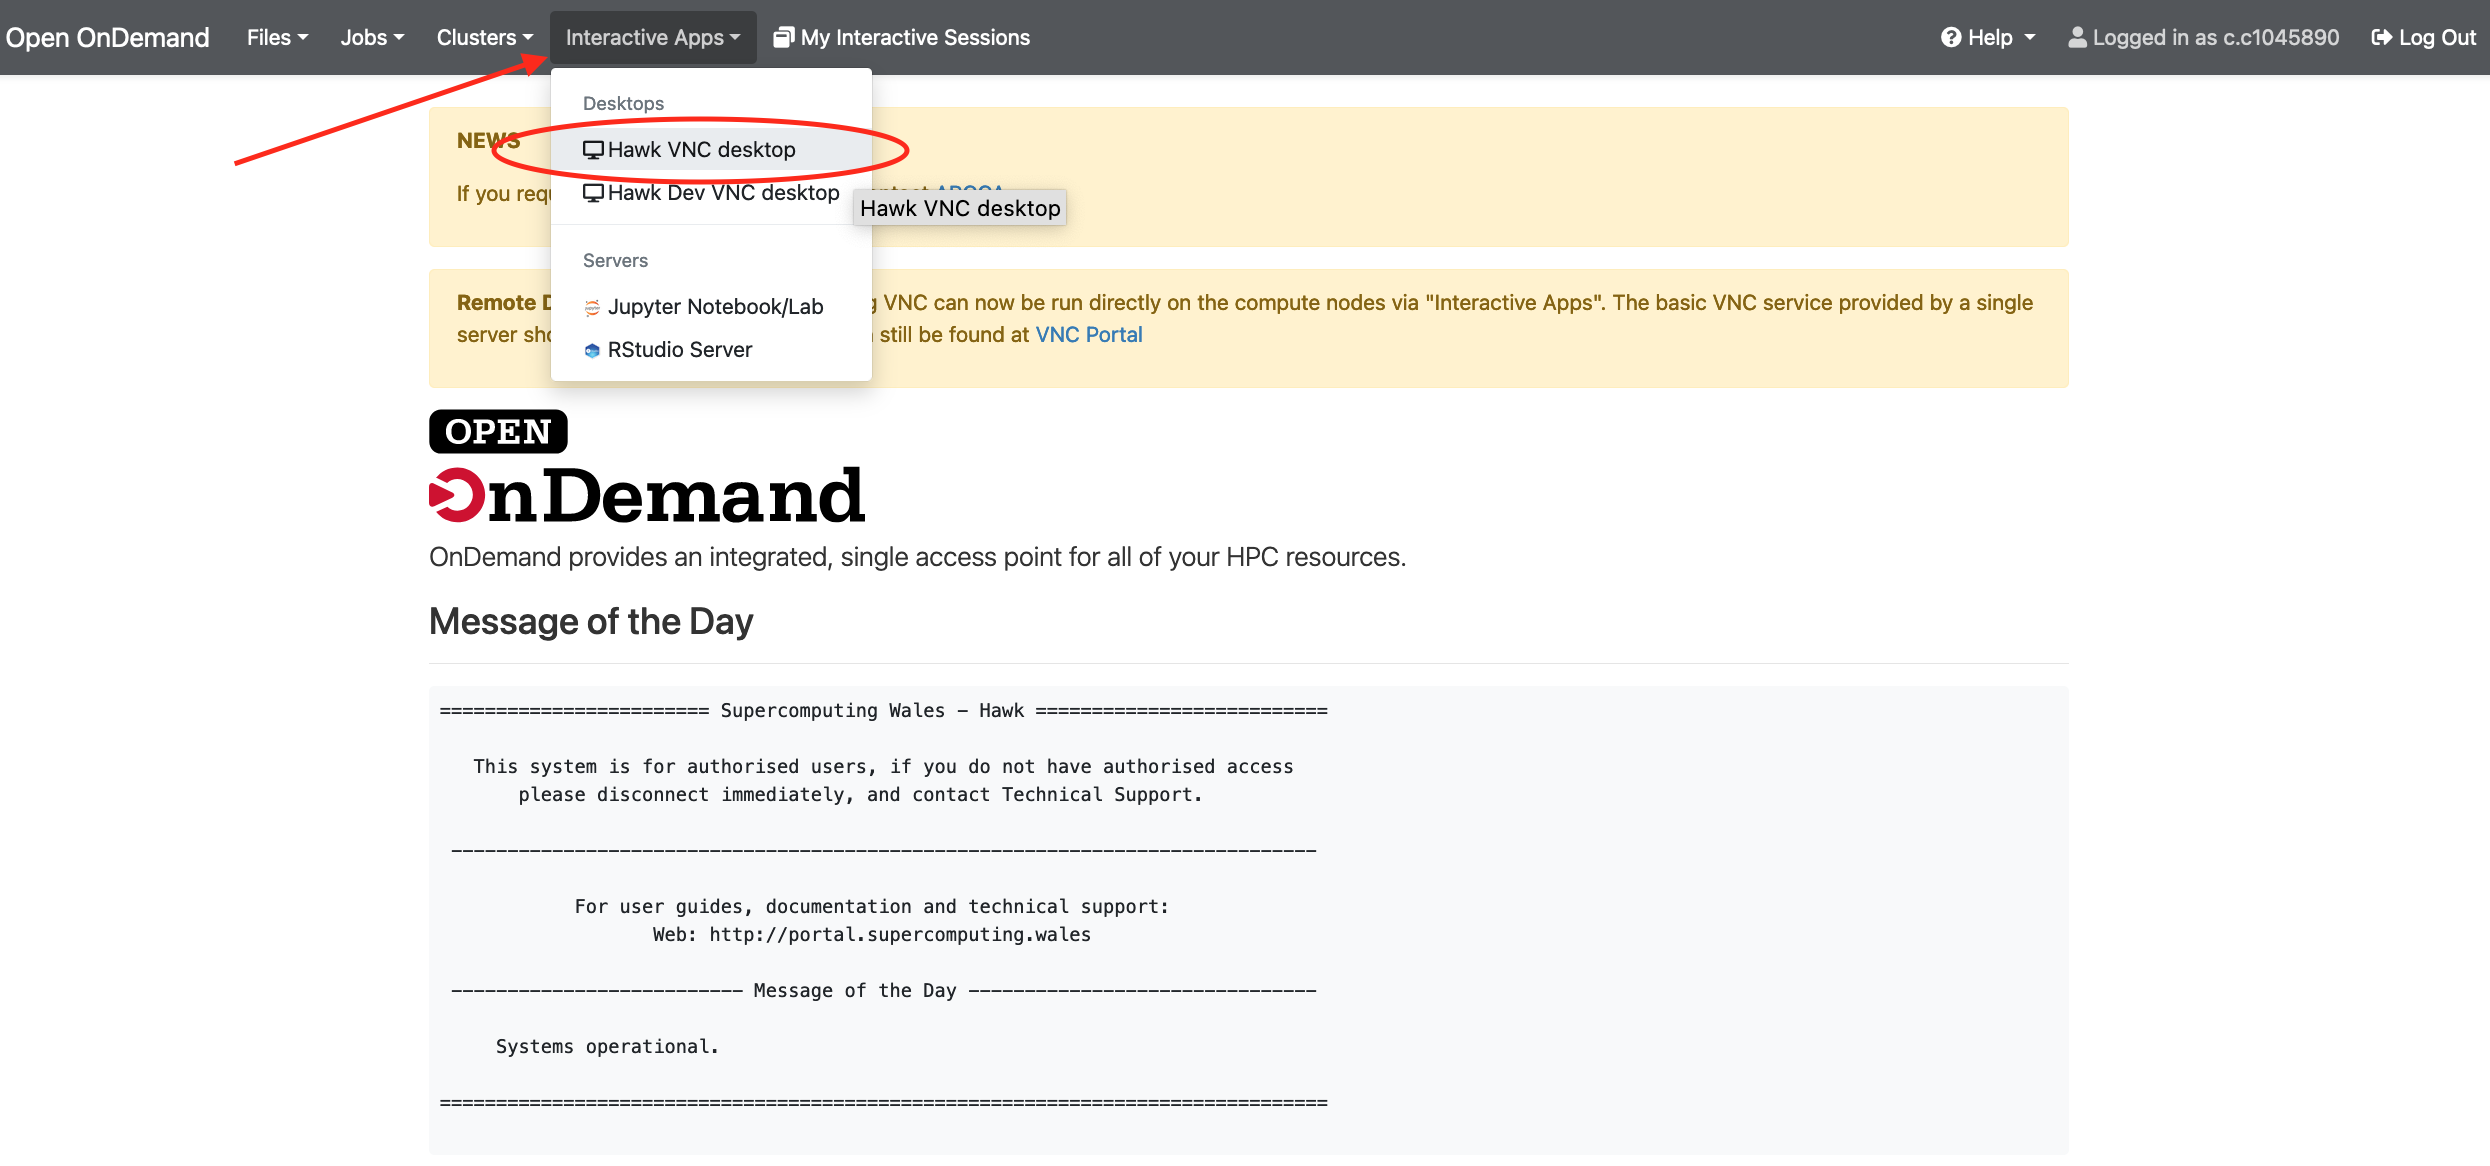
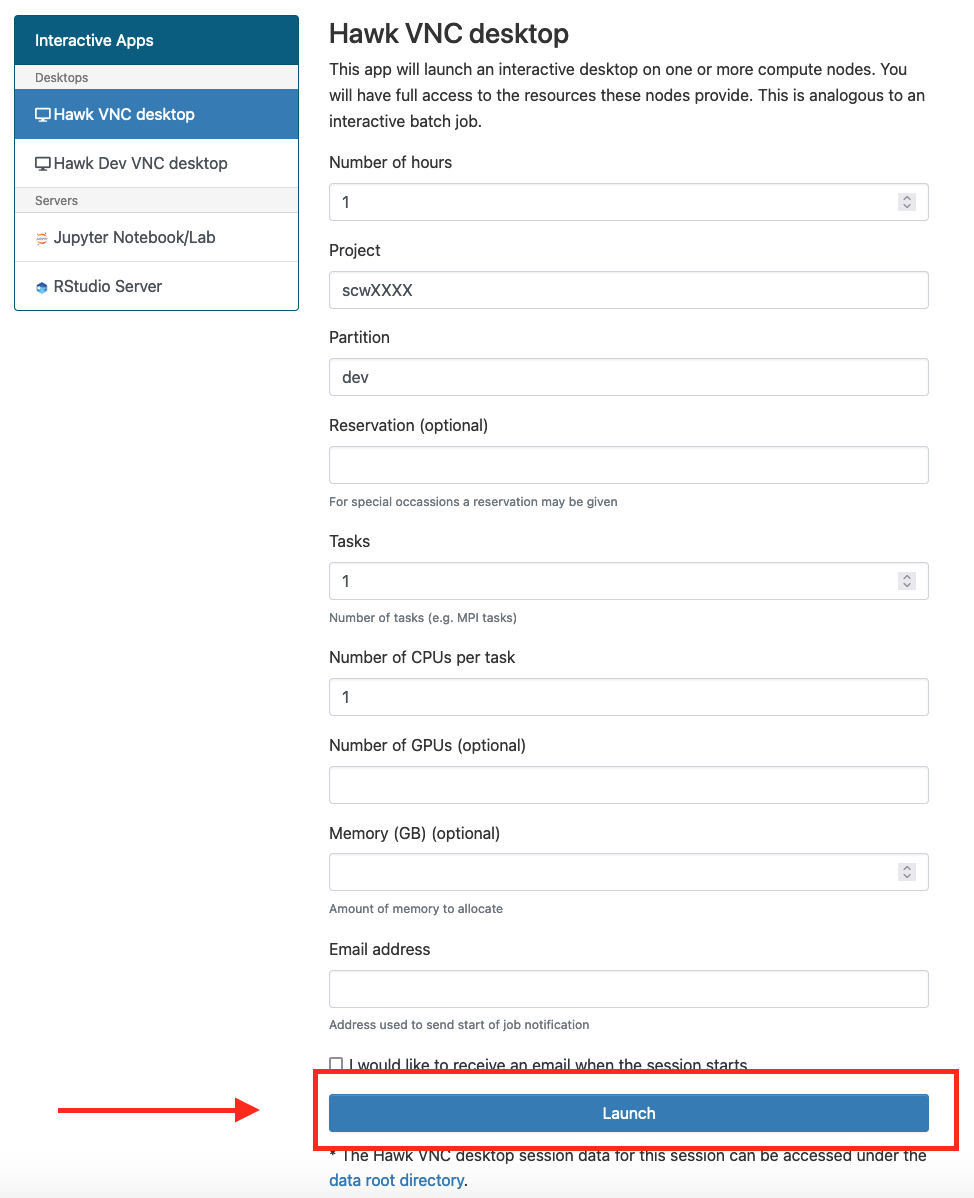
-
Go to “Interactive Apps” in the top menu and select “Hawk VNC Desktop”. This will bring you to a form where you can specify for how much time the desktop is required, number of CPUs, partition, etc. You can also choose to receive an email once the desktop is ready for you. Click the Launch button to submit the request.
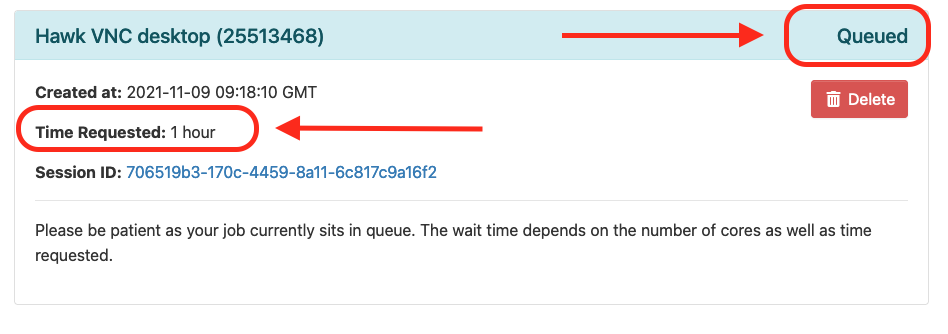
-
After submission you request will be placed on the queue and will wait for resources, hopefully for a short period, but this depends on the number of cores as well as time requested, so please be patient. At this point you can close the OnDemand website and come back at a later point to check progress or wait for the email notification if the option was selected.
Once your request is granted you should be able to see a Running message, the amount of resources granted and the time remaining.
Click Launch Hawk VNC Desktop to launch the desktop in a new web browser tab.

-
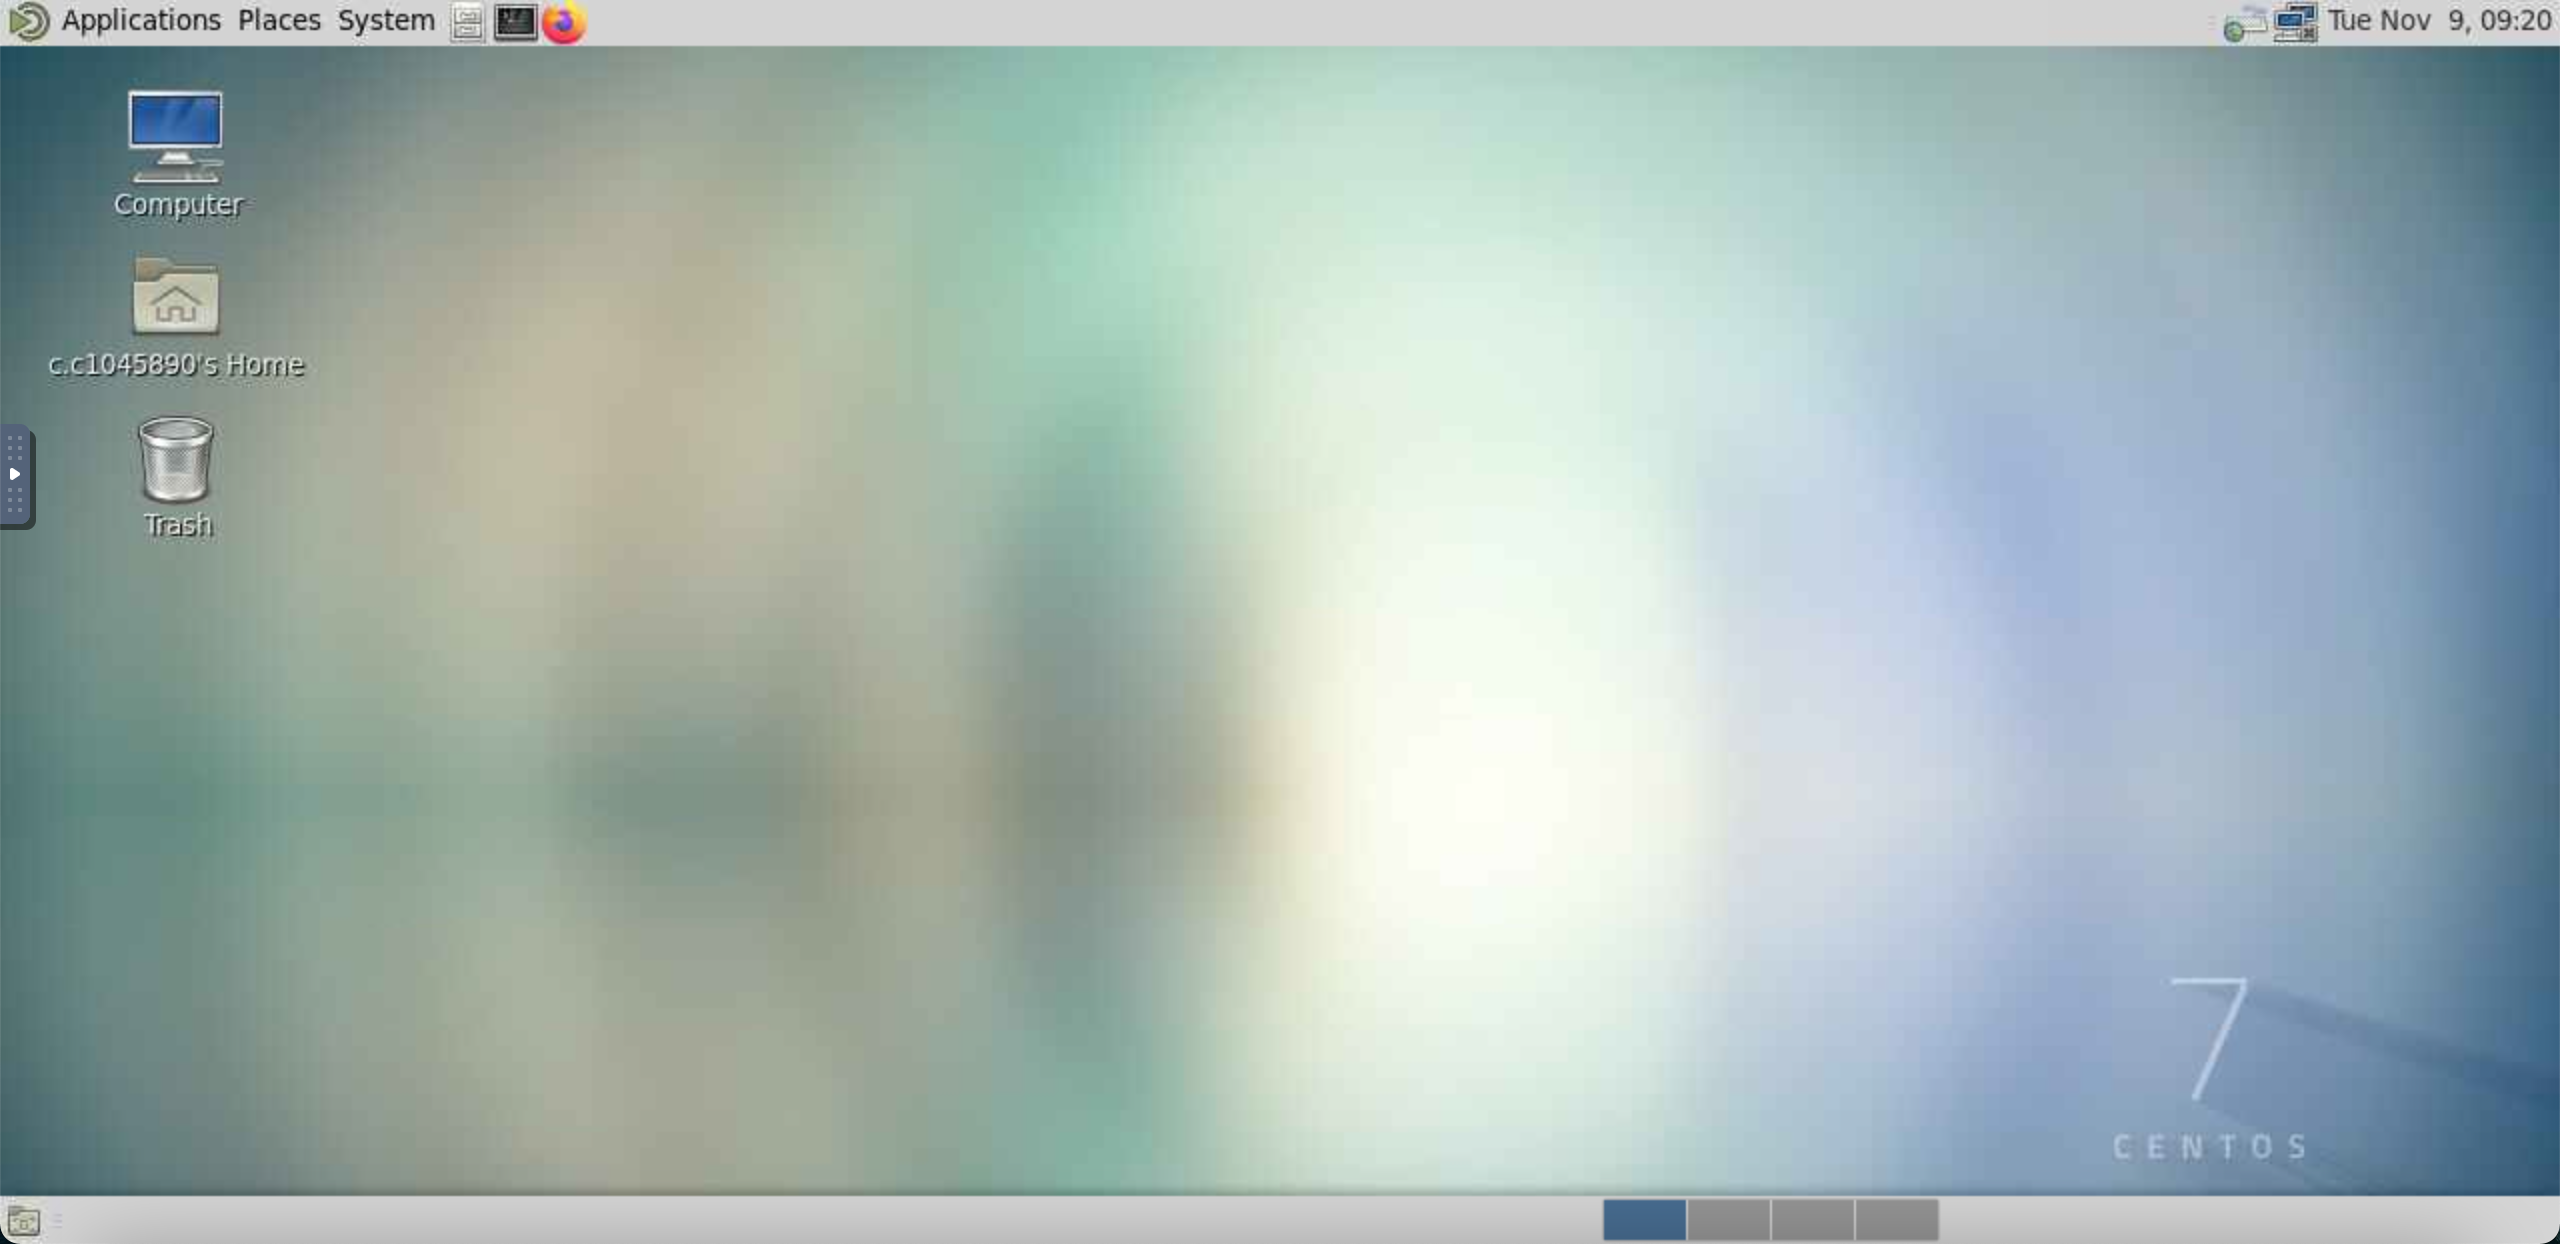
The VNC desktop can be used as any regular Operating System (in this case i Linux), in which you can click on icons to open folders (there is a direct access icon to your home directory in the deskop), open files to edit them and more importantly, open applications that require a GUI.
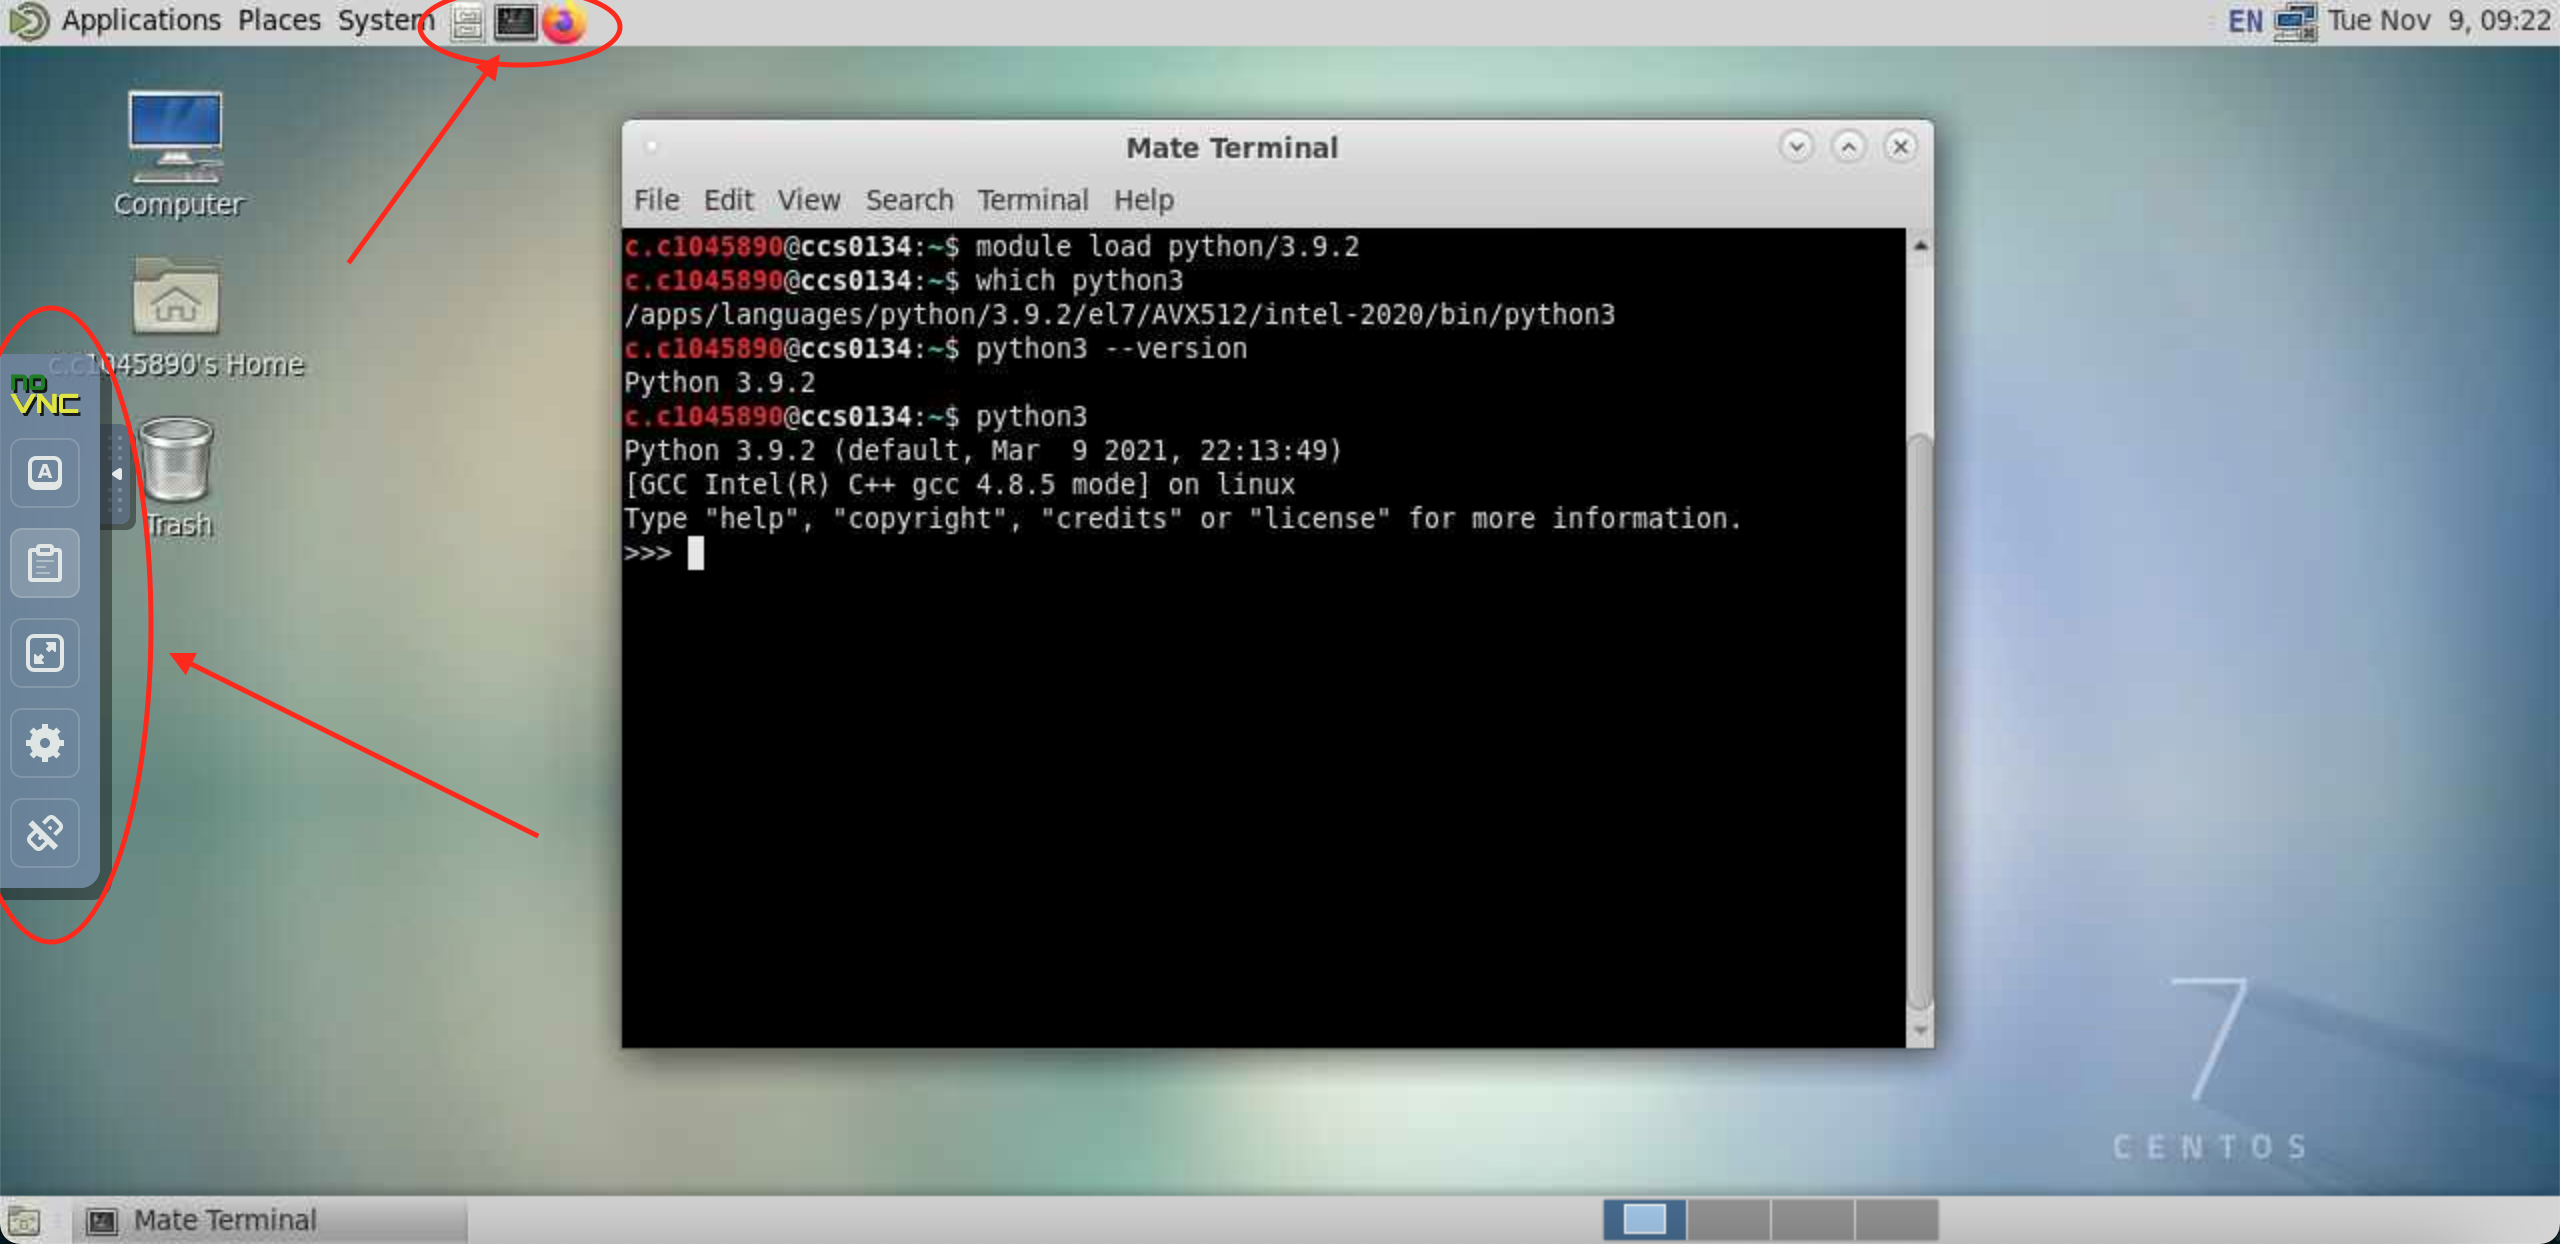
To load specific software, open a new terminal as shown in the images below and load any desired package. You can run the program from the command line and the GUI will be displayed in the desktop.
On the left there is a hidden menu that you can expand by clicking on it. It has a few useful tools including a clipboard to copy-paste text between the remote desktop and your local machine.
-
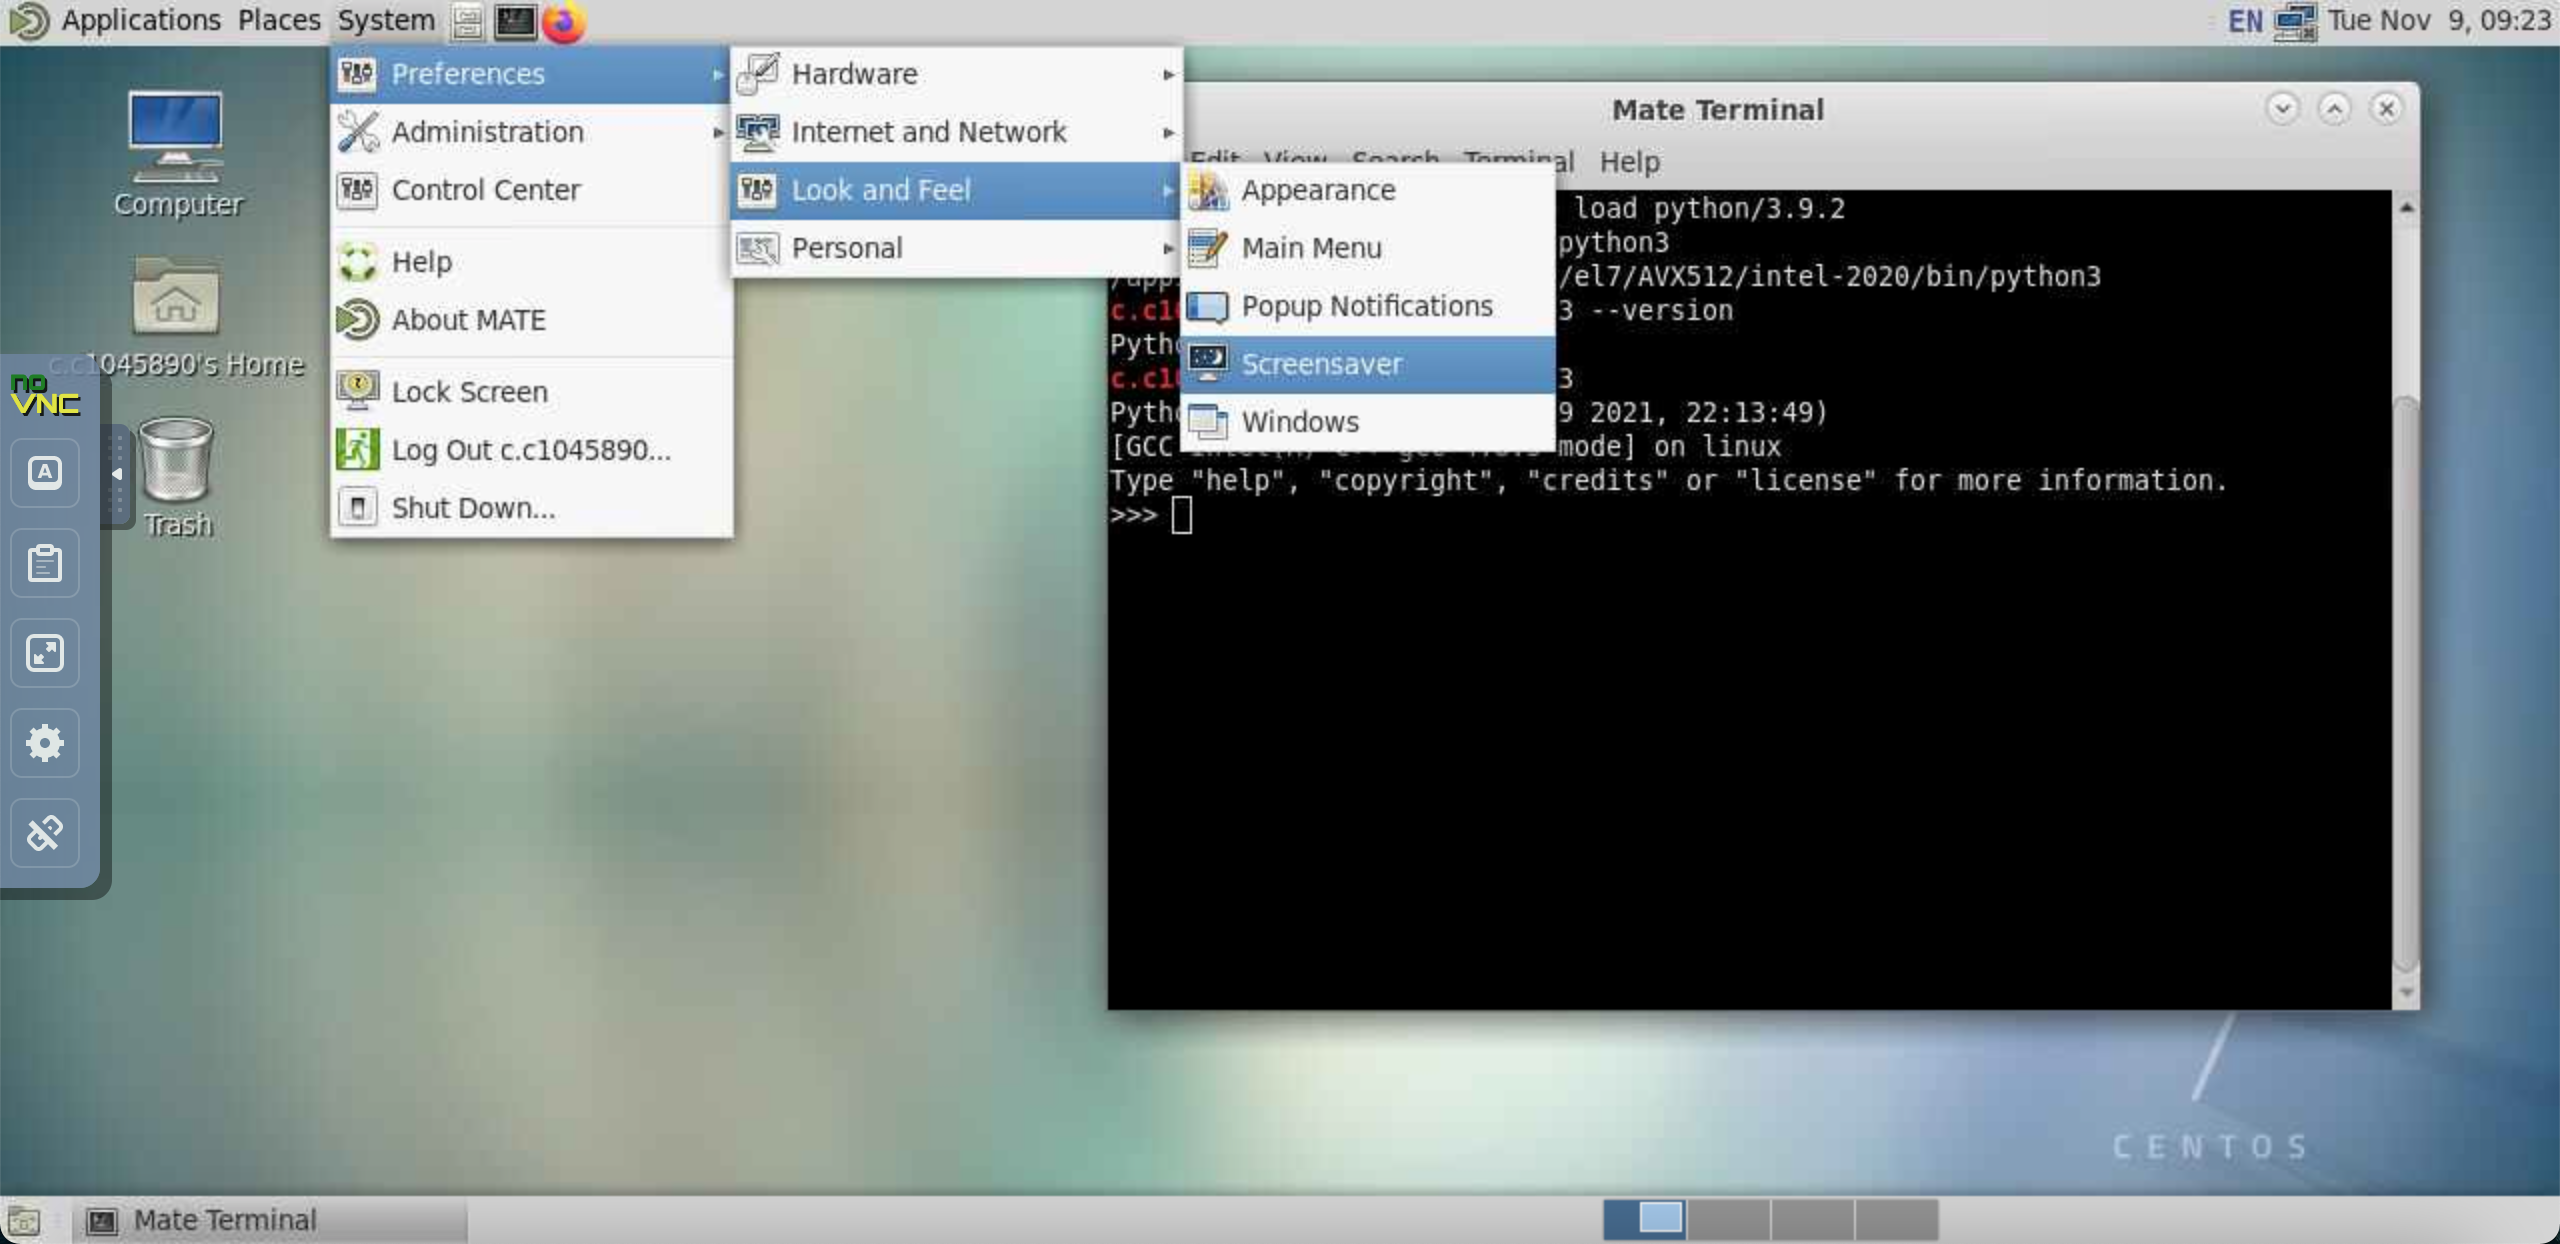
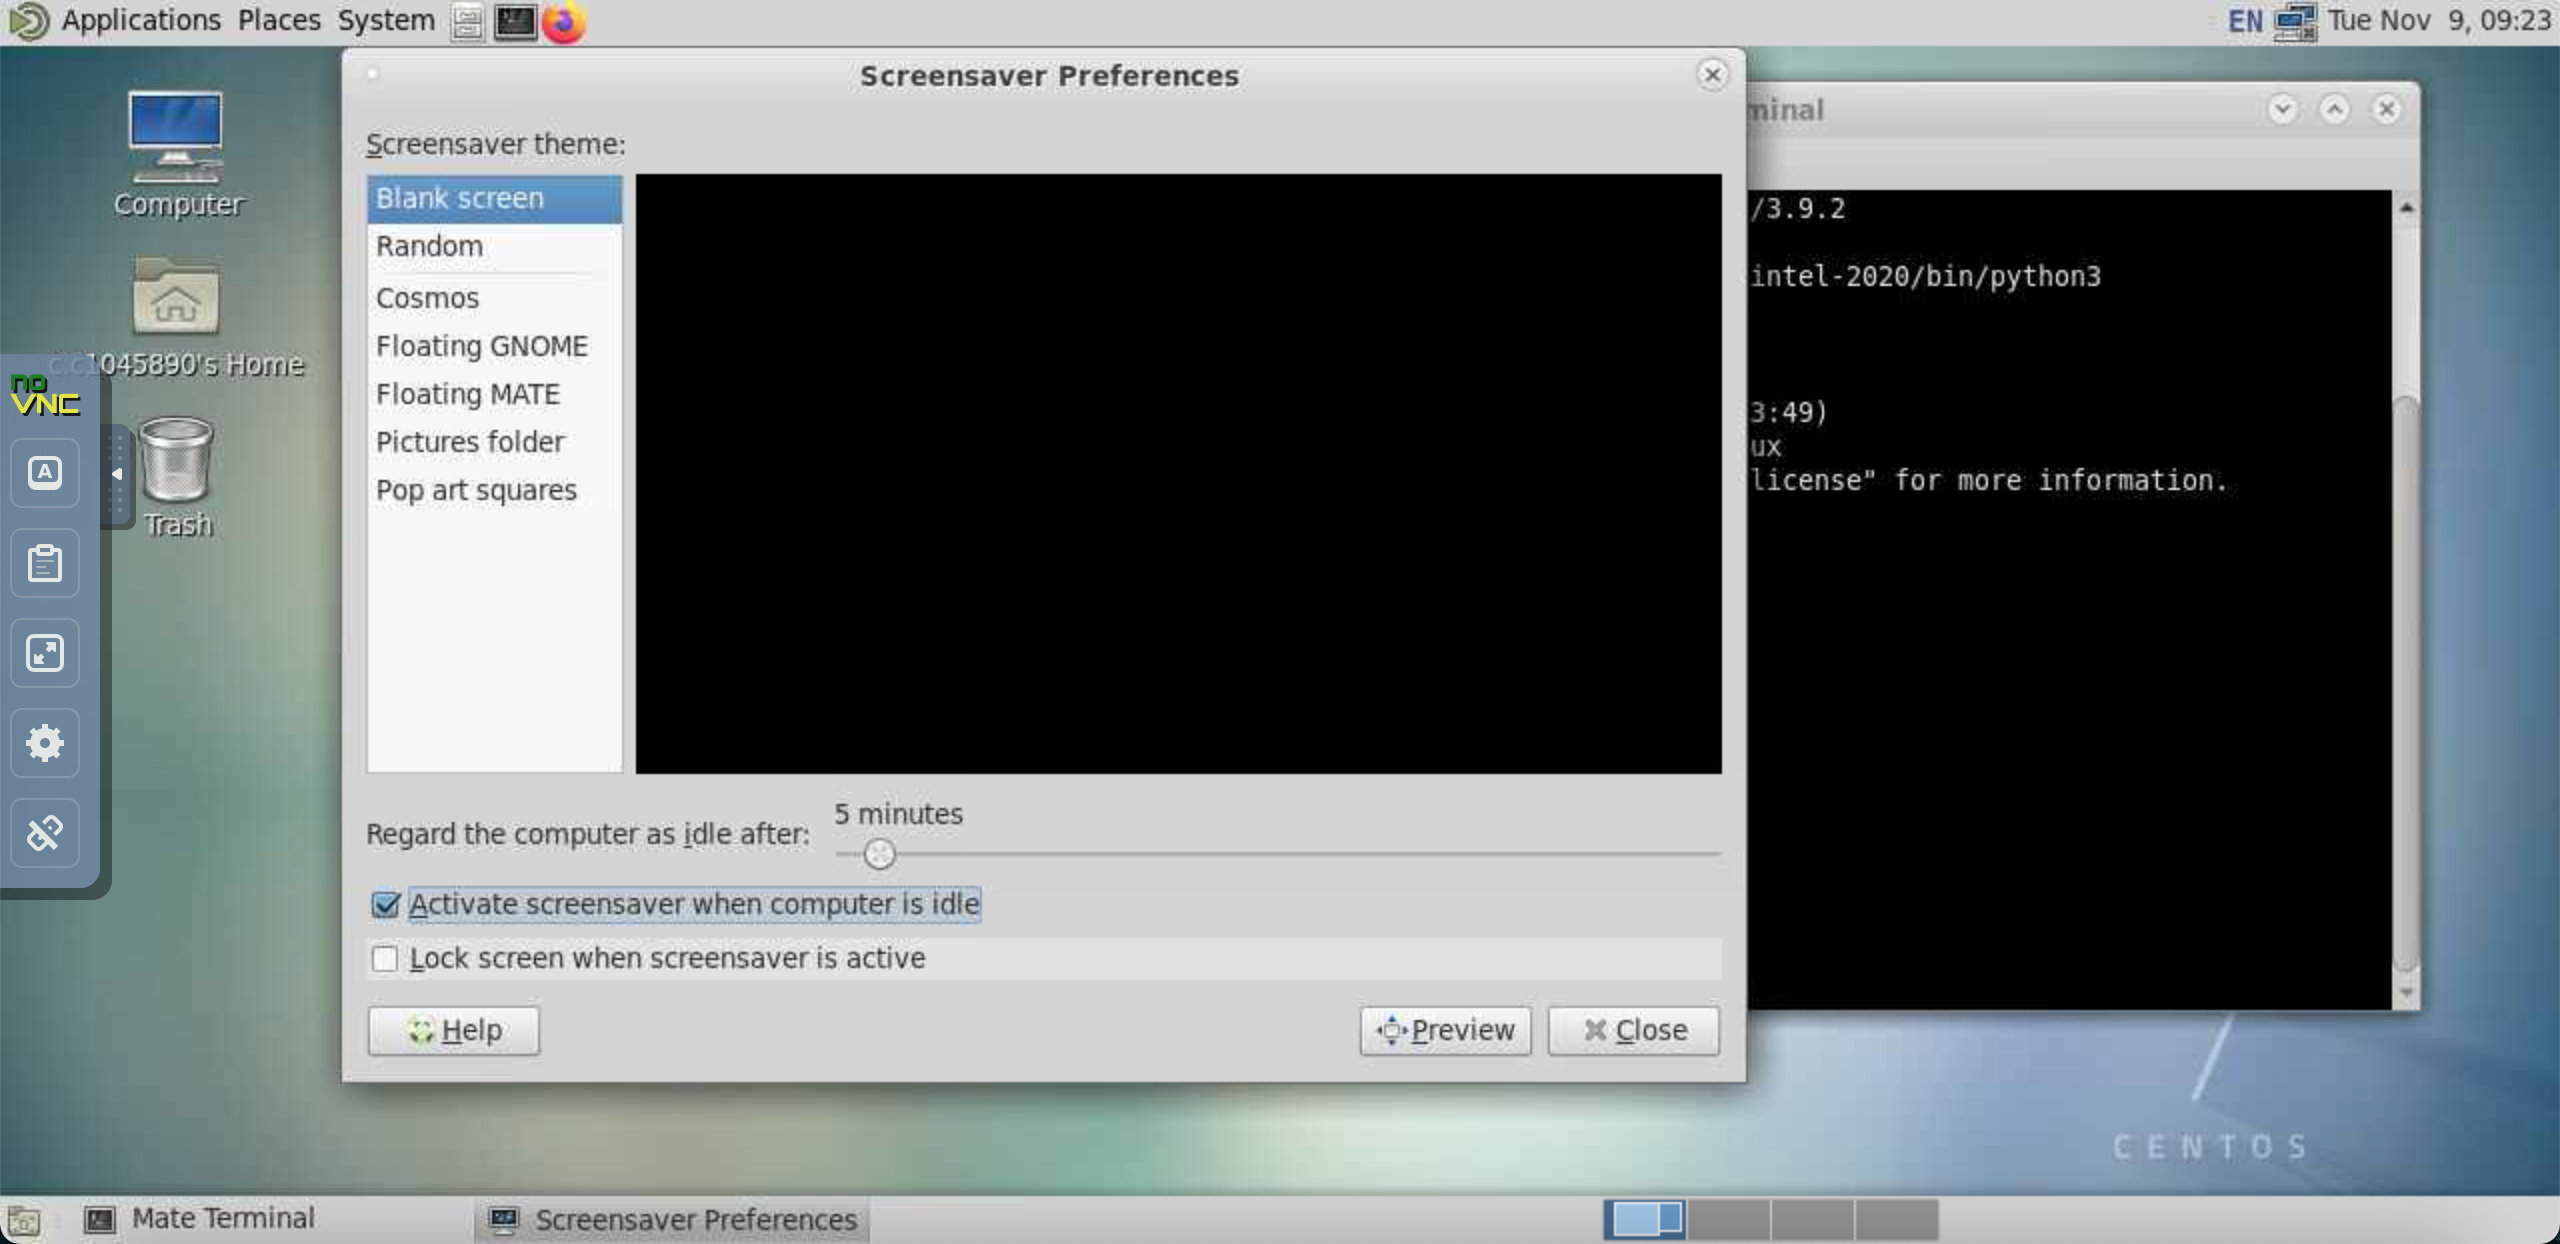
An additional pointer. Make sure that Lock screen when screensaver is active is disabled. If unsure, follow the steps in the image below to check.
Key Points
It is possible to use Graphical User Interfaces when working on Hawk.
X11 is a system that enables the display of graphical windows from a remote server
Almost all popular SSH clients support X11
Hawk provides VNC capabilities that enables the use of a remote Linux desktop.