Introducing containers
Overview
Teaching: 30 min
Exercises: 10 minQuestions
What are containers, and why might they be useful to me?
Objectives
Show how software depending on other software leads to configuration management problems.
Explain the notion of virtualisation in computing.
Explain the ways in which virtualisation may be useful.
Explain how containers streamline virtualisation.
Disclaimers
This looks like the Carpentries’ formatting of lessons because it is using their stylesheet (which is openly available for such purposes). However the similarity is visual-only: the lesson is not being developed by the Carpentries and has no association with the Carpentries.
Some parts of this course are in the early stages of development. Comments or ideas on how to improve the material are more than welcome!
Welcome, all
Introduce yourself and think about the following topics:
- What research area you are involved in
- Why you have come on this course and what you hope to learn
- One thing about you that may surprise people
Write a few sentences on the supplied online whiteboard.
The fundamental problem: software has dependencies that are difficult to manage
Consider Python: a widely used programming language for analysis. Many Python users install the language and tools using something such as Anaconda and give little thought to the underlying software dependencies allowing them to use libraries such as Matplotlib or Pandas on their computer. Indeed, in an ideal world none of us would need to think about fixing software dependencies, but we are far from that world. For example:
- Python 2.7 and Python 3 programs are generally incompatible
- Python 2.7 has now been deprecated but there are still many legacy programs out there
- Not all packages can be installed in the same Python environment at their most up to date versions due to conflicts in the shared dependencies
- Different versions of Python tools may give slightly different outputs and/or results
All of the above discussion is just about Python. Many people use many different tools and pieces of software during their research workflow all of which may have dependency issues. Some software may just depend on the version of the operating system you’re running or be more like Python where the languages change over time, and depend on an enormous set of software libraries written by unrelated software development teams.
What if you wanted to distribute a software tool that automated interaction between R and Python. Both of these language environments have independent version and software dependency lineages. As the number of software components such as R and Python increases, this can rapidly lead to a combinatorial explosion in the number of possible configurations, only some of which will work as intended. This situation is sometimes informally termed “dependency hell”.
The situation is often mitigated in part by factors such as:
- an acceptance of inherent software and hardware obsolesce so it’s not expected that all versions of software need to be supported forever;
- some inherent synchronisation in the reasons for making software changes (e.g., the shift from 32-bit to 64-bit software), so not all versions will be expected to interact with all other versions.
Although we have highlighted the dependency issue above, there are other, related problems that multiple versions of tools and software can cause:
- Reproducibility: we want to make sure that we (and others) can reproduce our research outputs and results. What if, a year after we have run an analysis pipeline and produced some results on a laptop, we need to run the same pipeline and reproduce the results but our old laptop has now been replaced by a new one (perhaps with a different operating system)? How can we make sure our software environment is equivalent to that on which we performed the original work?
- Workload: most people use multiple computers for their research (either simultaneously, or, over a period of time, due to upgrades or hardware failures). Installing the software and tools we need on all these systems and keeping everything up to date and in sync is a large burden of additional work we could do without. This problem may be even more severe if we have to use shared advanced computing facilities where we may not have administrator access to install software.
Thankfully there are ways to get underneath (a lot of) this mess: containers to the rescue! Containers provide a way to package up software dependencies and access to resources such as data in a uniform and portable manner that allows them to be shared and reused across many different computer resources.
Background: virtualisation in computing
When running software on a computer: if you feed in the same input, to the same computer, then the same output should appear - i.e. the result should be reproducible.
However a computer, let’s call it the “guest”, should itself be able to be simulated as running on another computer we will call the “host”. The guest computer can be said to have been virtualised: it is no longer a physical computer. Note that “virtual machine” is frequently referred to using the abbreviation “VM”.
We have avoided the software dependency issue by virtualising the lowest common factor across all software systems, which is the computer itself, beneath even the operating system software.
Omitting details and avoiding complexities…
Note that this description omits many details and avoids discussing complexities that are not particularly relevant to this introduction session, for example:
- Thinking with analogy to movies such as Inception, The Matrix, etc., can the guest computer figure out that it’s not actually a physical computer, and that it’s running as software inside a host physical computer? Yes, it probably can… but let’s not go there within this episode.
- Can you run a host as a guest itself within another host? Sometimes… but, again, we will not go there during this course.
Motivation for virtualisation
What features does virtualisation offer?
- Isolation: the VM is self-contained, so you can create and destroy it without affecting the host computer. Likewise, the software running in the VM can encounter a fatal error, crash, lock-up, etc., without affecting the host computer.
- Reproducibility: the VM can be tagged at a known-good situation. Enabling you to easily revert to this known state or share it with others, much as you can revert a document you are editing to a known good version. This allows you to more robustly have a reproducible output from the VM.
- Manageability: the VM is software, so can be saved and restored as you might a document file (albeit a much larger file than a typical document!).
- Migration: the VM is just data, so a complete VM can be transmitted to another physical host and run in the same way from there.
- Shareability: If you want to share your computational setup with someone else, you can transmit the VM to another person and they can run it on their host - you do not need to send them your actual computer!
Types of virtualisation:
- Full (hardware-level) virtualisation (software): Full virtualisation uses software that recreates the hardware environment of a hardware platform within which virtual machines can be run. A virtual machine sees the environment provided by the virtualisation software as the hardware it is running on, and the virtualisation software, in turn, makes use of the physical hardware of the host system to provide the actual computational resources to run the virtual machine. In standard virtualisation, the virtualisation software provides an environment that is the same as or similar to the host system. However, there is no reason why it can’t present a platform that looks, to the software running on it, like a completely different type of hardware - this is known as emulation - the virtualisation software is emulating another type of system.
- Full (hardware-level) virtualisation (hardware): Complete virtualisation of a hardware platform implemented entirely in software can be very resource intensive. Traditionally, a virtual machine running in virtualisation software on your host could be expected to run certain tasks significantly slower than if they were running directly on the host system’s hardware. In recent years, hardware support for virtualisation has been introduced into x86 processors to help improve the speed of virtualisation which has become increasingly widely used with the emergence of cloud platforms and large-scale multi-core hardware.
- Shared-kernel (operating system-level) virtualisation: This is a higher-level approach to virtualisation that has traditionally been most commonly seen on Unix variants such as Linux (e.g. OpenVZ) and Solaris (e.g. Solaris Zones). This is the same approach used by modern container platforms such as Docker and Singularity. “Virtual machines” or “containers” share the running kernel of the host operating system which makes things more lightweight and potentially offers better performance. A downside of this approach is that it is only possible to run operating systems compatible with the kernel of the host system in a shared-kernel/container environment. The virtual environment operates within a segregated area of the host system, seeing only its own filesystem and other hardware resources to which it has been allowed access. While this doesn’t provide the same level of isolation as a fully virtualised environment, the rapid development of container tools and platforms and their increasingly wide use means that rapid progress is being made in this area.
Downsides of virtualisation:
- The file describing a VM has to contain its entire simulated hard-disk, so this leads to very large files.
- The guest computer wastes a lot of time managing “hardware” that’s not actually real, e.g., VMs need to boot up in the same way that your laptop does.
- A host needs lots of RAM to run large numbers of virtual machines, as the strong isolation means that the VMs do not share any resources.
Containers are a type of lightweight virtualisation
Containers are similar to full, hardware-level virtual machines but offer a more lightweight solution. As highlighted above, containers sacrifice the strong isolation that full virtualisation provides in order to vastly reduce the resource requirements on the virtualisation host.
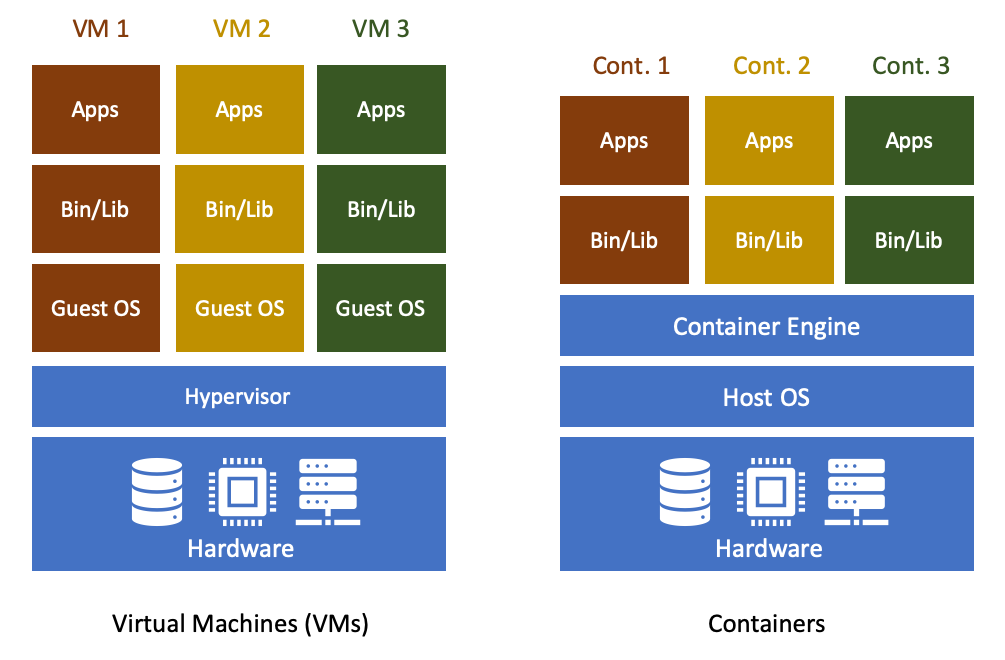
The term “container” can be usefully considered with reference to shipping containers. Before shipping containers were developed, packing and unpacking cargo ships was time consuming, and error prone, with high potential for different clients’ goods to become mixed up. Similar to VMs, software containers standardise the packaging of a complete software system (the lightweight virtual machine): you can drop a container into a container host, and it should “just work”.
On this course, we will be using Linux containers - all of the containers we will meet are based on the Linux operating system in one form or another. However, the same Linux containers we create can run on:
- macOS;
- Microsoft Windows;
- Linux; and
- The Cloud
We should certainly see people using the same containers on macOS and Windows today.
And what do you do?
Think about your work. How does computing help you do your research? How do you think containers (or virtualisation) could help you do more or better research?
Write a few sentences on this topic in the supplied online whiteboard in the section about yourself that you created earlier.
Containers and file systems
One complication with using a virtual environment such as a container (or a VM) is that the file systems (i.e. the directories that the container sees) can now potentially come from two different locations:
- Internal file systems: these provide directories that are part of the container itself and are not visible on the host outside the container. These directories can have the same location as directories on the host but the container will see its internal version of the directories rather than the host versions.
- Host file systems: these are directories mapped from the host into the container to allow the container to access data on the host system. Some container systems (e.g. Singularity) map particular directories into the container by default while others (e.g. Docker) do not generally do this. Note that the location (or path) to the directories in the container is not necessarily the same as that in the host. The command you use to start the container will usually provide a way to map host directories to directories in the container.
This is illustrated in the diagram below:
Host system:                                                      Container:
------------                                                      ----------
/                                                                 /
├── bin                                                           ├── bin                <-- Overrides host version
├── etc                                                           ├── etc                <-- Overrides host version
├── home                                                          ├── usr                <-- Overrides host version
│   └── auser/data ───> mapped to /data in container ──> ─┐       ├── sbin               <-- Overrides host version
├── usr                                                   │       ├── var                <-- Overrides host version
├── sbin                                                  └───────├── data
└── ...                                                           └── ...
Although there are many use cases for containers that do not require mapping host directories into the container, a lot of real-world use cases for containers in research do use this feature and we will see it in action throughout this lesson.
Docker and Singularity
Even though we will focus on Singularity during this course, it is worth highlighting Docker.
Docker is software that manages containers and the resources that containers need. While Docker is a leader in the container space, there are many similar technologies available and the concepts we learn today will allow us to use other container platforms even if their command syntax will be a little different.
SingularityCE or Apptainer are widely available on shared high performance computing systems where Docker’s design makes is unsuitable for the multi-user nature of these systems.
SingularityCE or Apptainer
Singularity started a project but in 2021 the project split into two versions, Sylabs continued via SingularityCE whilst Linux Foundation hosted Apptainer. Currently similar in features but could diverge as priorities differ for each project.
Terminology
Before we start the course, we will introduce some of the technical terms:
- Image: this is the term that describes the template for the virtual hard disk contents (files and folders) from which live instances of containers will be created. The term “container image” may sometimes be used to emphasise that the “image” relates to software containers and not, say, the sense of an “image” when discussing VMs or cute kitten pictures (without loss of generality).
- If you are interested in more technical details, Docker actually creates images by combining together multiple layers, although you can profitably use Docker without knowing much about layers. As a quick summary, each layer is a given set of files and folders. The combination of layers essentially involves a set-wise union of the files and folders in the layers, except that there is also a way for upper layers to hide files from lower layers (which has the appearance of deleting those files). Layers facilitate efficient storage space use, by allowing container images to share and reuse sets of files and folders, while still allowing individual container images to have their own specific files and folders.
- Container: this is an instance of a lightweight virtual machine created from a (container) image.
- Docker Hub: the Docker Hub is a storage resource and associated website where a vast collection of preexisting container images are documented and stored, and are made available for your use.
Key Points
Almost all software depends on other software components to function, but these components have independent evolutionary paths.
Projects involving many software components can rapidly run into a combinatorial explosion in the number of software version configurations available, yet only a subset of possible configurations actually works as desired.
Virtualisation is an approach that can collect software components together and can help avoid software dependency problems.
Containers are a popular type of lightweight virtualisation that are widely used.
Docker and Singularity are two different software platforms that can create and manage containers and the resources they use.
Singularity: Getting started
Overview
Teaching: 20 min
Exercises: 10 minQuestions
What is Singularity and why might I want to use it?
Objectives
Understand what Singularity is and when you might want to use it.
Undertake your first run of a simple Singularity container.
SingularityCE or Apptainer are the recommended approaches to running containers on HPC but before running we need to set up and use them. For the purpose of this material “Singularity” refers to either SingularityCE or Apptainer.
The Singularity material comprises 5 episodes, split into 2 parts:
Part I: Basic usage, working with images
- Singularity: Getting started: This introductory episode
- Working with SingularityCE/Apptainer containers: Going into a little more detail about Singularity containers and how to work with them
Part II: Creating images, running parallel codes
- Building Singularity images: Explaining how to build and share your own Singularity images
- Running MPI parallel jobs using Singularity containers: Explaining how to run MPI parallel codes from within Singularity containers
- Running Singularity containers with GPUs: Explaining how to run MPI parallel codes from within Singularity containers
Prerequisites
Parts I and II of the Singularity material both have slightly different requirements:
Part I: (the first two episodes)
- Access to a local or remote platform with Singularity pre-installed and accessible to you as a user (i.e. no administrator/root access required).
- If you are attending a taught version of this material, it is expected that the course organisers will provide access to a platform (e.g. an institutional HPC cluster) that you can use for the first section of this material.
Part II: (the next three episodes)
- Access to a Singularity builder site (shown during course) or root access on a system with Singularity installed. For real technical users it is possible to run Docker with a container that can run Singularity. This is outside the scope of this course.
Please note that the version of Singularity used in this part of the course is the latest stable release at the time of writing, version 3.7.0. If you are installing Singularity on your own system for use in the course, you are recommneded to install version 3.7.0.
Work in progress…
This section of the course is new material that is under ongoing development. We will introduce Singularity and demonstrate how to work with it. As the tools and best practices continue to develop, elements of this material are likely to evolve. We will also aim to add further content to this section of the course and welcome comments/suggestions on how the material can be improved or extended.
Singularity - Part I
What is Singularity?
SingularityCE and Apptainer are container platforms. In some ways it appears similar to Docker from a user perspective, but in others, particularly in the system’s architecture, it is fundamentally different. These differences mean that Singularity is particularly well-suited to running on distributed, High Performance Computing (HPC) infrastructure, as well as a Linux laptop or desktop!
System administrators will not, generally, install Docker on shared computing platforms such as lab desktops, research clusters or HPC platforms because the design of Docker presents potential security issues for shared platforms with multiple users. Singularity, on the other hand, can be run by end-users entirely within “user space”, that is, no special administrative privileges need to be assigned to a user in order for them to run and interact with containers on a platform where Singularity has been installed.
Getting started with Singularity
Initially developed within the research community, Singularity is open source and both SingularityCE repository and Apptainer respository are currently available on GitHub. Part I of the Singularity material is intended to be undertaken on a remote platform where Singularity has been pre-installed.
If you’re attending a taught version of this course, you will be provided with access details for a remote platform made available to you for use for Part I of the Singularity material. This platform will have the Singularity software pre-installed.
Installing Singularity on your own laptop/desktop
If you have a Linux system on which you have administrator access and you would like to install Singularity on this system, some information is provided at the start of Part II of the Singularity material.
Sign in to the remote platform, with Singularity installed, that you’ve been provided with access to. Check that the singularity command is available in your terminal:
Loading a module
HPC systems often use modules to provide access to software on the system so you may need to use the command:
$ module load singularitybefore you can use the
singularitycommand on the system.
$ singularity --version
apptainer version 1.2.2
Depending on the version of Singularity installed on your system, you may see a different version. At the time of writing, 1.2.2 is the latest release of Apptainer.
Where is SingularityCE
To keep things simple we kept a module called Singularity but defaulted to Apptainer but try an remember how to find modules on your HPC cluster.
Images and containers
We’ll start with a brief note on the terminology used in this section of the course. We refer to both images and containers. What is the distinction between these two terms?
Images are bundles of files including an operating system, software and potentially data and other application-related files. They may sometimes be referred to as a disk image or container image and they may be stored in different ways, perhaps as a single file, or as a group of files. Either way, we refer to this file, or collection of files, as an image.
A container is a virtual environment that is based on an image. That is, the files, applications, tools, etc that are available within a running container are determined by the image that the container is started from. It may be possible to start multiple container instances from an image. You could, perhaps, consider an image to be a form of template from which running container instances can be started.
Getting an image and running a Singularity container
If you recall, Docker images are formed of a set of layers that make up the complete image. If you pull a Docker image from Docker Hub, you see the different layers being downloaded to your system. They are stored in your local Docker repository on your system and you can see details of the available images using the docker command.
Singularity images are a little different. Singularity uses the Signularity Image Format (SIF) and images are provided as single SIF files. Singularity images can be pulled from container registries (the now offline Singularity Hub was a useful resource). Alternatively, Remote Builder can be used to build remotely from the command line. Singularity is also capable of running containers based on images pulled from Docker Hub and some other sources. We’ll look at accessing containers from Docker Hub later in the Singularity material.
Singularity Hub
Note that in addition to providing a repository that you can pull images from, Singularity Hub could also build Singularity images for you from a
recipe- a configuration file defining the steps to build an image. We’ll look at recipes and building images later.Remote Builder
To build images it requires registration on Sylabs Cloud website.
Let’s begin by creating a test directory, changing into it and pulling a test Hello World image from Docker:
$ mkdir test
$ cd test
$ singularity pull hello-world.sif docker://hello-world:latest
INFO:    Converting OCI blobs to SIF format
INFO:    Starting build...
Getting image source signatures
Copying blob 719385e32844 done
Copying config 0dcea989af done
Writing manifest to image destination
Storing signatures
2023/12/11 22:09:54  info unpack layer: sha256:719385e32844401d57ecfd3eacab360bf551a1491c05b85806ed8f1b08d792f6
What just happened?! We pulled a SIF image from Docker using the singularity pull command and directed it to store the image file using the name hello-world.sif. If you run the ls command, you should see that the hello-world.sif file is now in your current directory. This is our image and we can now run a container based on this image:
$ singularity run hello-world.sif
Hello from Docker!
...
The above command ran the hello-world container from the image we downloaded from Docker and the resulting output was shown.
How did the container determine what to do when we ran it?! What did running the container actually do to result in the displayed output?
When you run a container from an image without using any additional command line arguments, the container runs the default run script that is embedded within the image. This is a shell script that can be used to run commands, tools or applications stored within the image on container startup. We can inspect the image’s run script using the singularity inspect command:
$ singularity inspect -r hello-world.sif
#!/bin/sh
OCI_ENTRYPOINT=''
OCI_CMD='"/hello"'
...
This shows us the script within the hello-world.sif image configured to run by default when we use the singularity run command.
That concludes this introductory Singularity episode. The next episode looks in more detail at running containers.
Key Points
Singularity is another container platform and it is often used in cluster/HPC/research environments.
Singularity has a different security model to other container platforms, one of the key reasons that it is well suited to HPC and cluster environments.
Singularity has its own container image format (SIF).
The
singularitycommand can be used to pull images from Singularity Hub and run a container from an image file.
Working with Singularity containers
Overview
Teaching: 25 min
Exercises: 15 minQuestions
How do I run a shell or different commands within a container?
Where does Singularity store images?
Objectives
Learn about Singularity’s image cache.
Understand how to run different commands when starting a container and open an interactive shell within a container environment.
Learn more about how singularity handles users and binds directories from the host filesystem.
Learn how to run Singularity containers based on Docker images.
Singularity’s image cache
While Singularity doesn’t have a local image repository in the same way as Docker, it does cache downloaded image files. As we saw in the previous episode, images are simply .sif files stored on your local disk.
If you delete a local .sif image that you have pulled from a remote image repository and then pull it again, if the image is unchanged from the version you previously pulled, you will be given a copy of the image file from your local cache rather than the image being downloaded again from the remote source. This removes unnecessary network transfers and is particularly useful for large images which may take some time to transfer over the network. To demonstrate this, remove the hello-world.sif file stored in your test directory and then issue the pull command again:
$ rm hello-world.sif
$ singularity pull hello-world.sif docker://hello-world
INFO: Using cached SIF image
As we can see in the above output, the image has been returned from the cache and we don’t see the output that we saw previously showing the image being downloaded from Singularity Hub.
How do we know what is stored in the local cache? We can find out using the singularity cache command:
$ singularity cache list
There are 1 container file(s) using 44.00 KiB and 3 oci blob file(s) using 3.36 KiB of space
Total space used: 47.36 KiB
This tells us how many container files are stored in the cache and how much disk space the cache is using but it doesn’t tell us what is actually being stored. To find out more information we can add the -v verbose flag to the list command:
$ singularity cache list -v
NAME                     DATE CREATED           SIZE             TYPE
0dcea989af054c9b5ab290   2023-12-11 22:16:39    0.57 KiB         blob
719385e32844401d57ecfd   2023-12-11 22:16:39    2.40 KiB         blob
ad7c8b818cf3016b2b6437   2023-12-11 22:16:39    0.39 KiB         blob
e28fc75c4cbf64761ce6dd   2023-12-11 22:16:40    44.00 KiB        oci-tmp

There are 1 container file(s) using 44.00 KiB and 3 oci blob file(s) using 3.36 KiB of space
Total space used: 47.36 KiB
This provides us with some more useful information about the actual images stored in the cache. In the TYPE column we can see that our image type is blob because it’s a docker image that has been pulled from Docker Hub.
Cleaning the Singularity image cache
We can remove images from the cache using the
singularity cache cleancommand. Running the command without any options will display a warning and ask you to confirm that you want to remove everything from your cache.You can also remove specific images or all images of a particular type. Look at the output of
singularity cache clean --helpfor more information.
Working with containers
Running specific commands within a container
We saw earlier that we can use the singularity inspect command to see the run script that a container is configured to run by default. What if we want to run a different command within a container, or we want to open a shell within a container that we can interact with?
If we know the path of an executable that we want to run within a container, we can use the singularity exec command. For example, using the hello-world.sif container that we’ve already pulled from Docker Hub, we can run the following within the test directory where the hello-world.sif file is located:
$ singularity exec hello-world.sif /bin/echo Hello World!
FATAL: stat /bin/echo: no such file or directory
Here we see that a container has been started from the hello-world.sif image and the /bin/echo command was not found. The command provided an error and the container has terminated.
Basic exercise: Running a different command within the “hello-world” container
Can you run a container based on the
hello-world.sifimage that replicates the run command?Solution
$ singularity exec hello-world.sif /helloHello from Docker! ...
Running a shell within a container
If you want to open an interactive shell within a container, Singularity provides the singularity shell command. Let’s download a Ubuntu image from Docker Hub:
$ singularity pull ubuntu.sif docker://ubuntu
Again, using the ubuntu.sif image, and within our test directory, we can run a shell within a container from the hello-world image:
$ singularity shell ubuntu.sif
Apptainer> whoami
[<your username>]
Apptainer> ls
hello-world.sif
ubuntu.sif
Apptainer>
As shown above, we have opened a shell in a new container started from the ubuntu.sif image.
Running a shell inside a Singularity container
Q: What do you notice about the output of the above commands entered within the Singularity container shell?
Q: How would some programs behave? Try
lsb_release -aanduname -a.
Use the exit command to exit from the container shell.
Users, files and directories within a Singularity container
The first thing to note is that when you run whoami within the container you should see the username that you are signed in as on the host system when you run the container. For example, if my username is c.username:
$ singularity shell ubuntu.sif
Singularity> whoami
c.username
But hang on! I downloaded the standard, public version of the ubuntu image from Docker Hub. I haven’t customised it in any way. How is it configured with my own user details?!
If you have any familiarity with Linux system administration, you may be aware that in Linux, users and their Unix groups are configured in the /etc/passwd and /etc/group files respectively. In order for the shell within the container to know of my user, the relevant user information needs to be available within these files within the container.
Assuming this feature is enabled on your system, when the container is started, Singularity appends the relevant user and group lines from the host system to the /etc/passwd and /etc/group files within the container [1].
Singularity also binds some directories from the host system where you are running the singularity command into the container that you’re starting. Note that this bind process isn’t copying files into the running container, it is simply making an existing directory on the host system visible and accessible within the container environment. If you write files to this directory within the running container, when the container shuts down, those changes will persist in the relevant location on the host system.
There is a default configuration of which files and directories are bound into the container but ultimate control of how things are set up on the system where you’re running Singularity is determined by the system administrator. As a result, this section provides an overview but you may find that things are a little different on the system that you’re running on.
One directory that is likely to be accessible within a container that you start is your home directory. The mapping of file content and directories from a host system into a Singularity container is illustrated in the example below showing a subset of the directories on the host Linux system and in a Singularity container:
Host system:                                                      Singularity container:
-------------                                                     ----------------------
/                                                                 /
├── bin                                                           ├── bin
├── etc                                                           ├── etc
│   ├── ...                                                       │   ├── ...
│   ├── group  ─> user's group added to group file in container ─>│   ├── group
│   └── passwd ──> user info added to passwd file in container ──>│   └── passwd
├── home                                                          ├── usr
│   └── c.username ────> home directory made available ──> ─┐     ├── sbin
├── usr                 in container via bind mount         │     ├── home
├── sbin                                                    └────────>└── c.username
└── ...                                                           └── ...
Questions and exercises: Files in Singularity containers
Q1: What do you notice about the ownership of files in a container started from the ubuntu image? (e.g. take a look at the ownership of files in the root directory (
/))Exercise 1: In this container, try overwriting the
/environmentfile. What do you notice?_If you’re not familiar with shell output redirection please ask.
Exercise 2: In your home directory within the container shell, try and create a simple text file. Is it possible to do this? If so, why? If not, why not?! If you can successfully create a file, what happens to it when you exit the shell and the container shuts down?
Answers
A1: Use the
ls -lcommand to see a detailed file listing including file ownership and permission details. You should see that all the files are owned by you. This looks good - you should be ready to edit something in the exercise that follows…A Ex1: Unfortunately, it’s not so easy, depending on how you modified
/environmentyou probably saw an error similar to the following:Can't open file for writingorRead-only file systemA Ex2: Within your home directory, you should be able to successfully create a file. Since you’re seeing your home directory on the host system which has been bound into the container, when you exit and the container shuts down, the file that you created within the container should still be present when you look at your home directory on the host system.
Using Docker images with Singularity
Singularity can use Docker images as seen earlier, opening up access to a huge number of existing container images available on Docker Hub and other registries.
While Singularity doesn’t support running Docker images directly, it can pull them from Docker Hub and convert them into a suitable format for running via Singularity. When you pull a Docker image, Singularity pulls the slices or layers that make up the Docker image and converts them into a single-file Singularity SIF image.
For example, moving on from the simple Hello World examples that we’ve looked at so far, let’s pull one of the official Docker Python images. We’ll use the image with the tag 3.8.2-slim-buster which has Python 3.8.2 installed on Debian’s Buster (v10) Linux distribution:
$ singularity pull python-3.8.2.sif docker://python:3.8.2-slim-buster
INFO:    Converting OCI blobs to SIF format
INFO:    Starting build...
Getting image source signatures
Copying blob 54fec2fa59d0 done
Copying blob cd3f35d84cab done
Copying blob a0afc8e92ef0 done
Copying blob 9691f23efdb7 done
Copying blob 6512e60b314b done
Copying config 1c498e093b done
Writing manifest to image destination
Storing signatures
2020/12/13 23:43:09  info unpack layer: sha256:54fec2fa59d0a0de9cd2dec9850b36c43de451f1fd1c0a5bf8f1cf26a61a5da4
2020/12/13 23:43:10  info unpack layer: sha256:cd3f35d84caba5a287676eeaea3d371e1ed5af8c57c33532228a456e0505b2d5
2020/12/13 23:43:10  info unpack layer: sha256:a0afc8e92ef0f5e56ddda03f8af40a4396226443a446e457ab6ed2dcdec62619
2020/12/13 23:43:11  info unpack layer: sha256:9691f23efdb7fd2829d06ad8fb9c8338487c183bb1aefa0d737cece2a612f51b
2020/12/13 23:43:11  info unpack layer: sha256:6512e60b314b980bce8ece057d15292db0f50ca12dbe6dd5752e1e54c64ccca2
INFO:    Creating SIF file...
Note how we see singularity saying that it’s “Converting OCI blobs to SIF format”. We then see the layers of the Docker image being downloaded and unpacked and written into a single SIF file. Once the process is complete, we should see the python-3.8.2.sif image file in the current directory.
We can now run a container from this image as we would with any other singularity image.
Running the Python 3.8.2 image that we just pulled from Docker Hub
Try running the Python 3.8.2 image. What happens?
Try running some simple Python statements…
Running the Python 3.8.2 image
$ singularity run python-3.8.2.sifThis should put you straight into a Python interactive shell within the running container:
Python 3.8.2 (default, Apr 23 2020, 14:32:57)
[GCC 8.3.0] on linux
Type "help", "copyright", "credits" or "license" for more information.
>>>
Now try running some simple Python statements:
>>> import math
>>> math.pi
3.141592653589793
>>>
In addition to running a container and having it run the default run script, you could also start a container running a shell in case you want to undertake any configuration prior to running Python. This is covered in the following exercise:
Open a shell within a Python container
Try to run a shell within a singularity container based on the
python-3.8.2.sifimage. That is, run a container that opens a shell rather than the default Python interactive console as we saw above. See if you can find more than one way to achieve this.Within the shell, try starting the Python interactive console and running some Python commands.
Solution
Recall from the earlier material that we can use the
singularity shellcommand to open a shell within a container. To open a regular shell within a container based on thepython-3.8.2.sifimage, we can therefore simply run:$ singularity shell python-3.8.2.sifApptainer> echo $SHELL /bin/bash Apptainer> cat /etc/issue Debian GNU/Linux 10 \n \l Apptainer> exit $It is also possible to use the
singularity execcommand to run an executable within a container. We could, therefore, use theexeccommand to run/bin/bash:$ singularity exec python-3.8.2.sif /bin/bashApptainer> echo $SHELL /bin/bashYou can run the Python console from your container shell simply by running the
pythoncommand.
This concludes the second episode and Part I of the Singularity material. Part II contains a further three episodes where we’ll look creating your own images and then more advanced use of containers for running MPI parallel applications and running with Nvidia GPUs.
References
[1] Gregory M. Kurzer, Containers for Science, Reproducibility and Mobility: Singularity P2. Intel HPC Developer Conference, 2017. Available at: https://www.intel.com/content/dam/www/public/us/en/documents/presentation/hpc-containers-singularity-advanced.pdf
Key Points
Singularity caches downloaded images so that an image isn’t downloaded again when it is requested using the
singularity pullcommand.The
singularity execandsingularity shellcommands provide different options for starting containers.Singularity can start a container from a Docker image which can be pulled directly from Docker Hub.
Building Singularity images
Overview
Teaching: 25 min
Exercises: 15 minQuestions
How do I create my own Singularity images?
Objectives
Understand the different Singularity container file formats.
Understand how to build and share your own Singularity containers.
Singularity - Part II
Brief recap
In the two episodes covering Part I of the Singularity material we’ve seen how Singularity can be used on a computing platform where you don’t have any administrative privileges. The software was pre-installed and it was possible to work with existing images such as Singularity image files already stored on the platform or images obtained from a remote image repository such as Docker Hub.
It is clear that with Docker Hub there is a huge array of images available but what if you want to create your own images or customise existing images?
In this first of three episodes in Part II of the Singularity material, we’ll look at building Singularity images.
Preparing to use Singularity for building images
So far you’ve been able to work with Singularity from your own user account as a non-privileged user. This part of the Singularity material requires that you use Singularity in an environment where you have administrative (root) access. While it is possible to build Singularity containers without root access, it is highly recommended that you do this as the root user, as highlighted in this section of the Singularity documentation. Bear in mind that the system that you use to build containers doesn’t have to be the system where you intend to run the containers. If, for example, you are intending to build a container that you can subsequently run on a Linux-based cluster, you could build the container on your own Linux-based desktop or laptop computer. You could then transfer the built image directly to the target platform or upload it to an image repository and pull it onto the target platform from this repository.
There are three different options for accessing a suitable environment to undertake the material in this part of the course:
- Install Singularity locally on a system where you have administrative access
- Use Singularity on a system where it is already pre-installed and you have administrative (root) access
- Use one of the Singularity builders in the cloud such as provided by Sylabs or Gitlab/Github CI/CD pipelines.
We’ll focus on the last option in this part of the course. If you would like to install Singularity directly on your system, see the box below for some further pointers. Note that the installation process is an advanced task that is beyond the scope of this course so we won’t be covering this.
Installing Apptainer on your local system (optional) [Advanced task]
If you are running Linux and would like to install Apptainer locally on your system, Singularity provide the free, open source Apptainer. You will need to install various dependencies on your system and then build Singularity from source code.
If you are not familiar with building applications from source code, and want to investigate Docker further, it is strongly recommended that you use the Docker Singularity image, as described below in the “Getting started with the Docker Singularity image” section rather than attempting to build and install Singularity yourself. The installation process is an advanced task that is beyond the scope of this session.
However, if you have Linux systems knowledge and would like to attempt a local install Apptainer, you can find details in the INSTALL.md file within the Apptainer repository that explains how to install the prerequisites and build and install the software. Apptainer is written in the Go programming language and Go is the main dependency that you’ll need to install on your system. The process of installing Go and any other requirements is detailed in the INSTALL.md file.
Note
If you do not have access to a system with Docker installed, or a Linux system where you can build and install Singularity but you have administrative privileges on another system, you could look at installing a virtualisation tool such as VirtualBox on which you could run a Linux Virtual Machine (VM) image. Within the Linux VM image, you will be able to install Singularity. Again this is beyond the scope of the course.
If you are not able to access/run Singularity yourself on a system where you have administrative privileges, you can still follow through this material as it is being taught (or read through it in your own time if you’re not participating in a taught version of the course) since it will be helpful to have an understanding of how Singularity images can be built.
You could also attempt to follow this section of the lesson without using root and instead using the
singularitycommand’s--fakerootoption. However, you may encounter issues with permissions when trying to build images and run your containers and this is why running the commands as root is strongly recommended and is the approach described in this lesson.
Getting started with Sylabs Builder service
Sylabs provide a cloud based image builder service at Sylabs Builder. This requires registration and the installation of an access token as described in the Singularity documentation.
After generating the access token this is copied and pasted into Singularity configuration on a system. For example:
$ singularity remote login
An access token is already set for this remote. Replace it? [N/y]y
Generate an access token at https://cloud.sylabs.io/auth/tokens, and paste it here.
Token entered will be hidden for security.
Access Token:
INFO:    Access Token Verified!
INFO:    Token stored in /home/c.username/.singularity/remote.yaml
After successfully adding the token you are ready to use the remote builder.
Alternately getting started with the Docker Singularity image
The Singularity Docker image is available from Quay.io.
Familiarise yourself with the Docker Singularity image
Using your previously acquired Docker knowledge, get the Singularity image for
v3.7.0and ensure that you can run a Docker container using this image.Create a directory (e.g.
$HOME/singularity_data) on your host machine that you can use for storage of definition files (we’ll introduce these shortly) and generated image files.This directory should be bind mounted into the Docker container at the location
/home/singularityevery time you run it - this will give you a location in which to store built images so that they are available on the host system once the container exits. (take a look at the-vswitch)Hint: To be able to build an image using the Docker Singularity container, you’ll need to add the
--privilegedswitch to your docker command line.Questions:
- What is happening when you run the container?
- Can you run an interactive shell in the container?
Running the image
Having a bound directory from the host system accessible within your running Singularity container will give you somewhere to place created images so that they are accessible on the host system after the container exits. Begin by changing into the directory that you created above for storing your definiton files and built images (e.g.
$HOME/singularity_data).You may choose to:
- open a shell within the Docker image so you can work at a command prompt and run the
singularitycommand directly- use the
docker runcommand to run a new container instance every time you want to run thesingularitycommand.Either option is fine for this section of the material.
Some examples:
To run the
singularitycommand within the docker container directly from the host system’s terminal:docker run --privileged --rm -v ${PWD}:/home/singularity quay.io/singularity/singularity:v3.7.0 cache listTo start a shell within the Singularity Docker container where the
singularitycommand can be run directly:docker run -it --entrypoint=/bin/bash --privileged --rm -v ${PWD}:/home/singularity quay.io/singularity/singularity:v3.7.0To make things easier to read in the remainder of the material, command examples will use the
singularitycommand directly, e.g.singularity cache list. If you’re running a shell in the Docker container, you can enter the commands as they appear. If you’re using the container’s default run behaviour and running a container instance for each run of the command, you’ll need to replacesingularitywithdocker run --privileged -v ${PWD}:/home/singularity quay.io/singularity/singularity:v3.7.0or similar.
Building Singularity images
Introduction
As a platform that is widely used in the scientific/research software and HPC communities, Singularity provides great support for reproducibility. If you build a Singularity container for some scientific software, it’s likely that you and/or others will want to be able to reproduce exactly the same environment again. Maybe you want to verify the results of the code or provide a means that others can use to verify the results to support a paper or report. Maybe you’re making a tool available to others and want to ensure that they have exactly the right version/configuration of the code.
Similarly to Docker and many other modern software tools, Singularity follows the “Configuration as code” approach and a container configuration can be stored in a file which can then be committed to your version control system alongside other code. Assuming it is suitably configured, this file can then be used by you or other individuals (or by automated build tools) to reproduce a container with the same configuration at some point in the future.
Different approaches to building images
There are various approaches to building Singularity images. We highlight two different approaches here and focus on one of them:
- Building within a sandbox: You can build a container interactively within a sandbox environment. This means you get a shell within the container environment and install and configure packages and code as you wish before exiting the sandbox and converting it into a container image.
- Building from a Apptainer Definition File: This is Singularity’s equivalent to building a Docker container from a
Dockerfileand we’ll discuss this approach in this section.
You can take a look at Apptainer’s “Build a Container” documentation for more details on different approaches to building containers.
Why look at Singularity Definition Files?
Why do you think we might be looking at the definition file approach here rather than the sandbox approach?
Discussion
The sandbox approach is great for prototyping and testing out an image configuration but it doesn’t provide the best support for our ultimate goal of reproducibility. If you spend time sitting at your terminal in front of a shell typing different commands to add configuration, maybe you realise you made a mistake so you undo one piece of configuration and change it. This goes on until you have your completed configuration but there’s no explicit record of exactly what you did to create that configuration.
Say your container image file gets deleted by accident, or someone else wants to create an equivalent image to test something. How will they do this and know for sure that they have the same configuration that you had? With a definition file, the configuration steps are explicitly defined and can be easily stored (and re-run).
Definition files are small text files while container files may be very large, multi-gigabyte files that are difficult and time consuming to move around. This makes definition files ideal for storing in a version control system along with their revisions.
Creating a Singularity Definition File
A Singularity Definition File is a text file that contains a series of statements that are used to create a container image. In line with the configuration as code approach mentioned above, the definition file can be stored in your code repository alongside your application code and used to create a reproducible image. This means that for a given commit in your repository, the version of the definition file present at that commit can be used to reproduce a container with a known state. It was pointed out earlier in the course, when covering Docker, that this property also applies for Dockerfiles.
We’ll now look at a very simple example of a definition file:
Bootstrap: docker
From: ubuntu:20.04

%post
    apt-get -y update && apt-get install -y python

%runscript
    python -c 'print("Hello World! Hello from our custom Singularity image!")'
A definition file has a number of optional sections, specified using the % prefix, that are used to define or undertake different configuration during different stages of the image build process. You can find full details in Singularity’s Definition Files documentation. In our very simple example here, we only use the %post and %runscript sections.
Let’s step through this definition file and look at the lines in more detail:
Bootstrap: docker
From: ubuntu:20.04
These first two lines define where to bootstrap our image from. Why can’t we just put some application binaries into a blank image? Any applications or tools that we want to run will need to interact with standard system libraries and potentially a wide range of other libraries and tools. These need to be available within the image and we therefore need some sort of operating system as the basis for our image. The most straightforward way to achieve this is to start from an existing base image containing an operating system. In this case, we’re going to start from a minimal Ubuntu 20.04 Linux Docker image. Note that we’re using a Docker image as the basis for creating a Singularity image. This demonstrates the flexibility in being able to start from different types of images when creating a new Singularity image.
The Bootstrap: docker line is similar to prefixing an image path with docker:// when using, for example, the singularity pull command. A range of different bootstrap options are supported. From: ubuntu:20.04 says that we want to use the ubuntu image with the tag 20.04.
Next we have the %post section of the definition file:
%post
    apt-get -y update && apt-get install -y python3
In this section of the file we can do tasks such as package installation, pulling data files from remote locations and undertaking local configuration within the image. The commands that appear in this section are standard shell commands and they are run within the context of our new container image. So, in the case of this example, these commands are being run within the context of a minimal Ubuntu 20.04 image that initially has only a very small set of core packages installed.
Here we use Ubuntu’s package manager to update our package indexes and then install the python3 package along with any required dependencies. The -y switches are used to accept, by default, interactive prompts that might appear asking you to confirm package updates or installation. This is required because our definition file should be able to run in an unattended, non-interactive environment.
Finally we have the %runscript section:
%runscript
    python3 -c 'print("Hello World! Hello from our custom Singularity image!")'
This section is used to define a script that should be run when a container is started based on this image using the singularity run command. In this simple example we use python3 to print out some text to the console.
We can now save the contents of the simple defintion file shown above to a file and build an image based on it. In the case of this example, the definition file has been named my_test_image.def. Assuming you have successfully added an access token.
$ singularity build --remote my_test_image.sif my_test_image.def
The above command requests the building of an image based on the my_test_image.def file with the resulting image saved to the my_test_image.sif file. Note that you will need to prefix the command with sudo if you’re running a locally installed version of Singularity and not running via another method such as the remote builder used above because it is necessary to have administrative privileges to build the image. You should see output similar to the following:
INFO:    Starting build...
Getting image source signatures
Copying blob d51af753c3d3 skipped: already exists
Copying blob fc878cd0a91c skipped: already exists
Copying blob 6154df8ff988 skipped: already exists
Copying blob fee5db0ff82f skipped: already exists
Copying config 95c3f3755f done
Writing manifest to image destination
Storing signatures
2020/04/29 13:36:35  info unpack layer: sha256:d51af753c3d3a984351448ec0f85ddafc580680fd6dfce9f4b09fdb367ee1e3e
2020/04/29 13:36:36  info unpack layer: sha256:fc878cd0a91c7bece56f668b2c79a19d94dd5471dae41fe5a7e14b4ae65251f6
2020/04/29 13:36:36  info unpack layer: sha256:6154df8ff9882934dc5bf265b8b85a3aeadba06387447ffa440f7af7f32b0e1d
2020/04/29 13:36:36  info unpack layer: sha256:fee5db0ff82f7aa5ace63497df4802bbadf8f2779ed3e1858605b791dc449425
INFO:    Running post scriptlet
+ apt-get -y update
Get:1 http://archive.ubuntu.com/ubuntu focal InRelease [265 kB]
...
  [Package update output truncated]
...
Fetched 13.4 MB in 2s (5575 kB/s)
Reading package lists... Done
+ apt-get install -y python3
Reading package lists... Done
...
  [Package install output truncated]
...Processing triggers for libc-bin (2.31-0ubuntu9) ...
INFO:    Adding runscript
INFO:    Creating SIF file...
INFO:    Build complete: /tmp/image-000097878
WARNING: Skipping container verifying
 54.82 MiB / 54.82 MiB  100.00% 43.30 MiB/s 1sm01s
INFO:    Build complete: my_test_image.sif
You should now have a my_test_image.sif file in the current directory. Note that in the above output, where it says INFO: Starting build... there is a series of skipped: already exists messages for the Copying blob lines. This is because the Docker image slices for the Ubuntu 20.04 image have previously been downloaded and are cached on the system where this example is being run. On your system, if the image is not already cached, you will see the slices being downloaded from Docker Hub when these lines of output appear.
Permissions of the created image file when using sudo
You may find that the created Singularity image file on your host filesystem is owned by the
rootuser and not your user. In this case, you won’t be able to change the ownership/permissions of the file directly if you don’t have root access.However, the image file will be readable by you and you should be able to take a copy of the file under a new name which you will then own. You will then be able to modify the permissions of this copy of the image and delete the original root-owned file since the default permissions should allow this.
Now move your created .sif image file to a platform with an installation of Singularity. You could, for example, do this using the command line secure copy command scp.
Possible platform configuration for running Singularity containers
On some platforms (but not Hawk), it may be necesary to setup a shared temporary storage space for Singularity to use because it is not possible for it to use the standard
/tmpdirectory.First create a directory to be used for temporary storage. It is recommended that you create a directory named
$USER-singularity. We then need to set Singularity’s temporary directory environment variable to point to this location. Run the following commands:mkdir /lustre/home/shared/$USER-singularity export TMPDIR=/lustre/home/shared/$USER-singularity export SINGULARITY_TMPDIR=$TMPDIRWhen running Singularity containers, you’ll need to set
SINGULARITY_TMPDIRin each shell session that you open. However, you could add these commands to your~/.bashrcor~/.bash_profileso that the values are set by default in each shell that you open.
It is recommended that you move the create .sif file to a platform with an installation of Singularity, rather than attempting to run the image using the Docker container. However, if you do try to use the Docker container, see the notes below on “Using singularity run from within the Docker container” for further information.
Now that we’ve built an image, we can attempt to run it:
$ singularity run my_test_image.sif
If everything worked successfully, you should see the message printed by Python:
Hello World! Hello from our custom Singularity image!
Using
singularity runfrom within a Docker containerIt is strongly recommended that you don’t use a Docker container for running Singularity images, only for creating then, since the Singularity command runs within the container as the root user.
However, for the purposes of this simple example, if you are trying to run the container using the
singularitycommand from within the Docker container, it is likely that you will get an error relating to/etc/localtimesimilar to the following:WARNING: skipping mount of /etc/localtime: no such file or directory FATAL: container creation failed: mount /etc/localtime->/etc/localtime error: while mounting /etc/localtime: mount source /etc/localtime doesn't existThis occurs because the
/etc/localtimefile that provides timezone configuration is not present within the Docker container. If you want to use the Docker container to test that your newly created image runs, you’ll need to open a shell in the Docker container and add a timezone configuration as described in the Alpine Linux documentation:$ apk add tzdata $ cp /usr/share/zoneinfo/Europe/London /etc/localtimeThe
singularity runcommand should now work successfully.
Using Gitlab to build and store containers
It is possible to use Gitlab to build and store containers. For example Cardiff University Gitlab. To build we need to add a Gitlab-CI pipeline within a Gitlab project directory .gitlabci create a script build.sh to run that will install Singularity and create package e.g.
#!/bin/bash

yum install -y epel-release
yum install -y apptainer-suid git python3-pip

echo "Python Version:"
python3 --version

recipe=Singularity
imagefile="${recipe}.sif"
echo "Creating $imagefile using $recipe..."
singularity build $imagefile $recipe

echo "About to upload to $CI_REGISTRY"
echo "$CI_REGISTRY_PASSWORD" | singularity remote login -u $CI_REGISTRY_USER --password-stdin oras://$CI_REGISTRY
singularity push $imagefile oras://$CI_REGISTRY/arcca/containers/${recipe}:latest
The in the root directory of the project repository create Singularity defintition file e.g.
Bootstrap: docker
From: ubuntu:16.04

# Test
%runscript
    exec echo "Polo $@!"
And a .gitlab-ci.yml file
image:
  name: rockylinux:8
  entrypoint: ["/bin/sh", "-c"]

build:
  script:
     - /bin/bash .gitlabci/build.sh

      # step 1. build the container!
      # You can add any other sregistry push commands here, and specify a client
      # (and make sure your define the encrypted environment credentials in gitlab
      # to push to your storage locations of choice

      # - mkdir -p build && cp *.sif build
      # - mkdir -p build && cp Singularity* build

      # Step 2. Take a look at "artifacts" below and add the paths you want added
      # You can also add the entire build folder. You can also upload to storage
      # clients defined by sregistry, here are some examples
      # https://singularityhub.github.io/sregistry-cli/clients
      # Environment variables must be defined in CI encrypted secrets/settings
      # https://code.stanford.edu/help/ci/variables/README#variables).
      #- /bin/bash build.sh --uri collection/container --cli google-storage Singularity
      #- /bin/bash build.sh --uri collection/container --cli google-drive Singularity
      #- /bin/bash build.sh --uri collection/container --cli globus Singularity
      #- /bin/bash build.sh --uri collection/container --cli registry Singularity

  # This is where you can save job artifacts
  # https://docs.gitlab.com/ee/user/project/pipelines/job_artifacts.html
  # You can specify the path to containers or the build folder to save.
  # Don't forget to save your recipes too!
  #artifacts:
  #    paths:
  #      - build/Singularity.sif
  #      - build/Singularity
Then on change to Singularity file it should rebuild the container and upload to the Gitlab container registry for your project.
More advanced definition files
Here we’ve looked at a very simple example of how to create an image. At this stage, you might want to have a go at creating your own definition file for some code of your own or an application that you work with regularly. There are several definition file sections that were not used in the above example, these are:
%setup%files%environment%startscript%test%labels%help
The Sections part of the definition file documentation details all the sections and provides an example definition file that makes use of all the sections.
Additional Singularity features
Singularity has a wide range of features. You can find full details in the Singularity User Guide and we highlight a couple of key features here that may be of use/interest:
Signing containers: If you do want to share container image (.sif) files directly with colleagues or collaborators, how can the people you send an image to be sure that they have received the file without it being tampered with or suffering from corruption during transfer/storage? And how can you be sure that the same goes for any container image file you receive from others? Singularity supports signing containers. This allows a digital signature to be linked to an image file. This signature can be used to verify that an image file has been signed by the holder of a specific key and that the file is unchanged from when it was signed. You can find full details of how to use this functionality in the Singularity documentation on Signing and Verifying Containers.
How Singularity Hub used to work
A collection of Singularity definition files were built up on the Supercomputing Wales Github account
This repository was configured to use a web hook to automatically build updates to the repository on the Singularity Hub.
Once built it can then be pulled from Singularity Hub using
$ singularity pull shub://SupercomputingWales/singularity_hub:hello-world
This pull was performed earlier in the very first examples. It is worth noting limits that are imposed on users to keep
the usage to a manageable amount. The resource to build the images is currently provided by Google free of charge but
abuse of the system could change that.
Key Points
Singularity definition files are used to define the build process and configuration for an image.
Singularity’s Docker container provides a way to build images on a platform where Singularity is not installed but Docker is available.
Existing images from remote registries such as Docker Hub can be used as a base for creating new Singularity images.
Running MPI parallel jobs using Singularity containers
Overview
Teaching: 30 min
Exercises: 20 minQuestions
How do I set up and run an MPI job from a Singularity container?
Objectives
Learn how MPI applications within Singularity containers can be run on HPC platforms
Understand the challenges and related performance implications when running MPI jobs via Singularity
Running MPI parallel codes with Singularity containers
MPI overview
MPI - Message Passing Interface - is a widely used standard for parallel programming. It is used for exchanging messages/data between processes in a parallel application. If you’ve been involved in developing or working with computational science software, you may already be familiar with MPI and running MPI applications.
When working with an MPI code on a large-scale cluster, a common approach is to compile the code yourself, within your own user directory on the cluster platform, building against the supported MPI implementation on the cluster. Alternatively, if the code is widely used on the cluster, the platform administrators may build and package the application as a module so that it is easily accessible by all users of the cluster.
An important aspect of MPI is the support for PMI - Parallel Process-Management Interface which allows MPI programs to be run with many different process managers that actually run the MPI code. This reduces the overhard of having to match MPI libraries at runtime with what the code was built with at buildtime.
MPI codes with Singularity containers
We’ve already seen that building Singularity containers can be impractical without root access. Since we’re highly unlikely to have root access on a large institutional, regional or national cluster, building a container directly on the target platform is not normally an option.
If our target platform uses OpenMPI, one of the two widely used source MPI implementations, we can build/install a compatible OpenMPI version on our local build platform, or directly within the image as part of the image build process. We can then build our code that requires MPI, either interactively in an image sandbox or via a definition file.
If the target platform uses a version of MPI based on MPICH, the other widely used open source MPI implementation, there is ABI compatibility between MPICH and several other MPI implementations. In this case, you can build MPICH and your code on a local platform, within an image sandbox or as part of the image build process via a definition file, and you should be able to successfully run containers based on this image on your target cluster platform.
As described in Singularity’s MPI documentation, support for both OpenMPI and MPICH is provided. Instructions are given for building the relevant MPI version from source via a definition file and we’ll see this used in an example below.
While building a container on a local system that is intended for use on a remote HPC platform does provide some level of portability, if you’re after the best possible performance, it can present some issues. The version of MPI in the container will need to be built and configured to support the hardware on your target platform if the best possible performance is to be achieved. Where a platform has specialist hardware with proprietary drivers, building on a different platform with different hardware present means that building with the right driver support for optimal performance is not likely to be possible. This is especially true if the version of MPI available is different (but compatible). Singularity’s MPI documentation highlights two different models for working with MPI codes. The hybrid model that we’ll be looking at here involves using the MPI executable from the MPI installation on the host system to launch singularity and run the application within the container. The application in the container is linked against and uses the MPI installation within the container which, in turn, communicates with the MPI daemon process running on the host system.
In this section we will be using the srun command as an alternate launcher to take advantage of PMI.
Building and running a Singularity image for an MPI code
Building and testing an image
This example makes the assumption that you’ll be building a container image on a local platform and then deploying it to a cluster with a different but compatible MPI implementation (using PMI). See Singularity and MPI applications in the Singularity documentation for further information on how this works.
We’ll build an image from a definition file. Containers based on this image will be able to run MPI benchmarks using the OSU Micro-Benchmarks software.
In this example, the target platform is a remote HPC cluster that uses Intel MPI and Slurm. The container can be built via methods used in the previous episode of the Singularity material.
Begin by creating a directory, within that directory save the following definition file content to a .def file, e.g. osu_benchmarks.def:
Bootstrap: docker
From: ubuntu:20.04

%environment
    export SINGULARITY_MPICH_DIR=/usr

%post
    apt-get -y update && DEBIAN_FRONTEND=noninteractive apt-get -y install build-essential libfabric-dev libibverbs-dev gfortran wget autoconf
    cd /root
    wget http://www.mpich.org/static/downloads/3.3.2/mpich-3.3.2.tar.gz
    tar zxvf mpich-3.3.2.tar.gz && cd mpich-3.3.2
    echo "Configuring and building MPICH..."
    ./configure --prefix=/usr --with-device=ch3:nemesis:ofi && make -j2 && make install
    cd /root
    wget https://mvapich.cse.ohio-state.edu/download/mvapich/osu-micro-benchmarks-5.7.tar.gz
    tar zxvf osu-micro-benchmarks-5.7.tar.gz
    cd osu-micro-benchmarks-5.7/
    echo "Configuring and building OSU Micro-Benchmarks..."
    autoreconf -vif
    ./configure --prefix=/usr/local/osu CC=/usr/bin/mpicc CXX=/usr/bin/mpicxx
    make -j2 && make install

%runscript
    echo "Rank ${PMI_RANK} - About to run: /usr/local/osu/libexec/osu-micro-benchmarks/mpi/$*"
    exec /usr/local/osu/libexec/osu-micro-benchmarks/mpi/$*
A quick overview of what the above definition file is doing:
- The image is being bootstrapped from the
ubuntu:20.04Docker image. - In the
%environmentsection: Set an environment variable that will be available within all containers run from the generated image. - In the
%postsection:- Ubuntu’s
apt-getpackage manager is used to update the package directory and then install the compilers and other libraries required for the MPICH build. - The MPICH .tar.gz file is downloaded, extracted and the configure, build and install steps are run. Note the use of the
--with-deviceoption to configure MPICH to use the correct driver to support improved communication performance on a high performance cluster. - The OSU Micro-Benchmarks tar.gz file is downloaded, extracted and the configure, build and install steps are run to build the benchmark code from source.
- Ubuntu’s
- In the
%runscriptsection: A runscript is set up that will echo the rank number of the current process and then run the command provided as a command line argument.
Note that base path of the the executable to run is hardcoded in the run script so the command line parameter to provide when running a container based on this image is relative to this base path, for example, startup/osu_hello, collective/osu_allgather, pt2pt/osu_latency, one-sided/osu_put_latency.
Build and test the OSU Micro-Benchmarks image
Using the above definition file, build a Singularity image named
osu_benchmarks.sif.Once you have built the image, use it to run the
osu_hellobenchmark that is found in thestartupbenchmark folder.Solution
You should be able to build an image from the definition file as follows:
$ singularity build --remote osu_benchmarks.sif osu_benchmarks.defIf instead, you’re running the Singularity Docker container directly from the command line to undertake your build, you’ll need to provide the full path to the
.deffile at which it appears within the container - for example, if you’ve bind mounted the directory containing the file to/home/singularitywithin the container, the full path to the.deffile will be/home/singularity/osu_benchmarks.def._Assuming the image builds successfully, you can then try running the container locally and also transfer the SIF file to a cluster platform that you have access to (that has Singularity installed) and run it there.
Let’s begin with a single-process run of
osu_helloon the system to ensure that we can run the container as expected:$ srun -n 1 -p c_compute_mdi1 --reservation=training -A scw1148 --pty bash $ srun singularity run osu_benchmarks.sif startup/osu_helloYou should see output similar to the following:
Rank  - About to run: /usr/local/osu/libexec/osu-micro-benchmarks/mpi/startup/osu_hello
# OSU MPI Hello World Test v5.7
This is a test with 1 processes
If run outside of a cluster, note that no rank number is shown since we didn’t run the container via mpirun and so the
${PMI_RANK}environment variable that we’d normally have set in an MPICH run process is not set.
Running Singularity containers via MPI
Assuming the above tests worked, we can now try undertaking a parallel run of one of the OSU benchmarking tools within our container image.
This is where things get interesting and we’ll begin by looking at how Singularity containers are run within an MPI environment.
If you’re familiar with running MPI codes, you’ll know that you use mpirun, mpiexec or a similar MPI executable to start your application. This executable may be run directly on the local system or cluster platform that you’re using, or you may need to run it through a job script submitted to a job scheduler. Your MPI-based application code, which will be linked against the MPI libraries, will make MPI API calls into these MPI libraries which in turn talk to the MPI daemon process running on the host system. This daemon process handles the communication between MPI processes, including talking to the daemons on other nodes to exchange information between processes running on different machines, as necessary.
When running code within a Singularity container, we don’t use the MPI executables stored within the container (i.e. we DO NOT run singularity exec mpirun -np <numprocs> /path/to/my/executable). Instead we use the MPI installation on the host system or the process manager in a scheduler such as Slurm that supports PMI, to run Singularity and start an instance of our executable from within a container for each MPI process. Without Singularity support in an MPI implementation, this results in starting a separate Singularity container instance within each process. This can present some overhead if a large number of processes are being run on a host. Where Singularity support is built into an MPI implementation this can address this potential issue and reduce the overhead of running code from within a container as part of an MPI job.
Ultimately, this means that our running MPI code is linking to the MPI libraries from the MPI install within our container and these are, in turn, communicating with the MPI daemon on the host system which is part of the host system’s MPI installation. These two installations of MPI may be different but as long as there is ABI compatibility between the version of MPI installed in your container image and the version on the host system, your job should run successfully. If running with srun this is solved by PMI support in-built into the scheduler.
We can now try running a 2-process MPI run of a point to point benchmark osu_latency. If your local system has both MPI and Singularity installed and has multiple cores, you can run this test on that system. Alternatively you can run on a cluster. Note that you may need to submit this command via a job submission script submitted to a job scheduler if you’re running on a cluster (and use the scheduler’s PMI support). If you’re attending a taught version of this course, some information will be provided below in relation to the cluster that you’ve been provided with access to.
Undertake a parallel run of the
osu_latencybenchmark (general example)Move the
osu_benchmarks.sifSingularity image onto the cluster (or other suitable) platform where you’re going to undertake your benchmark run.You should be able to run the benchmark using a command similar to the one shown below. However, if you are running on a cluster, you may need to write and submit a job submission script at this point to initiate running of the benchmark.
$ srun singularity run osu_benchmarks.sif pt2pt/osu_latencyExpected output and discussion
As you can see in the mpirun command shown above, we have called
mpirunon the host system and are passing to MPI thesingularityexecutable for which the parameters are the image file and any parameters we want to pass to the image’s run script, in this case the path/name of the benchmark executable to run.The following shows an example of the output you should expect to see. You should have latency values shown for message sizes up to 4MB.
Rank 1 - About to run: /.../mpi/pt2pt/osu_latency
Rank 0 - About to run: /.../mpi/pt2pt/osu_latency
# OSU MPI Latency Test v5.7
# Size          Latency (us)
0                       0.38
1                       0.34
...
Undertake a parallel run of the
osu_latencybenchmark (taught course cluster example)This version of the exercise for undertaking a parallel run of the osu_latency benchmark with your Singularity container that contains an MPI build is specific to this run of the course.
The information provided here is specifically tailored to the HPC platform that you’ve been given access to for this taught version of the course.
Move the
osu_benchmarks.sifSingularity image onto the cluster where you’re going to undertake your benchmark run. You should usescpor a similar utility to copy the file.The platform you’ve been provided with access to uses
Slurmschedule jobs to run on the platform. You now need to create aSlurmjob submission script to run the benchmark.Download this template script and edit it to suit your configuration.
Submit the modified job submission script to the
Slurmscheduler using thesbatchcommand.$ sbatch osu_latency.slurmExpected output and discussion
As you will have seen in the commands using the provided template job submission script, we have called
mpirunon the host system and are passing to MPI thesingularityexecutable for which the parameters are the image file and any parameters we want to pass to the image’s run script. In this case, the parameters are the path/name of the benchmark executable to run.The following shows an example of the output you should expect to see. You should have latency values shown for message sizes up to 4MB.
INFO:    Convert SIF file to sandbox...
INFO:    Convert SIF file to sandbox...
Rank 1 - About to run: /.../mpi/pt2pt/osu_latency
Rank 0 - About to run: /.../mpi/pt2pt/osu_latency
# OSU MPI Latency Test v5.7
# Size          Latency (us)
0                       1.49
1                       1.50
2                       1.50
...
4194304               915.44
INFO:    Cleaning up image...
INFO:    Cleaning up image...
This has demonstrated that we can successfully run a parallel MPI executable from within a Singularity container. However, in this case, the two processes will almost certainly have run on the same physical node so this is not testing the performance of the interconnects between nodes.
You could now try running a larger-scale test. You can also try running a benchmark that uses multiple processes, for example try collective/osu_gather.
Investigate performance when using a container image built on a local system and run on a cluster
To get an idea of any difference in performance between the code within your Singularity image and the same code built natively on the target HPC platform, try building the OSU benchmarks from source, locally on the cluster. Then try running the same benchmark(s) that you ran via the singularity container. Have a look at the outputs you get when running
collective/osu_gatheror one of the other collective benchmarks to get an idea of whether there is a performance difference and how significant it is.Try running with enough processes that the processes are spread across different physical nodes so that you’re making use of the cluster’s network interconnects.
What do you see?
Discussion
You may find that performance is significantly better with the version of the code built directly on the HPC platform. Alternatively, performance may be similar between the two versions.
How big is the performance difference between the two builds of the code?
What might account for any difference in performance between the two builds of the code?
If performance is an issue for you with codes that you’d like to run via Singularity, you are advised to take a look at using the bind model for building/running MPI applications through Singularity.
Key Points
Singularity images containing MPI applications can be built on one platform and then run on another (e.g. an HPC cluster) if the two platforms have compatible MPI implementations.
When running an MPI application within a Singularity container, use the MPI executable on the host system to launch a Singularity container for each process.
Think about parallel application performance requirements and how where you build/run your image may affect that.
Running Singularity containers with GPUs
Overview
Teaching: 30 min
Exercises: 20 minQuestions
How do I set up and run with GPUs from a Singularity container?
Objectives
Learn how GPU applications within Singularity containers can be run on HPC platforms
Running Singularity containers with GPUs
GPU overview
GPUs are dedicated pieces of hardware that can perform certain jobs very quickly. On our supercomputer we have a number of GPU nodes that are based on Nvidia Tesla P100 and V100 technology. To access these cards there is a kernel driver to interface with the hardware and libraries that communicate between application and kernel.
Singularity support of GPUs includes Nvidia and AMD.
GPU codes with Singularity containers
We’ve already seen that building Singularity containers can be impractical without root access. Since we’re highly unlikely to have root access on a large institutional, regional or national cluster, building a container directly on the target platform is not normally an option.
Singularity attempts to make available in the container all the files and devices required for GPU support. However, when building the image we can use some knowledge and install, for example, Nvidia CUDA libraries if we know it will support the system we are targetting. Anaconda for example installs CUDA runtime package for code that uses it.
Building and running a Singularity image with GPU support
Let us try running Pytorch with GPU support inside an Anaconda environment. The key option to supply singularity is
the --nv argument to bring into the container all the required files to access the GPU. For example
$ singularity run --nv my_image.sif
Building and testing an image
Lets create a directory and within the directory create a .def file with the following contents.
Bootstrap:docker
From:continuumio/miniconda3:4.9.2

%labels
MAINTAINER Thomas Green

%environment

%runscript
. /etc/profile
conda activate pytorch
exec python3

%post
# Create some common mountpoints for systems without overlayfs
mkdir /scratch
mkdir /apps

. /etc/profile
conda create --name pytorch
conda activate pytorch
conda install pytorch torchvision torchaudio cudatoolkit=10.2 -c pytorch
A quick overview of what the above definition file is doing:
- The image is being bootstrapped from the
minicondaDocker image. - In the
%postsection:- Create some local bind locations. Backwards support for systems not supporting overlayFS.
- Source the
/etc/profileto bring in the environment. - Run the
condacommands.
- In the
%runscriptsection: A runscript is set up to run Python.
Build and test the Pytorch image
Using the above definition file, build a Singularity image named
pytorch.sif.Once you have built the image, use it to run python and try using Pytorch and run example code
Solution
You should be able to build an image from the definition file as follows:
$ singularity build --remote pytorch.sif pytorch.defIf successfully built we can try running the container.
$ singularity run --nv pytorch.sif
This has demonstrated that we can successfully run GPU code from within a Singularity container.
Singularity wrap-up
This concludes the 5 episodes of the course covering Singularity. We hope you found this information useful and that it has inspired you to use Singularity to help enhance the way you build/work with research software.
As a new set of material, we appreciate that there are likely to be improvements that can be made to enhance the quality of this material. We welcome your thoughts, suggestions and feedback on improvements that could be made to help others making use of these lessons.
Key Points
Singularity images require special access to GPUs due to dependency on libraries on the host operating system.
Understand the dependency between host operating system files and GPU runtime libraries in the container.
Bootstrapping your use of Containers
Overview
Teaching: 5 min
Exercises: 60 minQuestions
How can I get started using containers in my research?
Where can I get help to start using containers?
Objectives
Get help to get your work up and running using containers
Understand where you can get help from in the future
Now you hopefully know enough about containers to start to explore how to use them in your work and to understand what the potential benefits are to you. You may also have ideas around where the barriers and difficulties may lie and have further questions on how you can start using and/or trying containers in your research.
This session is designed to give you the opportunity to explore these questions and issues. The instructors and helpers on the course will be on hand to answer your questions and discuss next steps with you.
Potential discussions
Things you could discuss with the instructors and helpers could include:
- Your research workflow and where containers could help
- How to get access to facilities that support Singularity containers for your work
- How to get help and support to use containers for your work. For example, software development, further training, access to local expertise
Options for this session
There are a number of different options for practical work during this session. These include: exploring your own workflow with containers with support from instructors and helpers or discussing topics with the instructors/helpers (as described above). The idea of the session is to help you bootstrap your use of containers and what this means will differ from individual to individual!
Exploring your work using HPC
If you have a practical example of something from your area of work that you would like help with getting up and running using containers, this is great! Please feel free to discuss this with us and ask questions (both technical and non-technical).
Getting further help
Beyond the obvious documentation and tutorials that are available on the web, you may want access to support to help you use containers in your research. This is where Research Software Engineers (RSEs) come in. RSEs are people who have the technical experience to help researchers use a variety of tools and technologies in their research in a sustainable and reproducible way. Many different countries and institutions now have RSE organisations and groups that researchers can contact for help and support. A good place to start is the website of the Society of Research Software Engineering which has links to international RSE organisations and local UK RSE groups.
Key Points
Understand the next steps for you in using containers.
Understand how you can access help and support to use containers.