Code migration to HPC systems
Overview
Teaching: 40 min
Exercises: 0 minQuestions
I would like to try Hawk, can I keep working with Jupyter Notebooks? (yes, but …)
How to access Jupyter Notebooks on Hawk?
How to transition from interactive Jupyter Notebooks to automated Python scripts?
Objectives
Learn how to set up your work environment (transfer files, install libraries).
Understand the differences and trade-offs between Jupyter Notebooks and Python scripts.
Running Jupyter Notebooks on a remote HPC systems
Although the most traditional way to interact with remote HPC and cloud systems
is through the command line (via the ssh and scp commands) some systems also
offer graphical user interfaces for some services. Specifically, on Hawk you can
deploy
Jupyter Notebooks via OnDemand (a web portal that
allow you to work with HPC systems interactively). The notes below provide
instructions for both methods of access: through OnDemand and through a ssh
tunnel.
To access a Jupyter Notebook server via an ssh tunnel you need first to
login to Hawk:
$ ssh hawk-username@hawklogin.cf.ac.uk
Once logged in, confirm that Python 3 is accessible:
  $ module load compiler/gnu/9
  $ module load python/3.7.0
  $ python3 --version
Python 3.7.0
We need to install Jupyter Notebooks on our user account on the remote server (we will discuss more about installing Python packages later on):
  $ python3 -m venv create my_venv
  $ . my_venv/bin/activate
  $ python3 -m pip install jupyterlab
The installation process will try to download several dependencies from the internet. Be patient, it shouldn’t take more than a couple of minutes.
Now, this is important, the Jupyter Notebook server must be run on a compute node, please take a look at our best practices guidelines in the SCW portal. If the concept of login and compute nodes is still not clear at this point don’t worry too much (but you can find out more in out Supercomputing for Beginners training course. For now, run the following command to instruct the Hawk job scheduler to run a Jupyter Notebook server on a compute node:
$ srun -n 1 -p htc --account=scwXXXX -t 1:00:00 jupyter-lab --ip=0.0.0.0
  http://ccs1015:8888/?token=77777add13ab93a0c408c287a630249c2dba93efdd3fae06
  or http://127.0.0.1:8888/?token=77777add13ab93a0c408c287a630249c2dba93efdd3fae06
Next, open a new terminal and create a ssh tunnel using the node and port obtained in the previous step (e.g. ccs1015:8888):
$ ssh -L8888:ccs1015:8888 hawk-username@hawklogin.cf.ac.uk
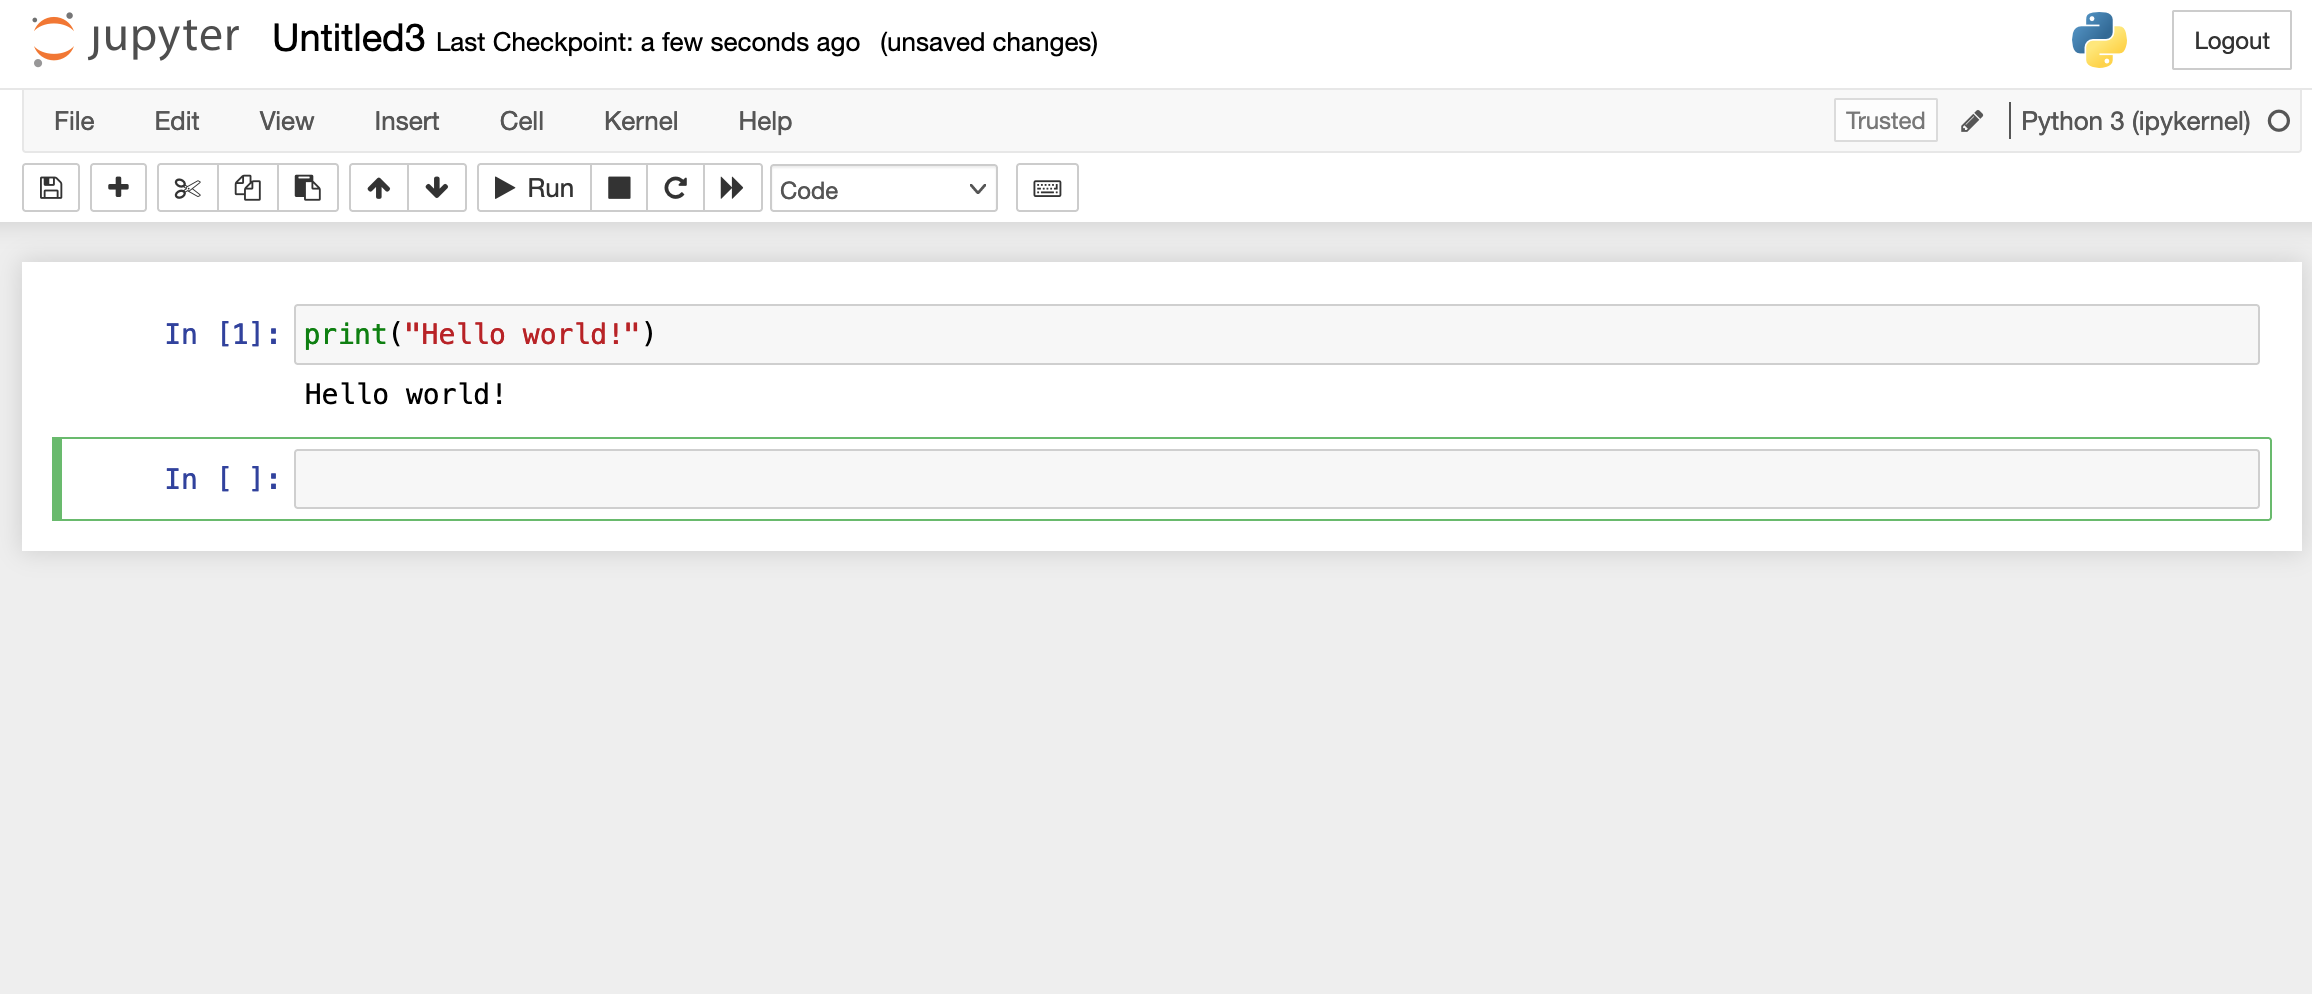
You should be able to navigate to http://localhost:8888 in your web browser (use the token provided in the output if needed). If everything went well, you should see something like:
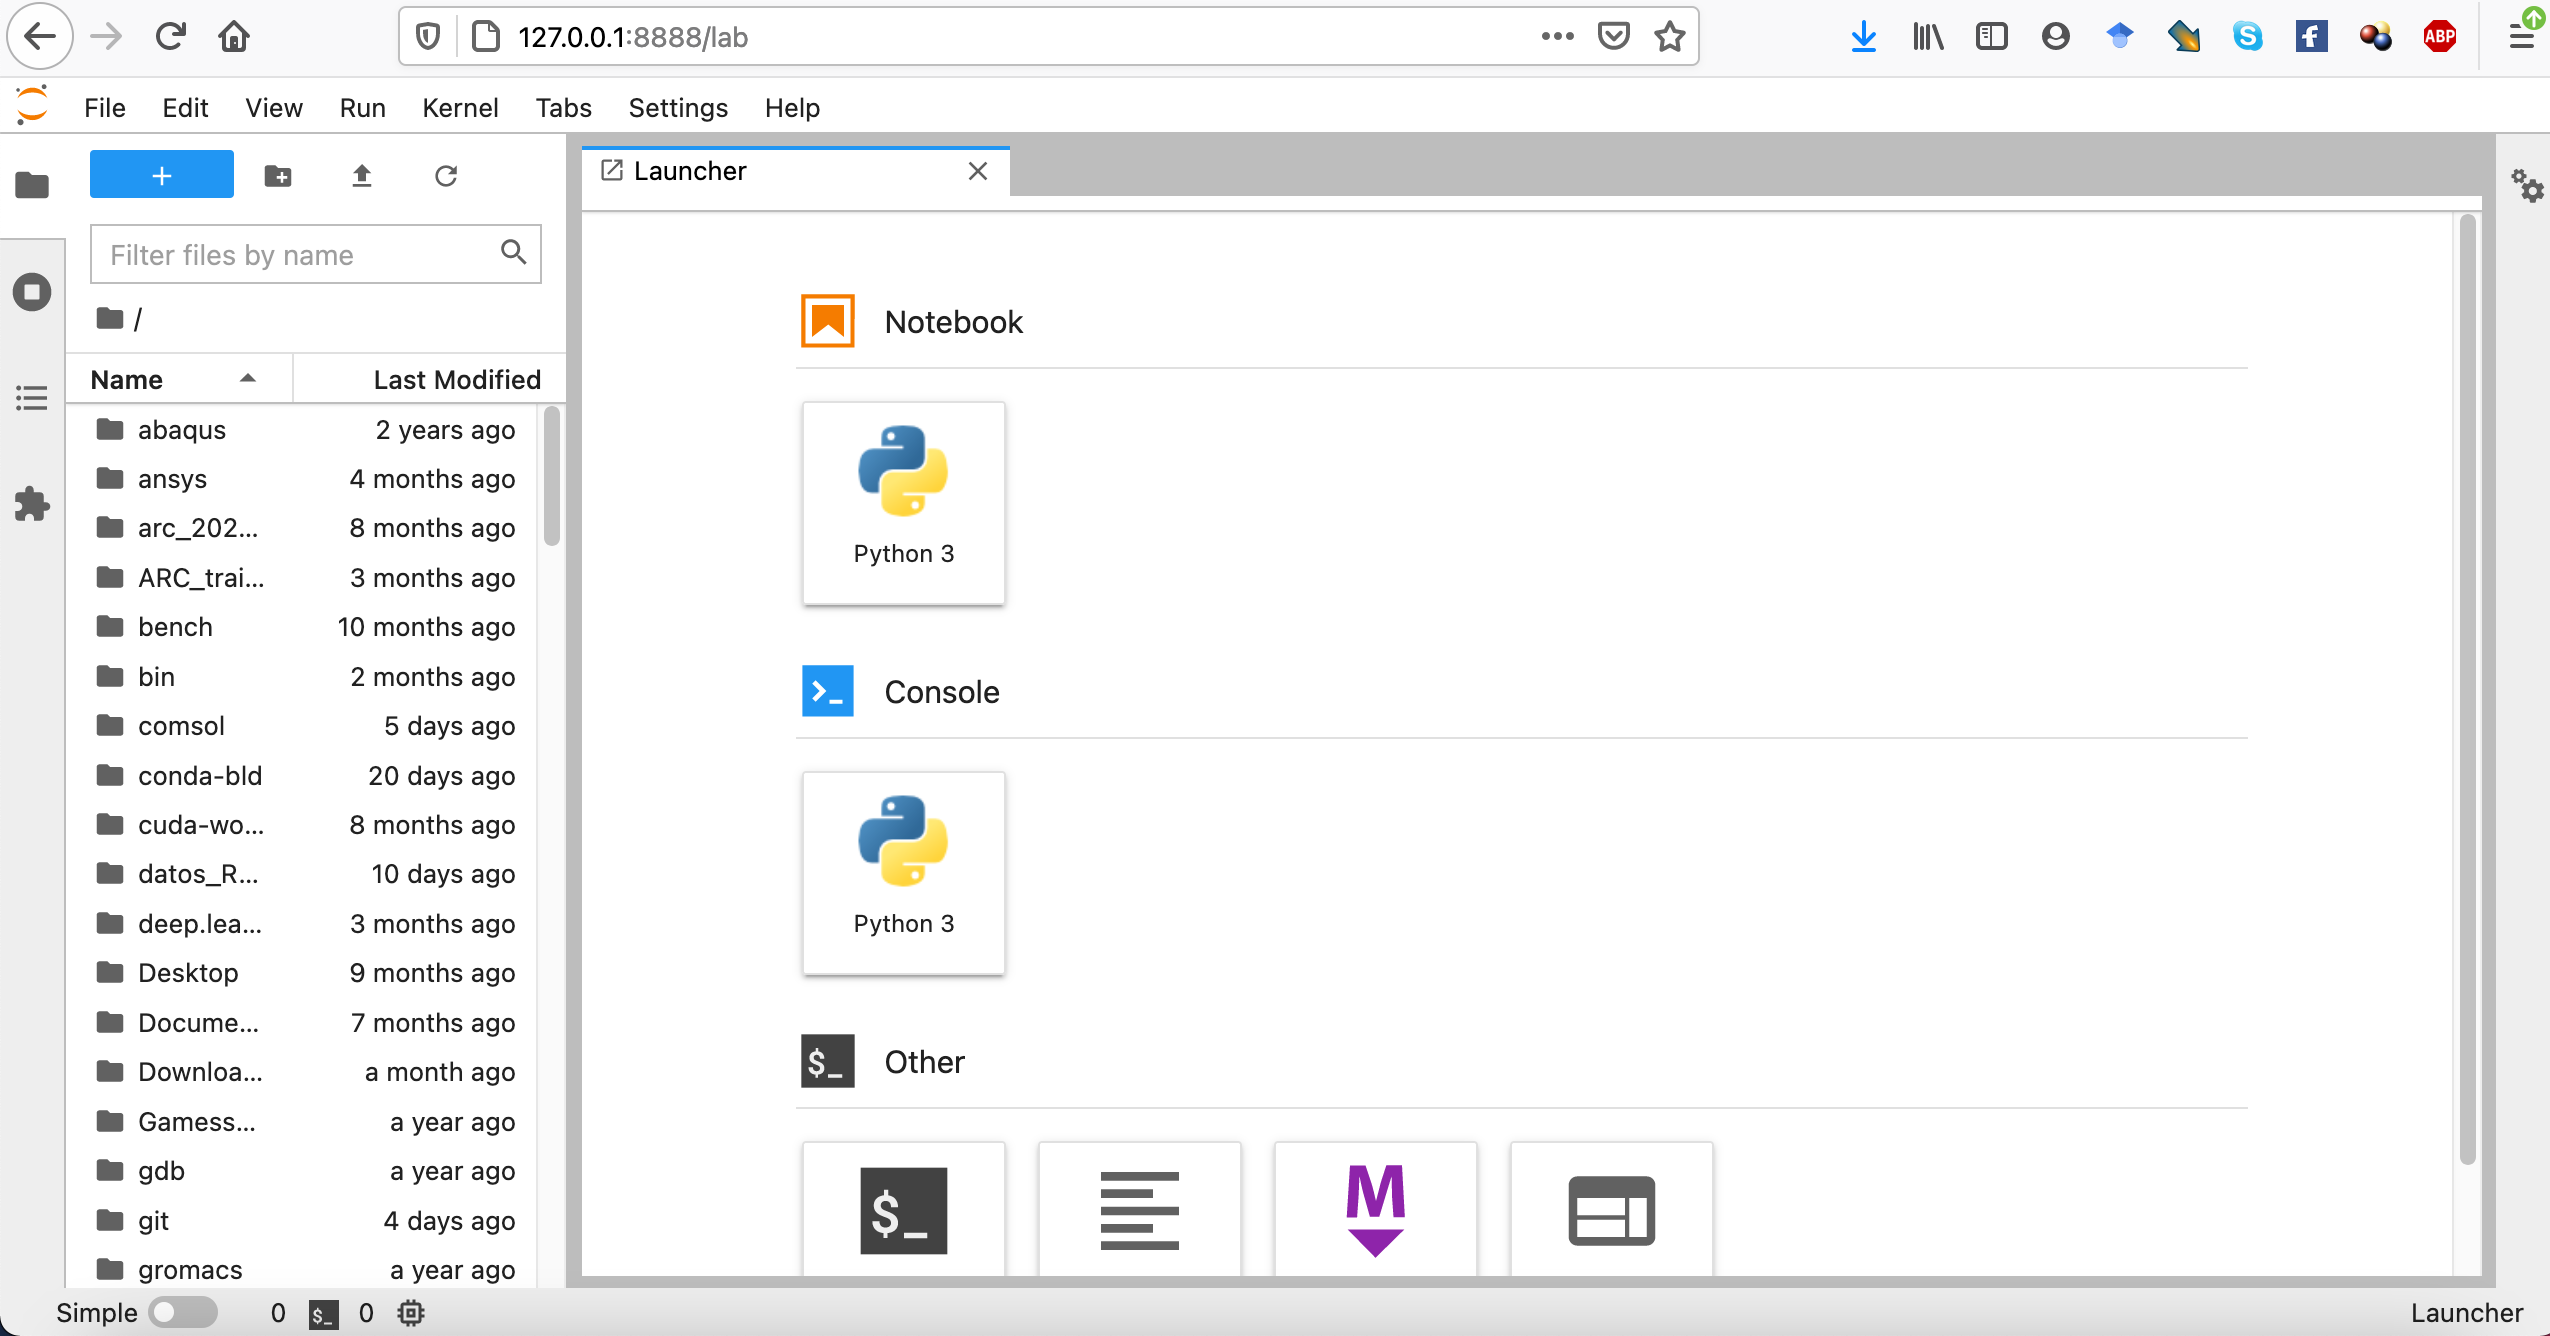
Where you should be able to access the files stored your Hawk user account.
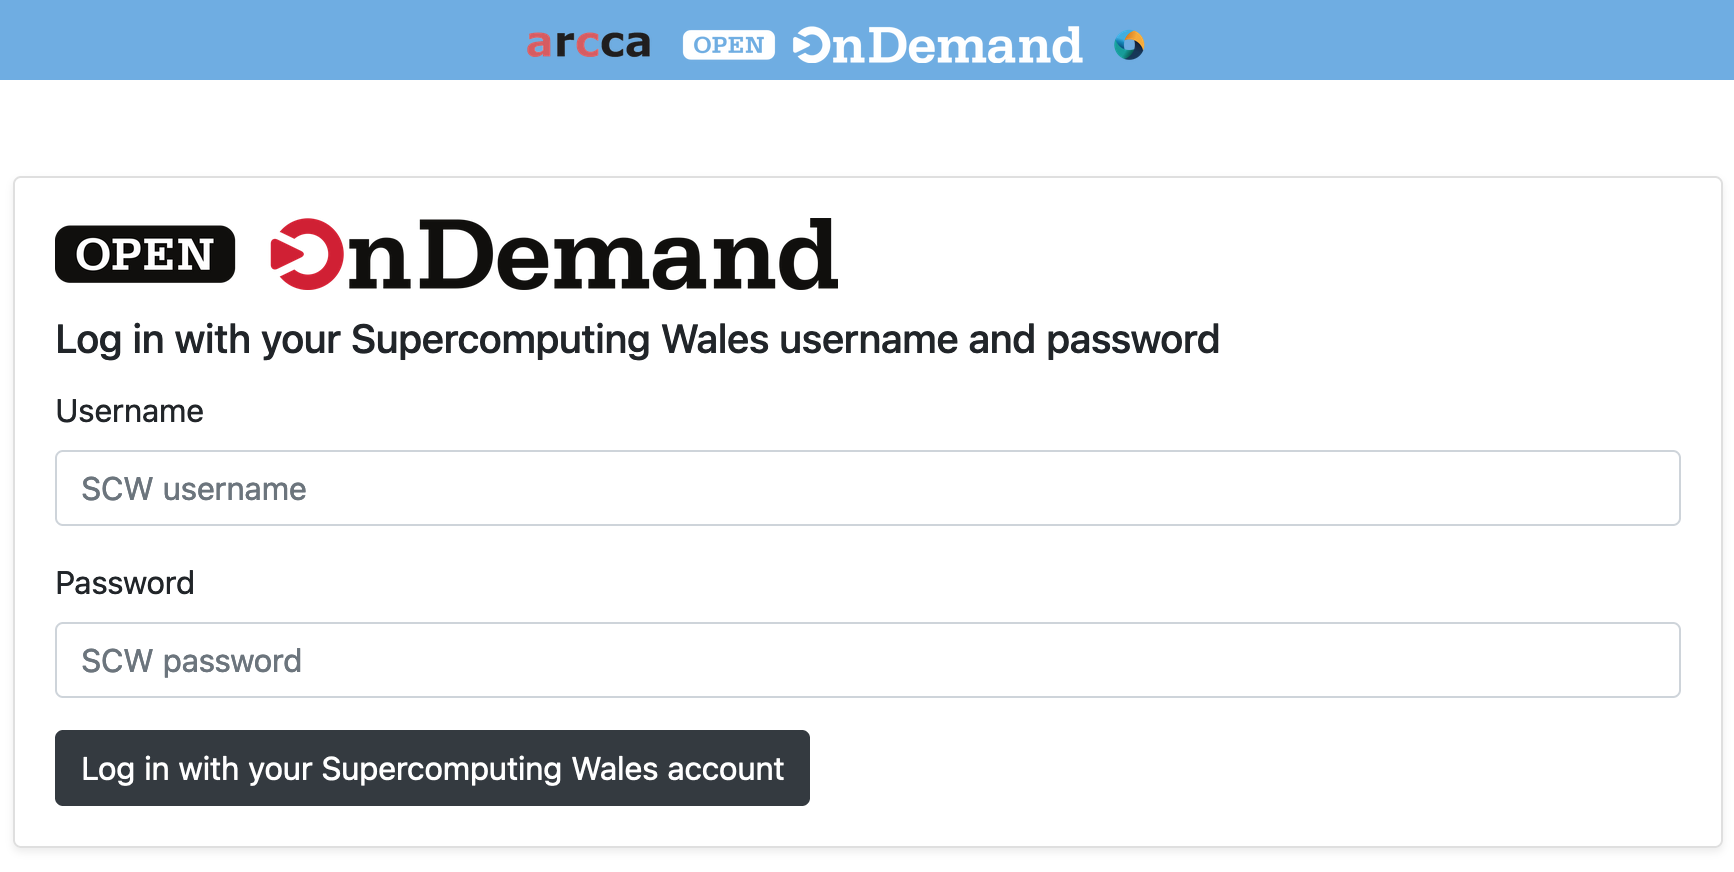
- Go to ARCCA OnDemand portal (this requires access to Cardiff University VPN ).
-
Enter your details: Hawk username and password. Once logged in you should land on a page with useful information including the usual Message of the Day (MOD) commonly seen when logging in to Hawk via the terminal.
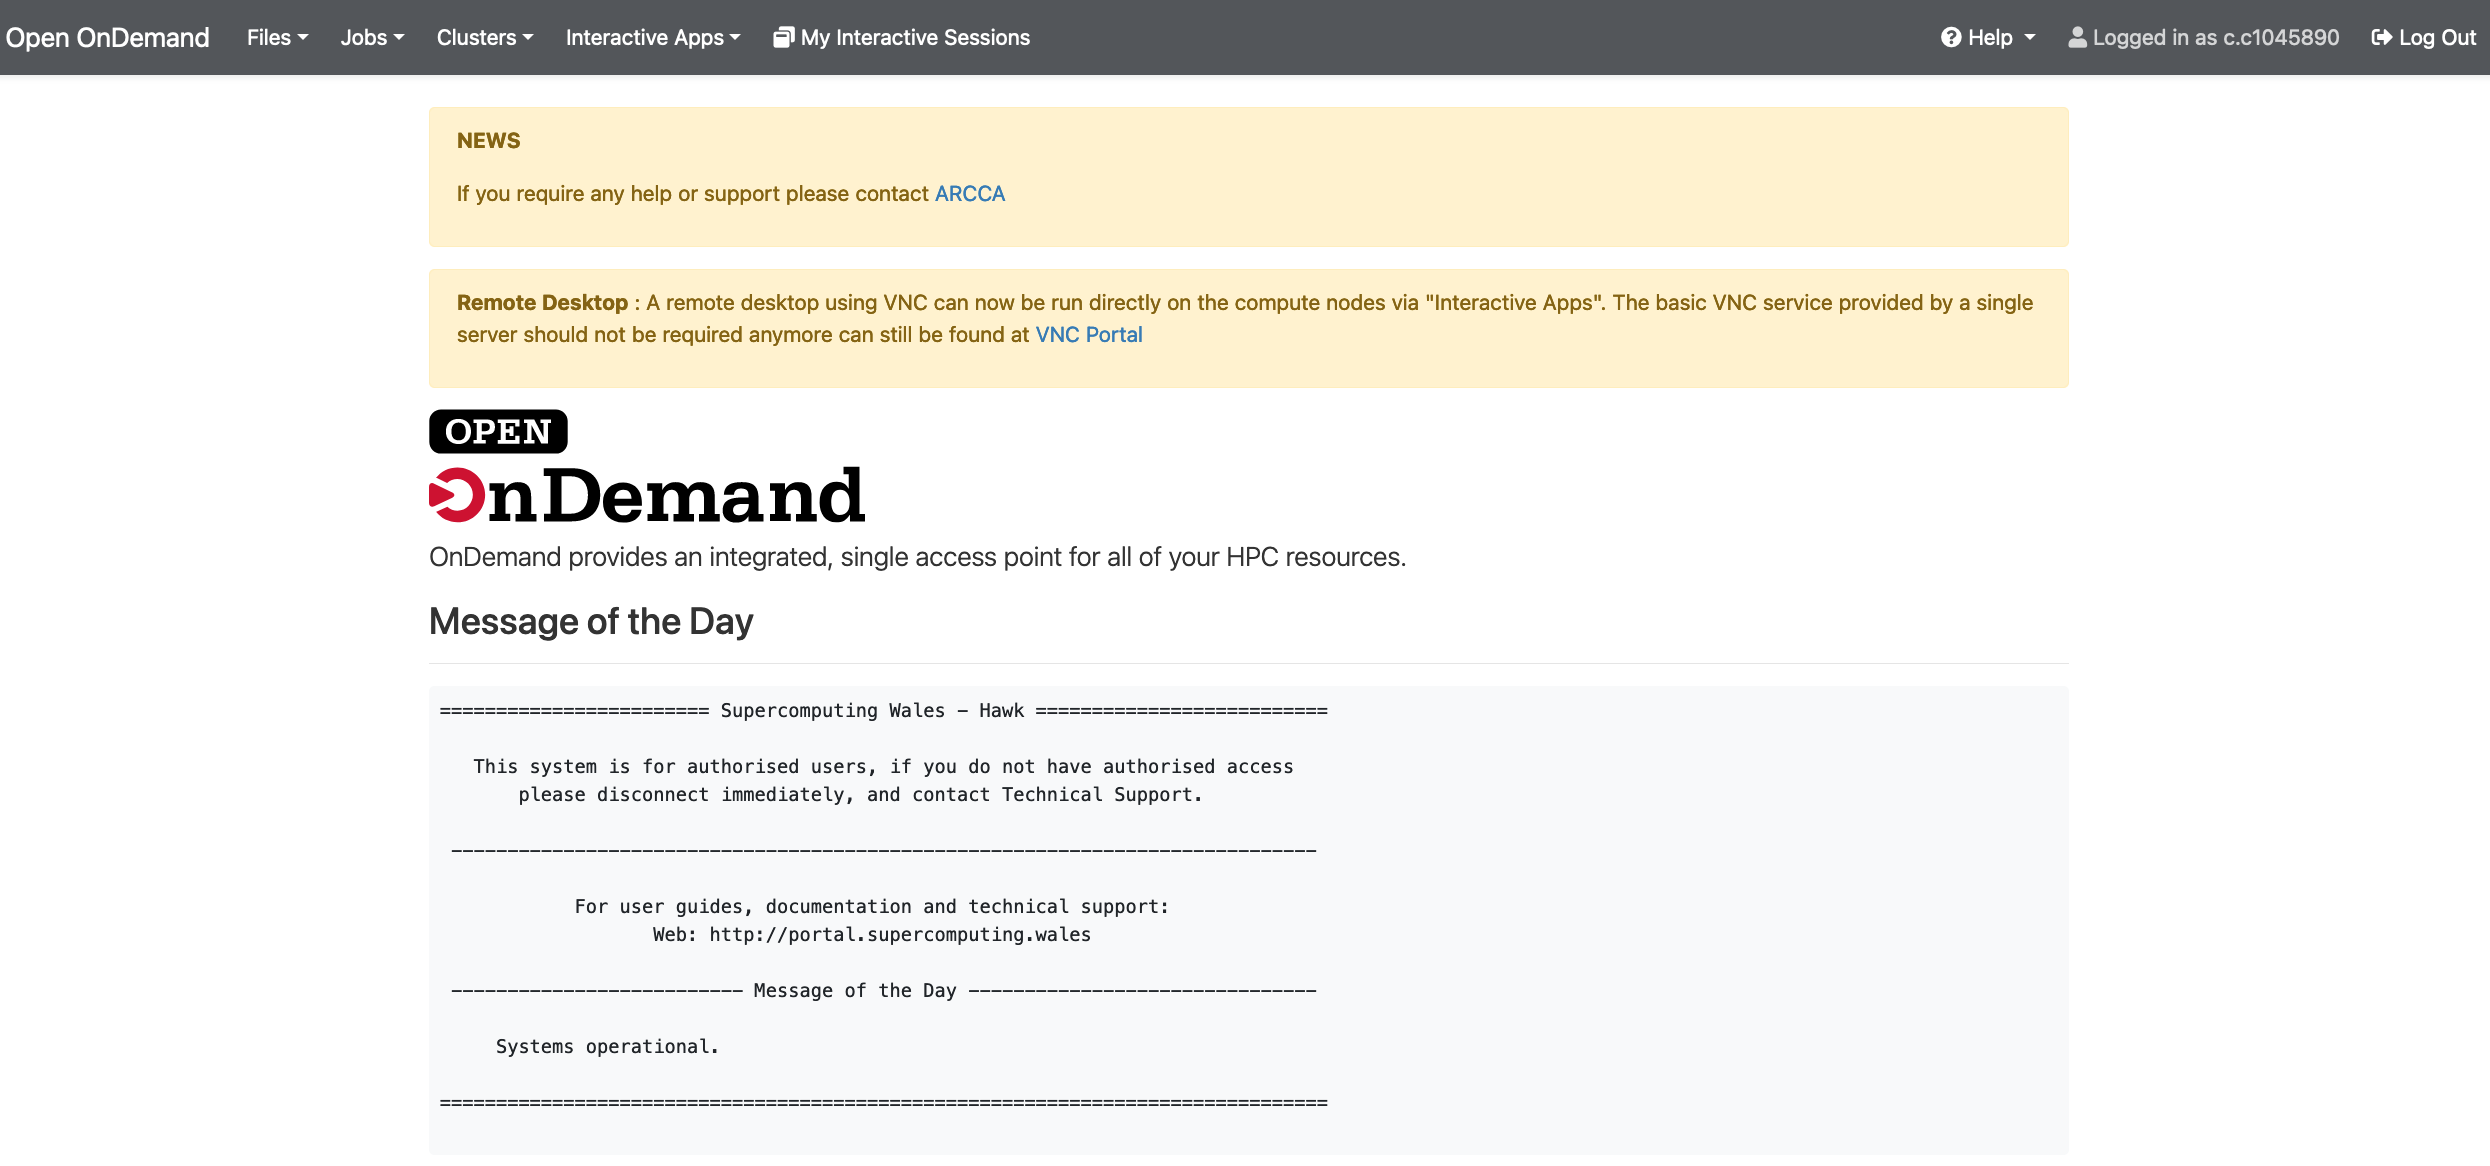
-
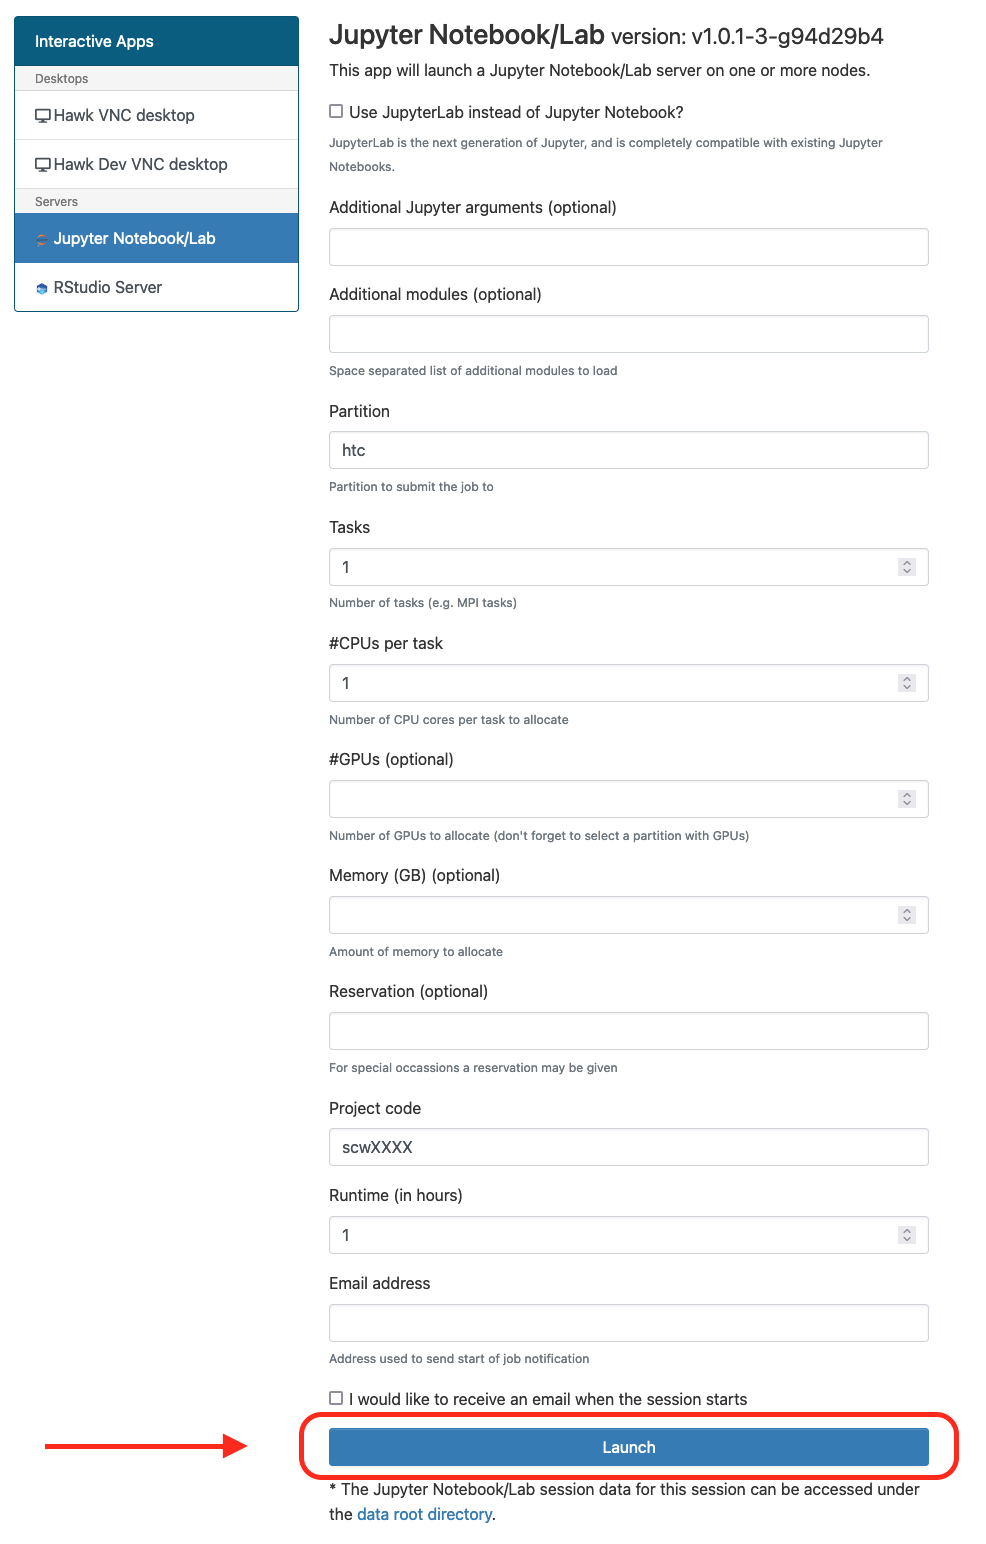
Go to “Interactive Apps” in the top menu and select “Jupyter Notebook/Lab”. This will bring you to a form where you can specify for how much time the desktop is required, number of CPUs, partition, etc. You can also choose to receive an email once the desktop is ready for you. Click the Launch button to submit the request.
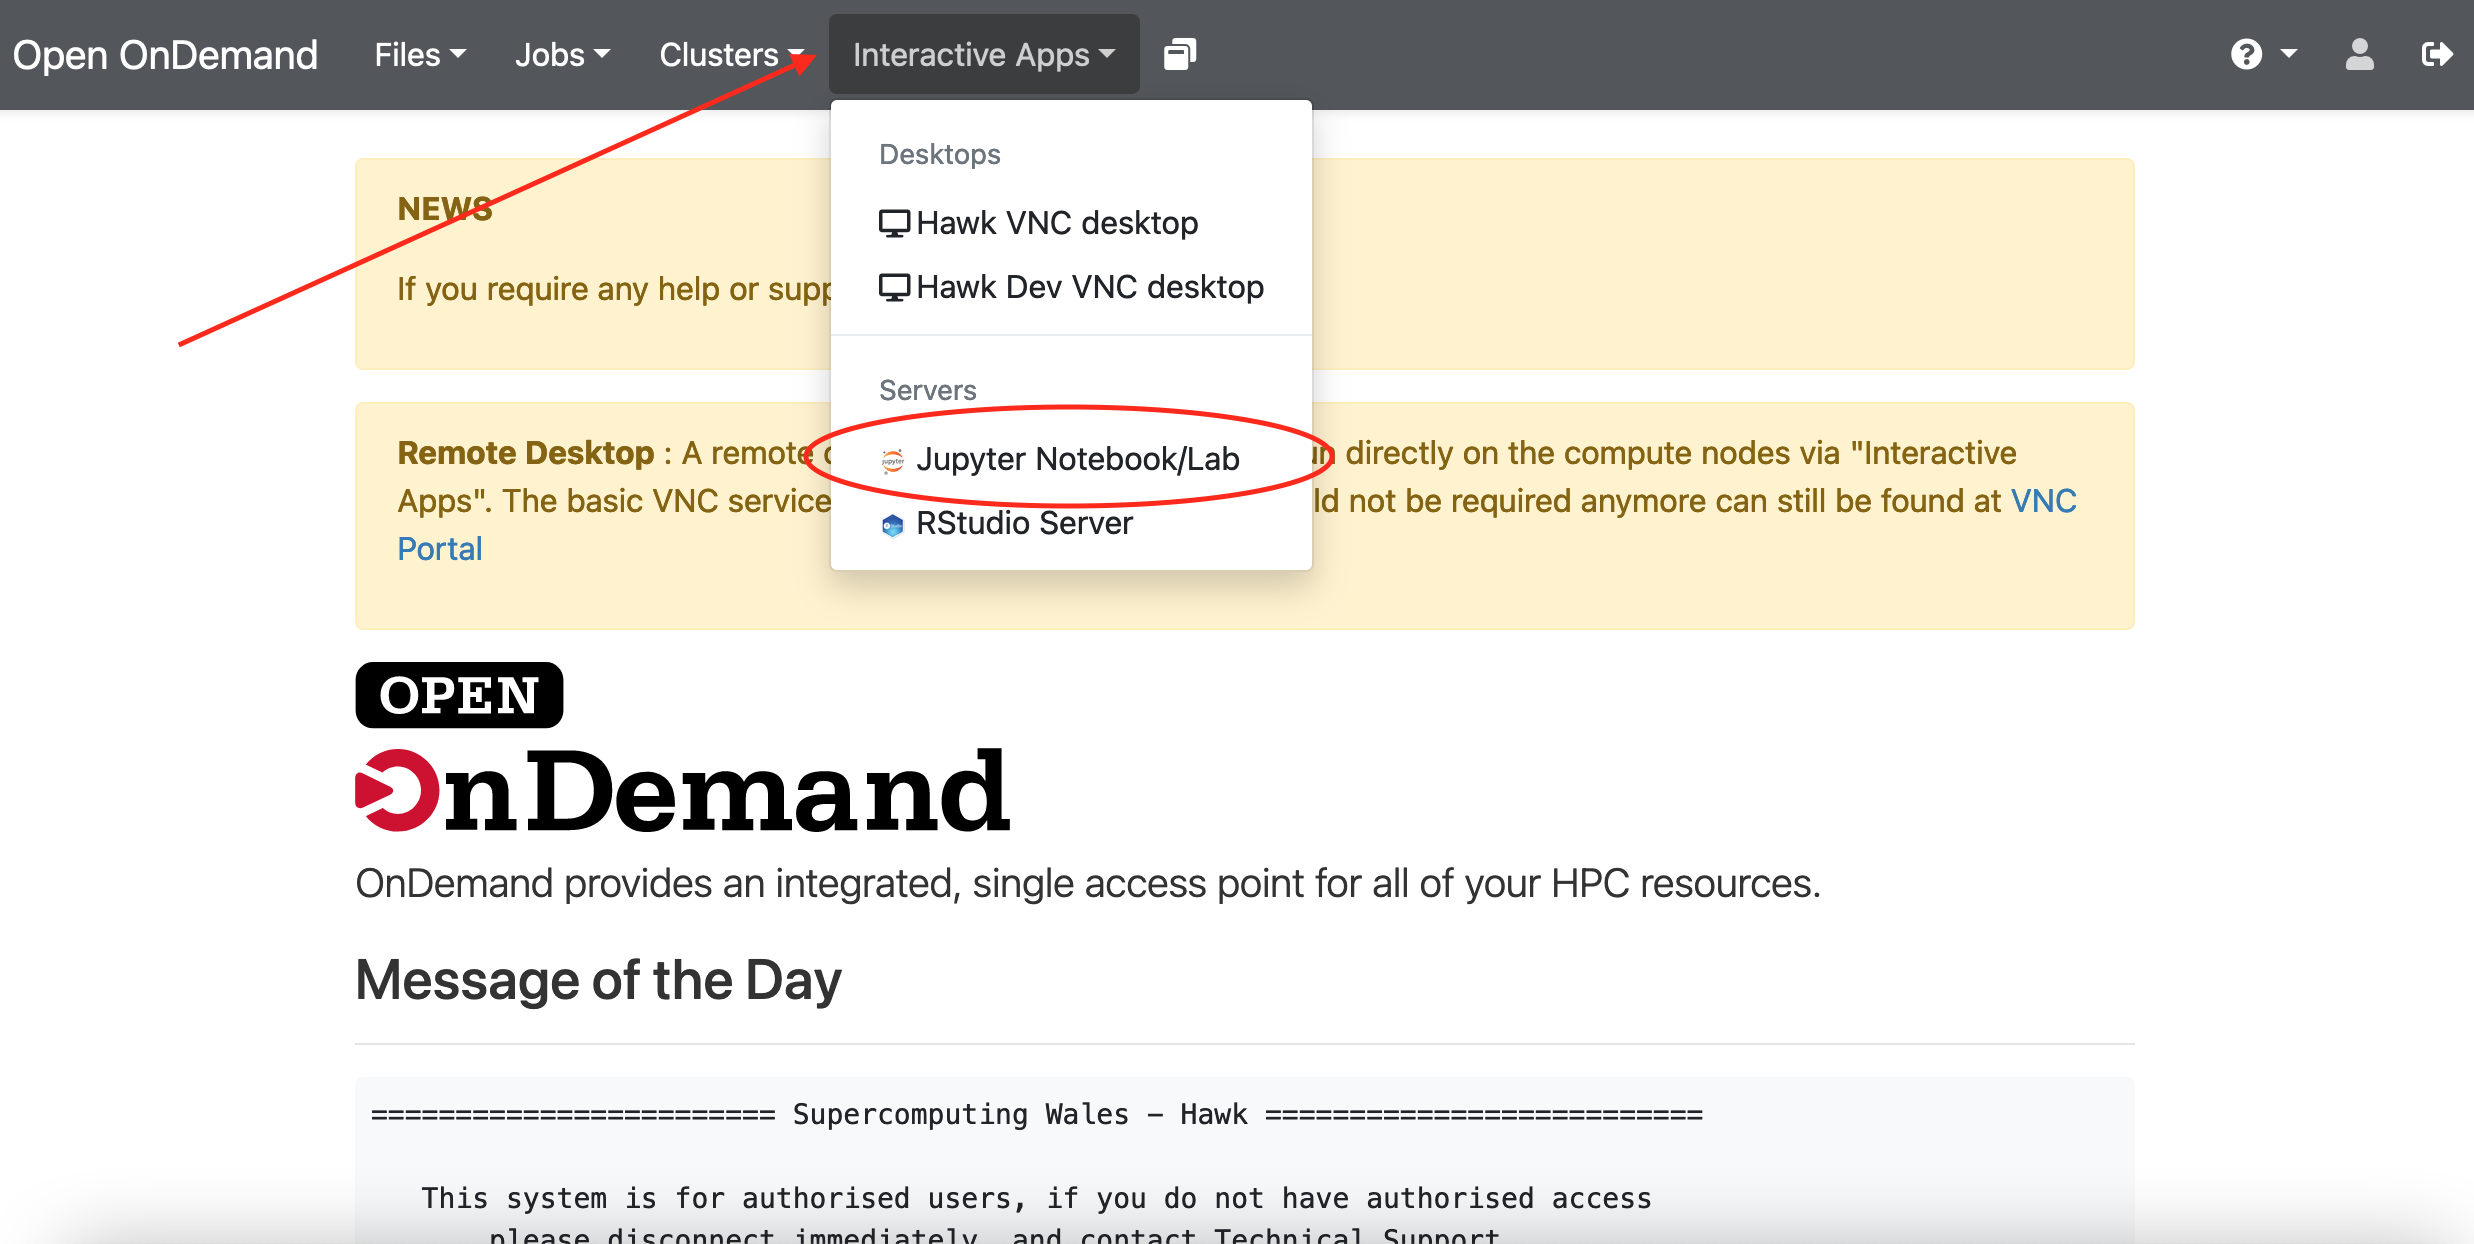
-
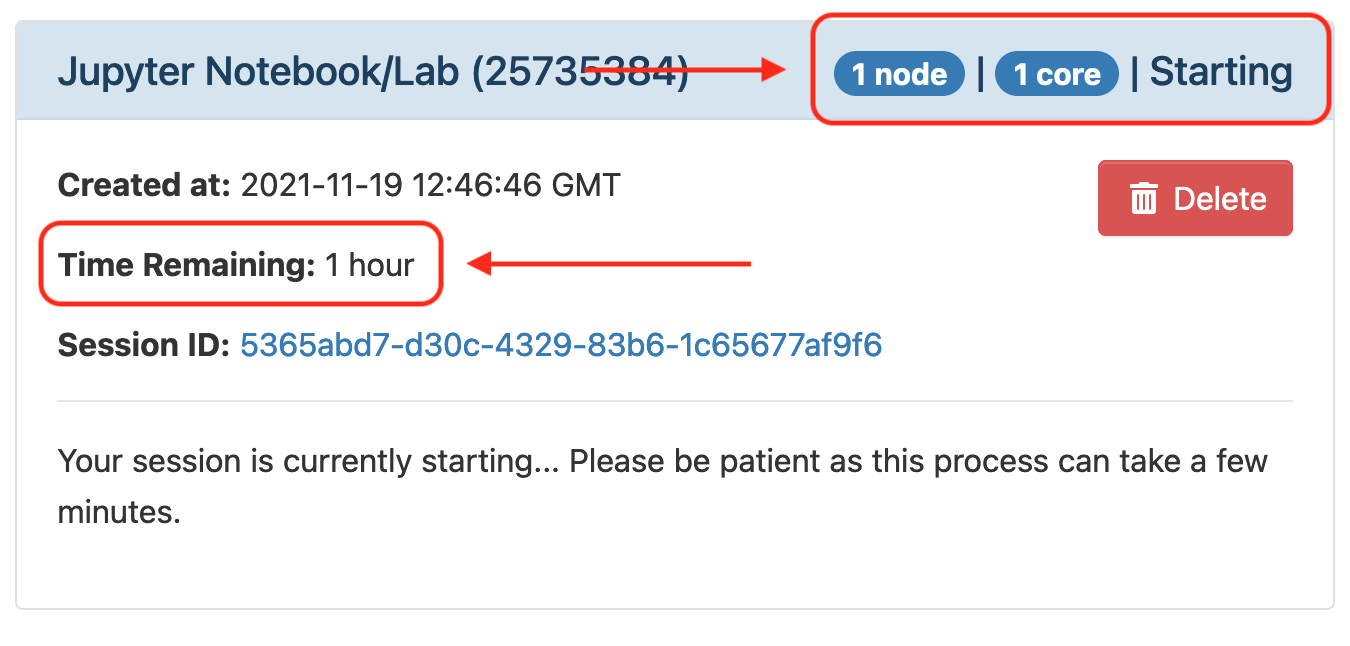
After submission you request will be placed on the queue and will wait for resources, hopefully for a short period, but this depends on the number of cores as well as time requested, so please be patient. At this point you can close the OnDemand website and come back at a later point to check progress or wait for the email notification if the option was selected.
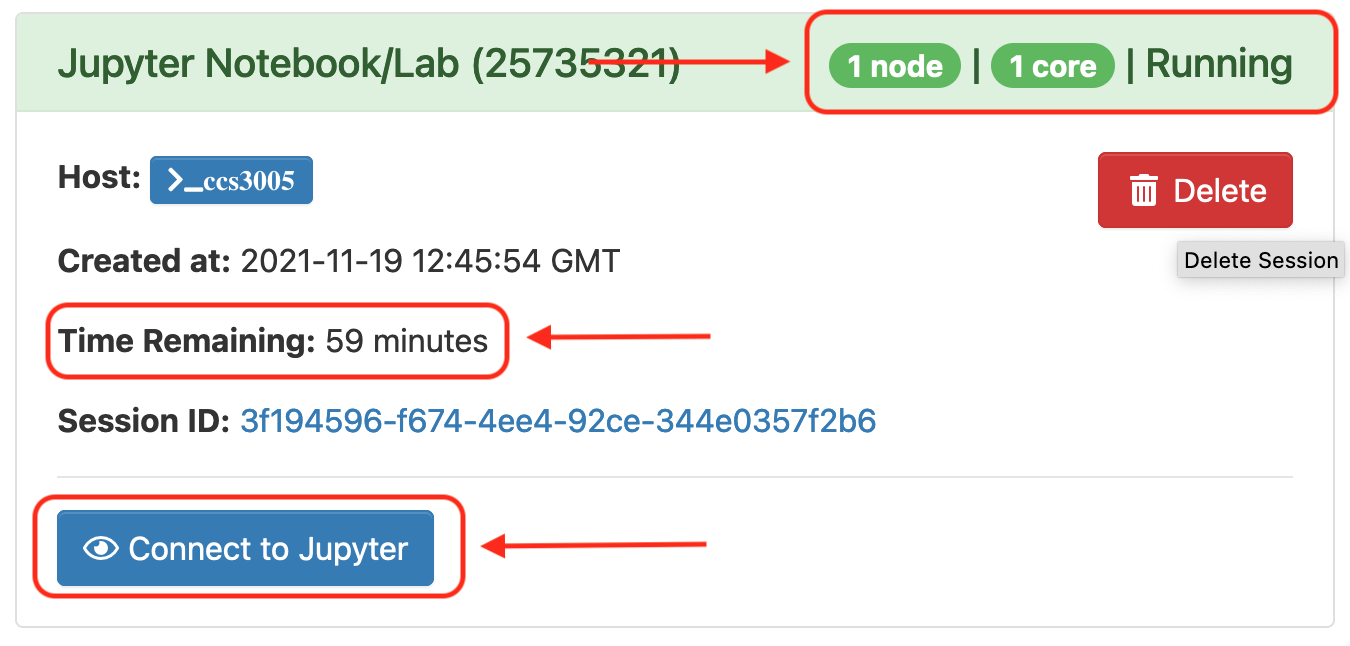
Once your request is granted you should be able to see a Running message, the amount of resources granted and the time remaining.
Click Connect to Jupyter to launch the Jupyter in a new web browser tab.
-
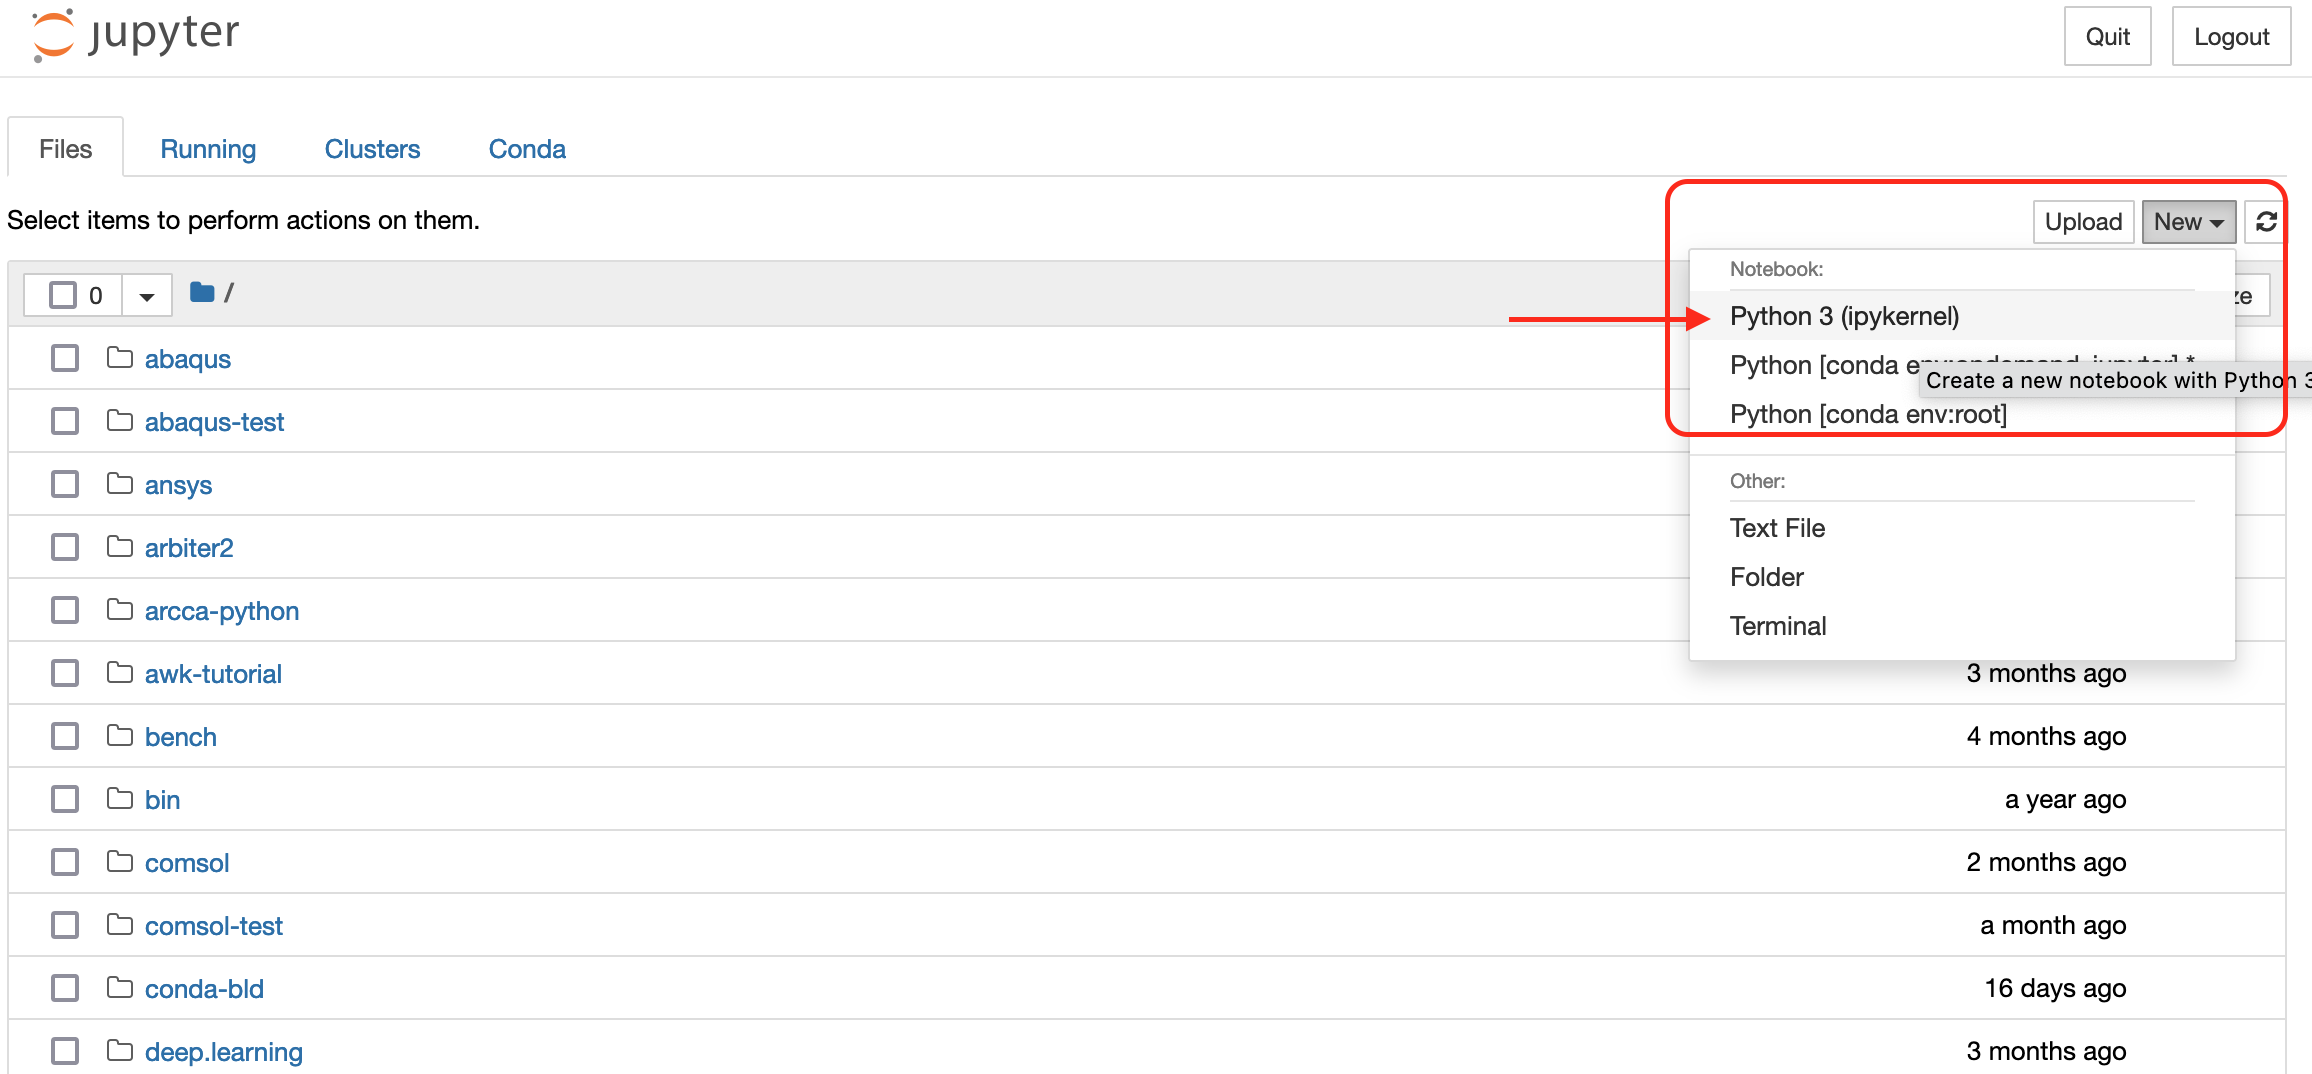
You should now have the familiar interface of Jupyter Notebooks in front of you. It will show the documents and directories in your user account on Hawk. To create a new Notebook, go to the dropdown menu New on the right side and click on Python 3 (ipykernel). A new tab will open with a new notebook ready for you to start working.
Copying data
To keep working on Hawk with the Notebooks we have written locally in our Desktop computer we need to transfer them over. Depending on our platform we can do this in a couple of ways:
On Windows you can use MobaXterm to transfer files to Hawk from your local computer.
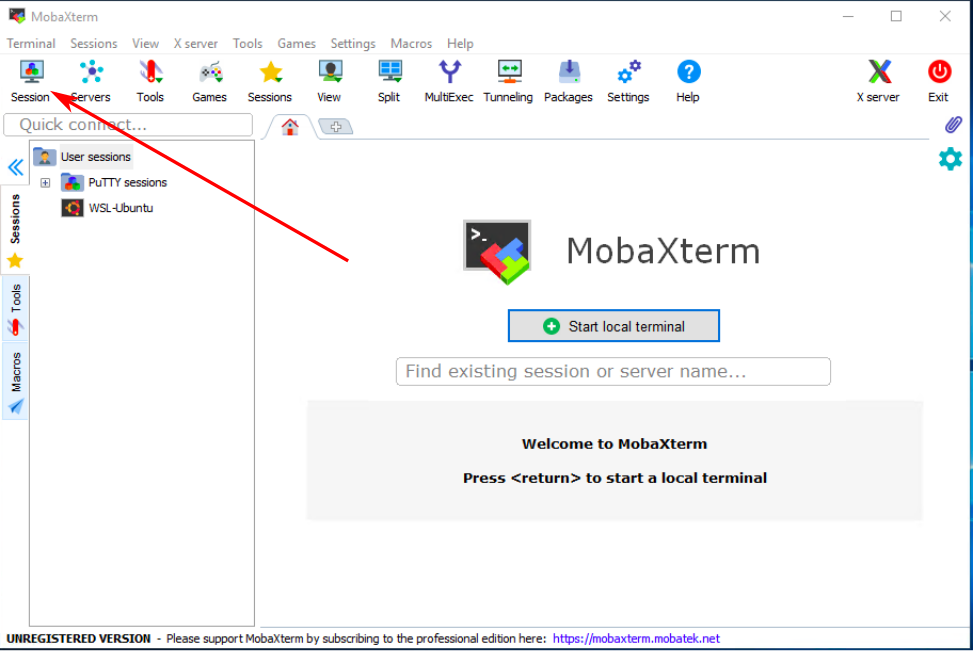 Click on Session to open the different connection methods available in MobaXterm |
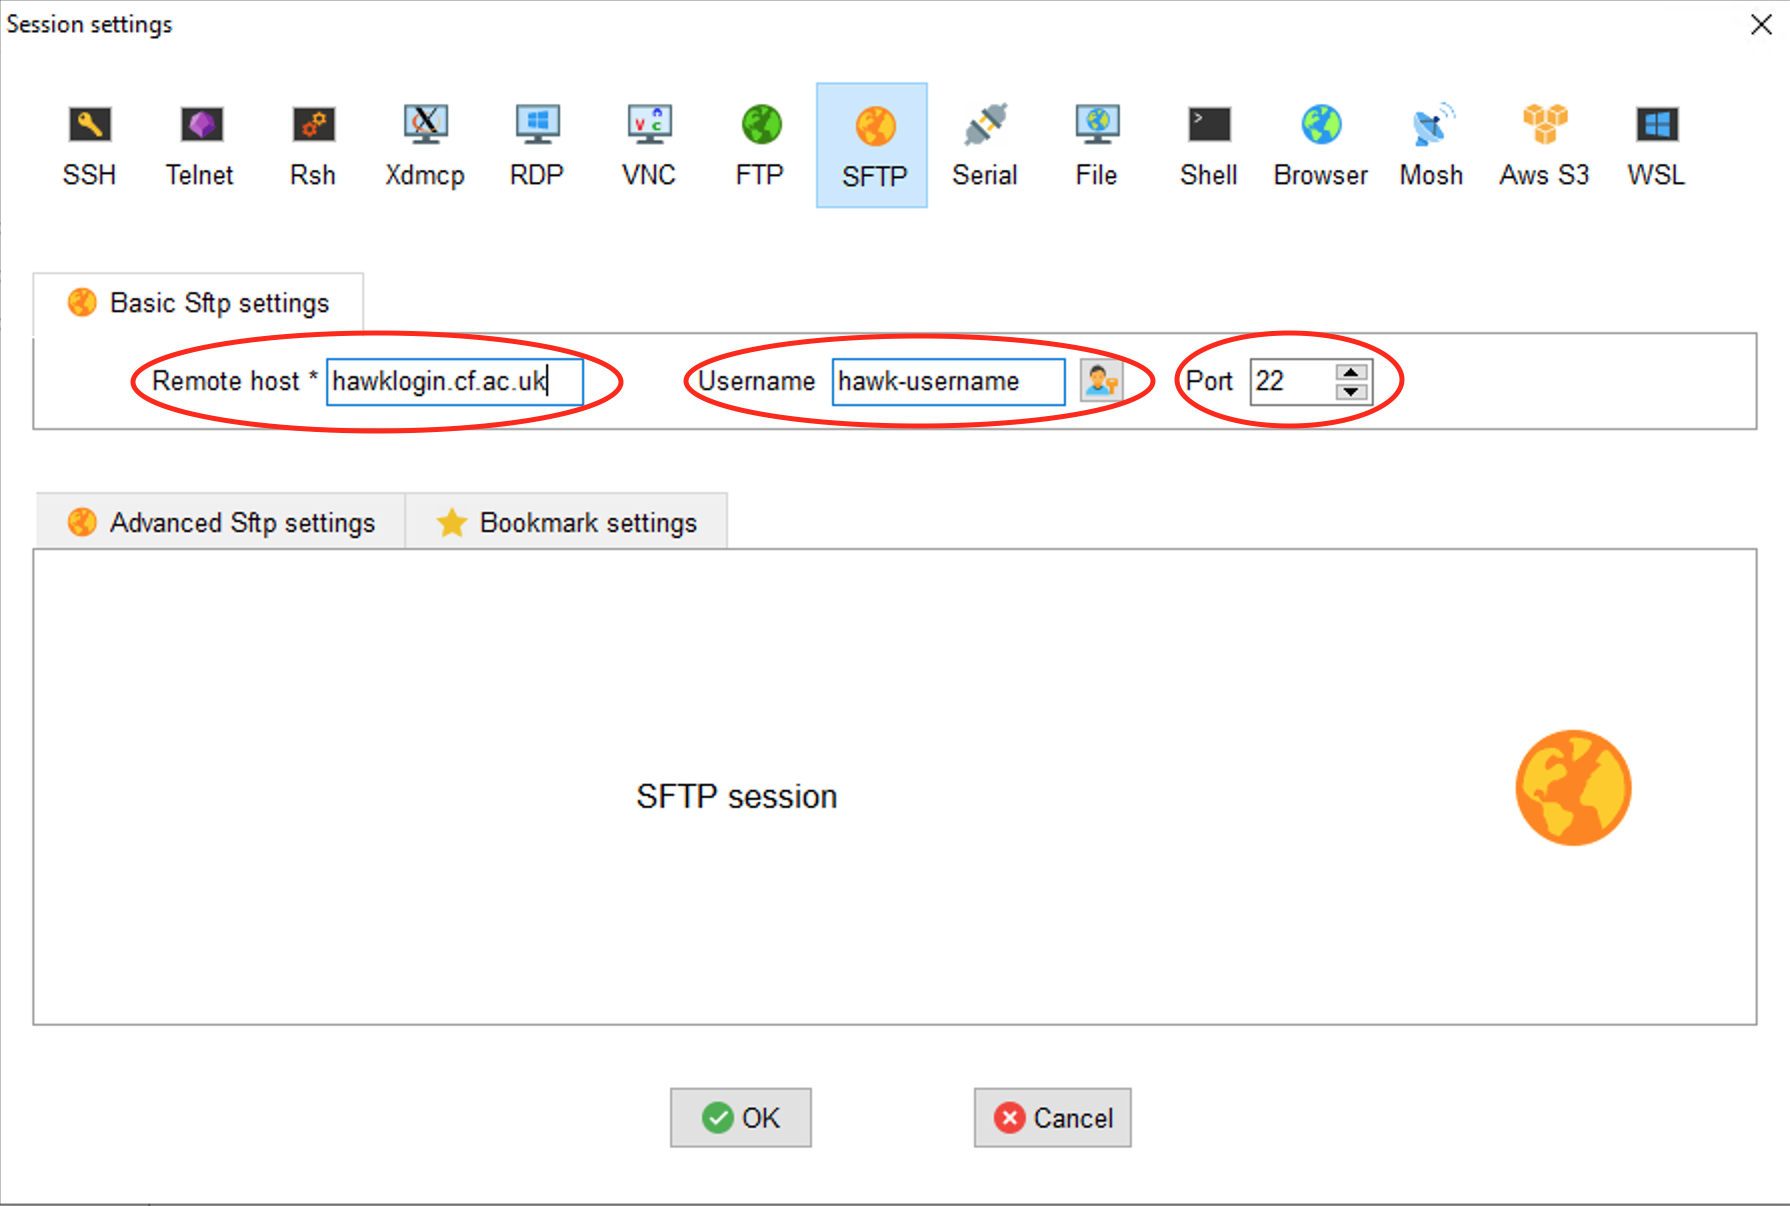 Select SFTP and enter the Remote Host (hawklogin.cf.ac.uk) and your Hawk username |
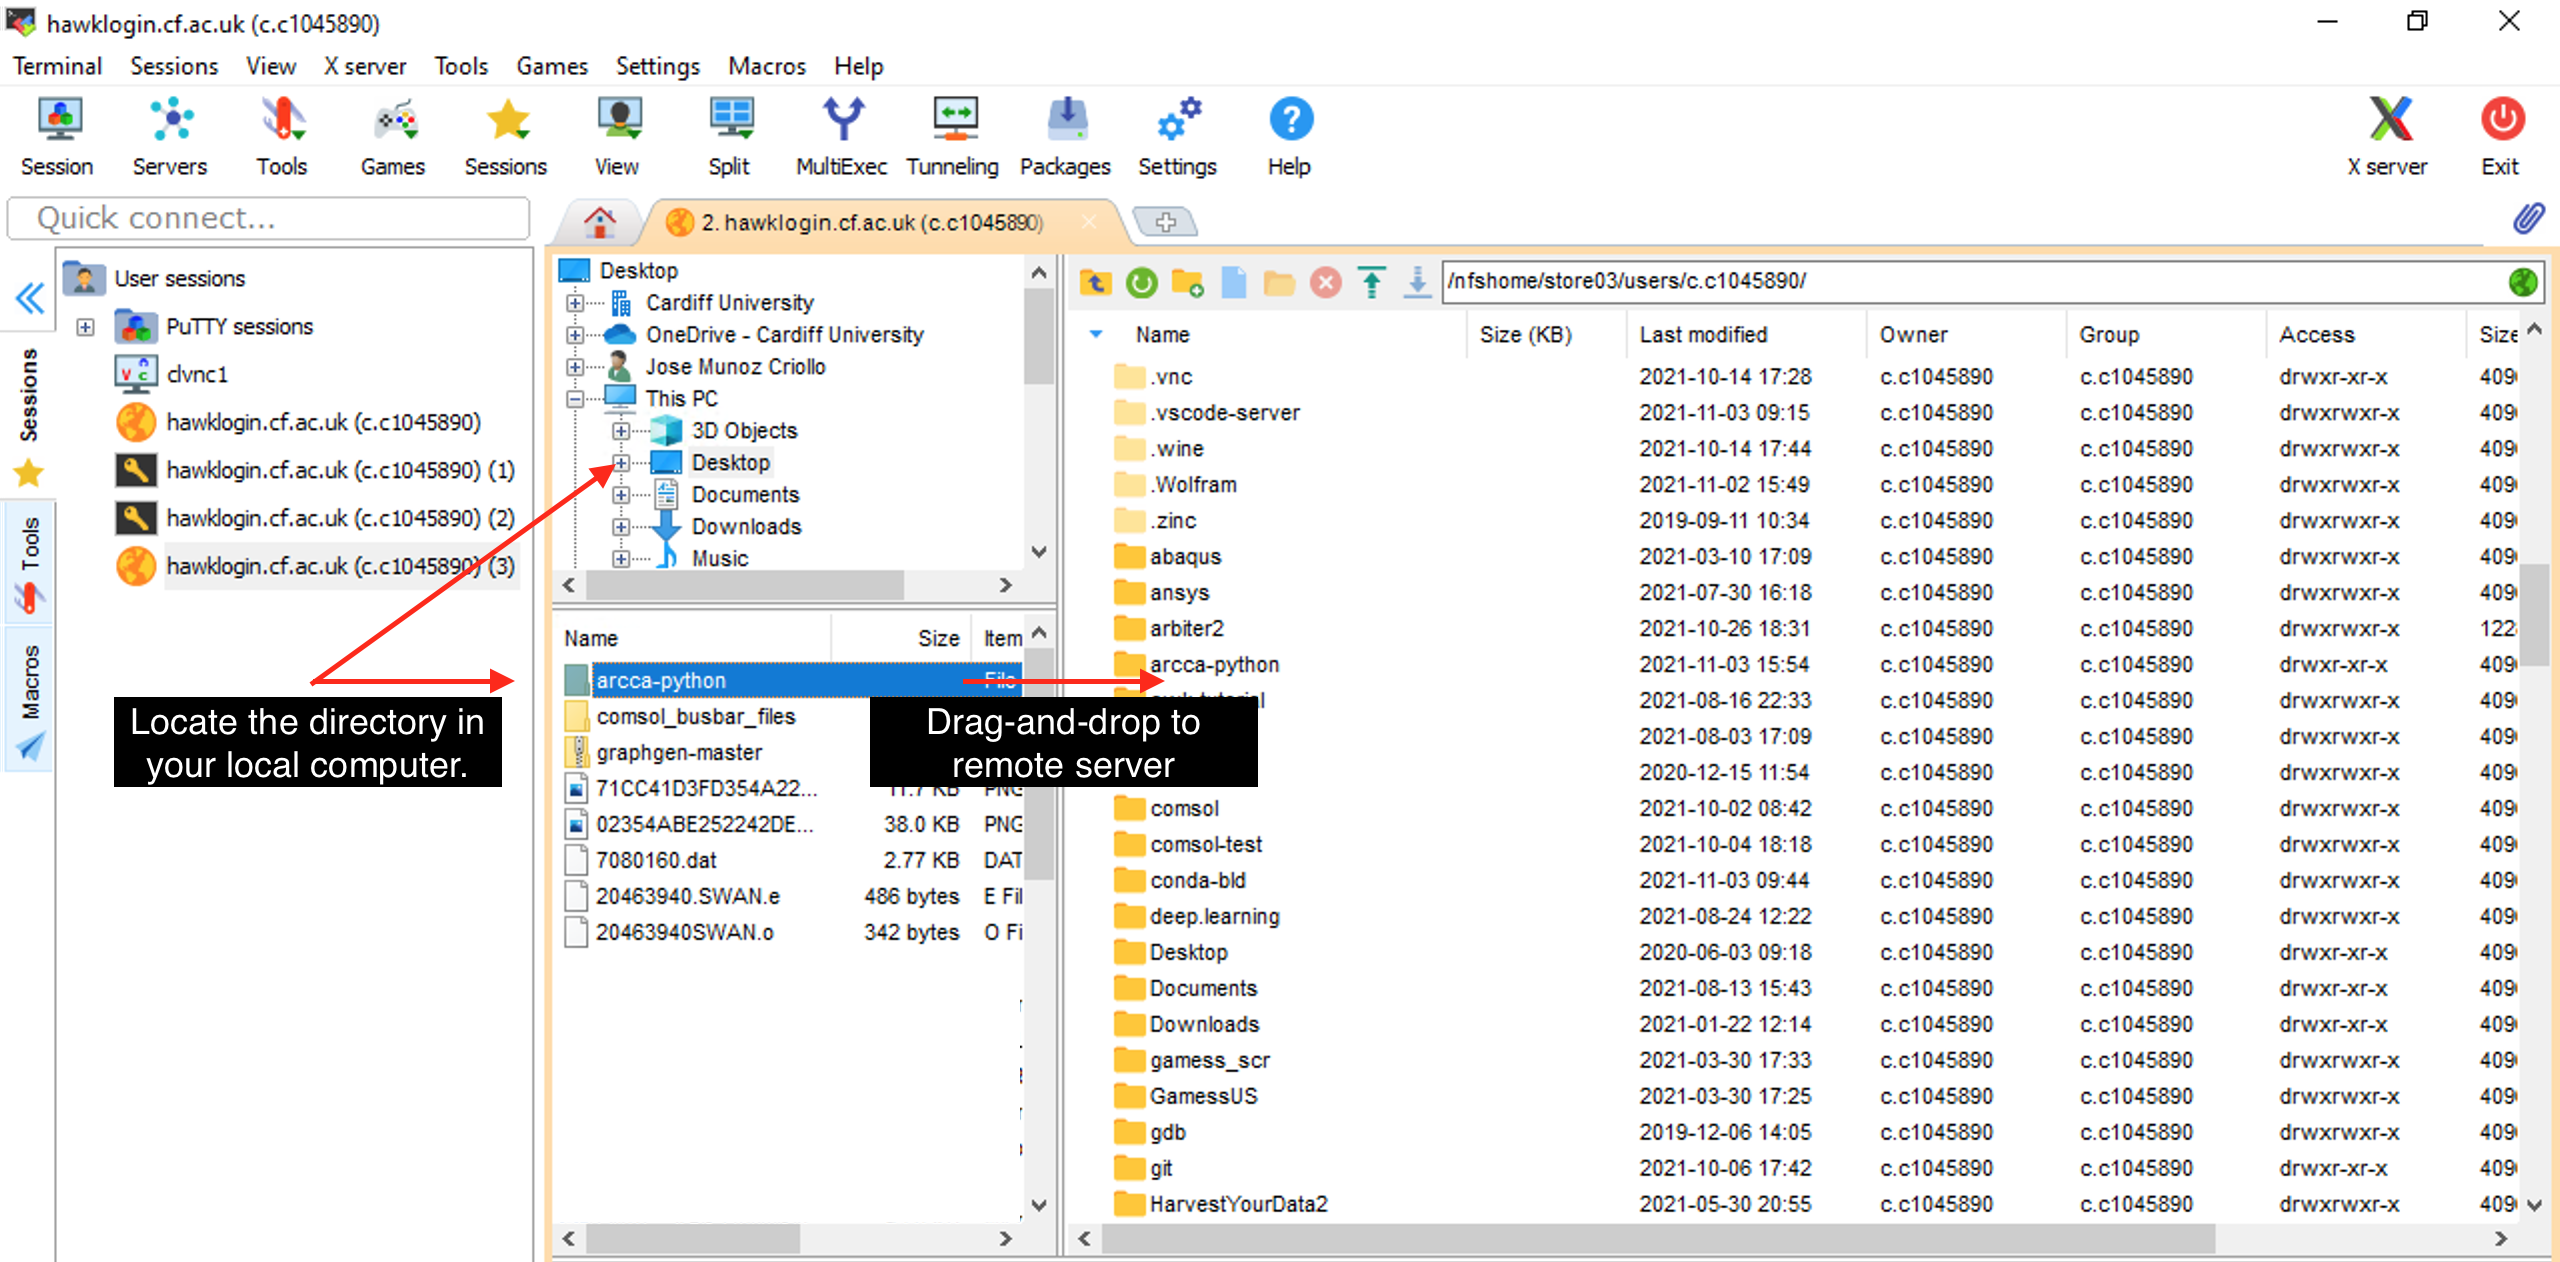 Locate the directory in your local computer and drag and drop to the remote server on the right pane. |
MacOS and Linux provide the command scp -r that can be used to recursively copy your work directory over to your home directory in Hawk:
  $ scp -r arcca-python hawk-username@hawklogin.cf.ac.uk:/home/hawk-username
  python-novice-inflammation-code.zip           100% 7216   193.0KB/s   00:00
  Untitled.ipynb                                100%   67KB 880.2KB/s   00:00
  inflammation.png                              100%   13KB 315.6KB/s   00:00
  argv_list.py                                  100%   42     0.4KB/s   00:00
  readings_08.py                                100% 1097    10.6KB/s   00:00
  readings_09.py                                100%  851    24.8KB/s   00:00
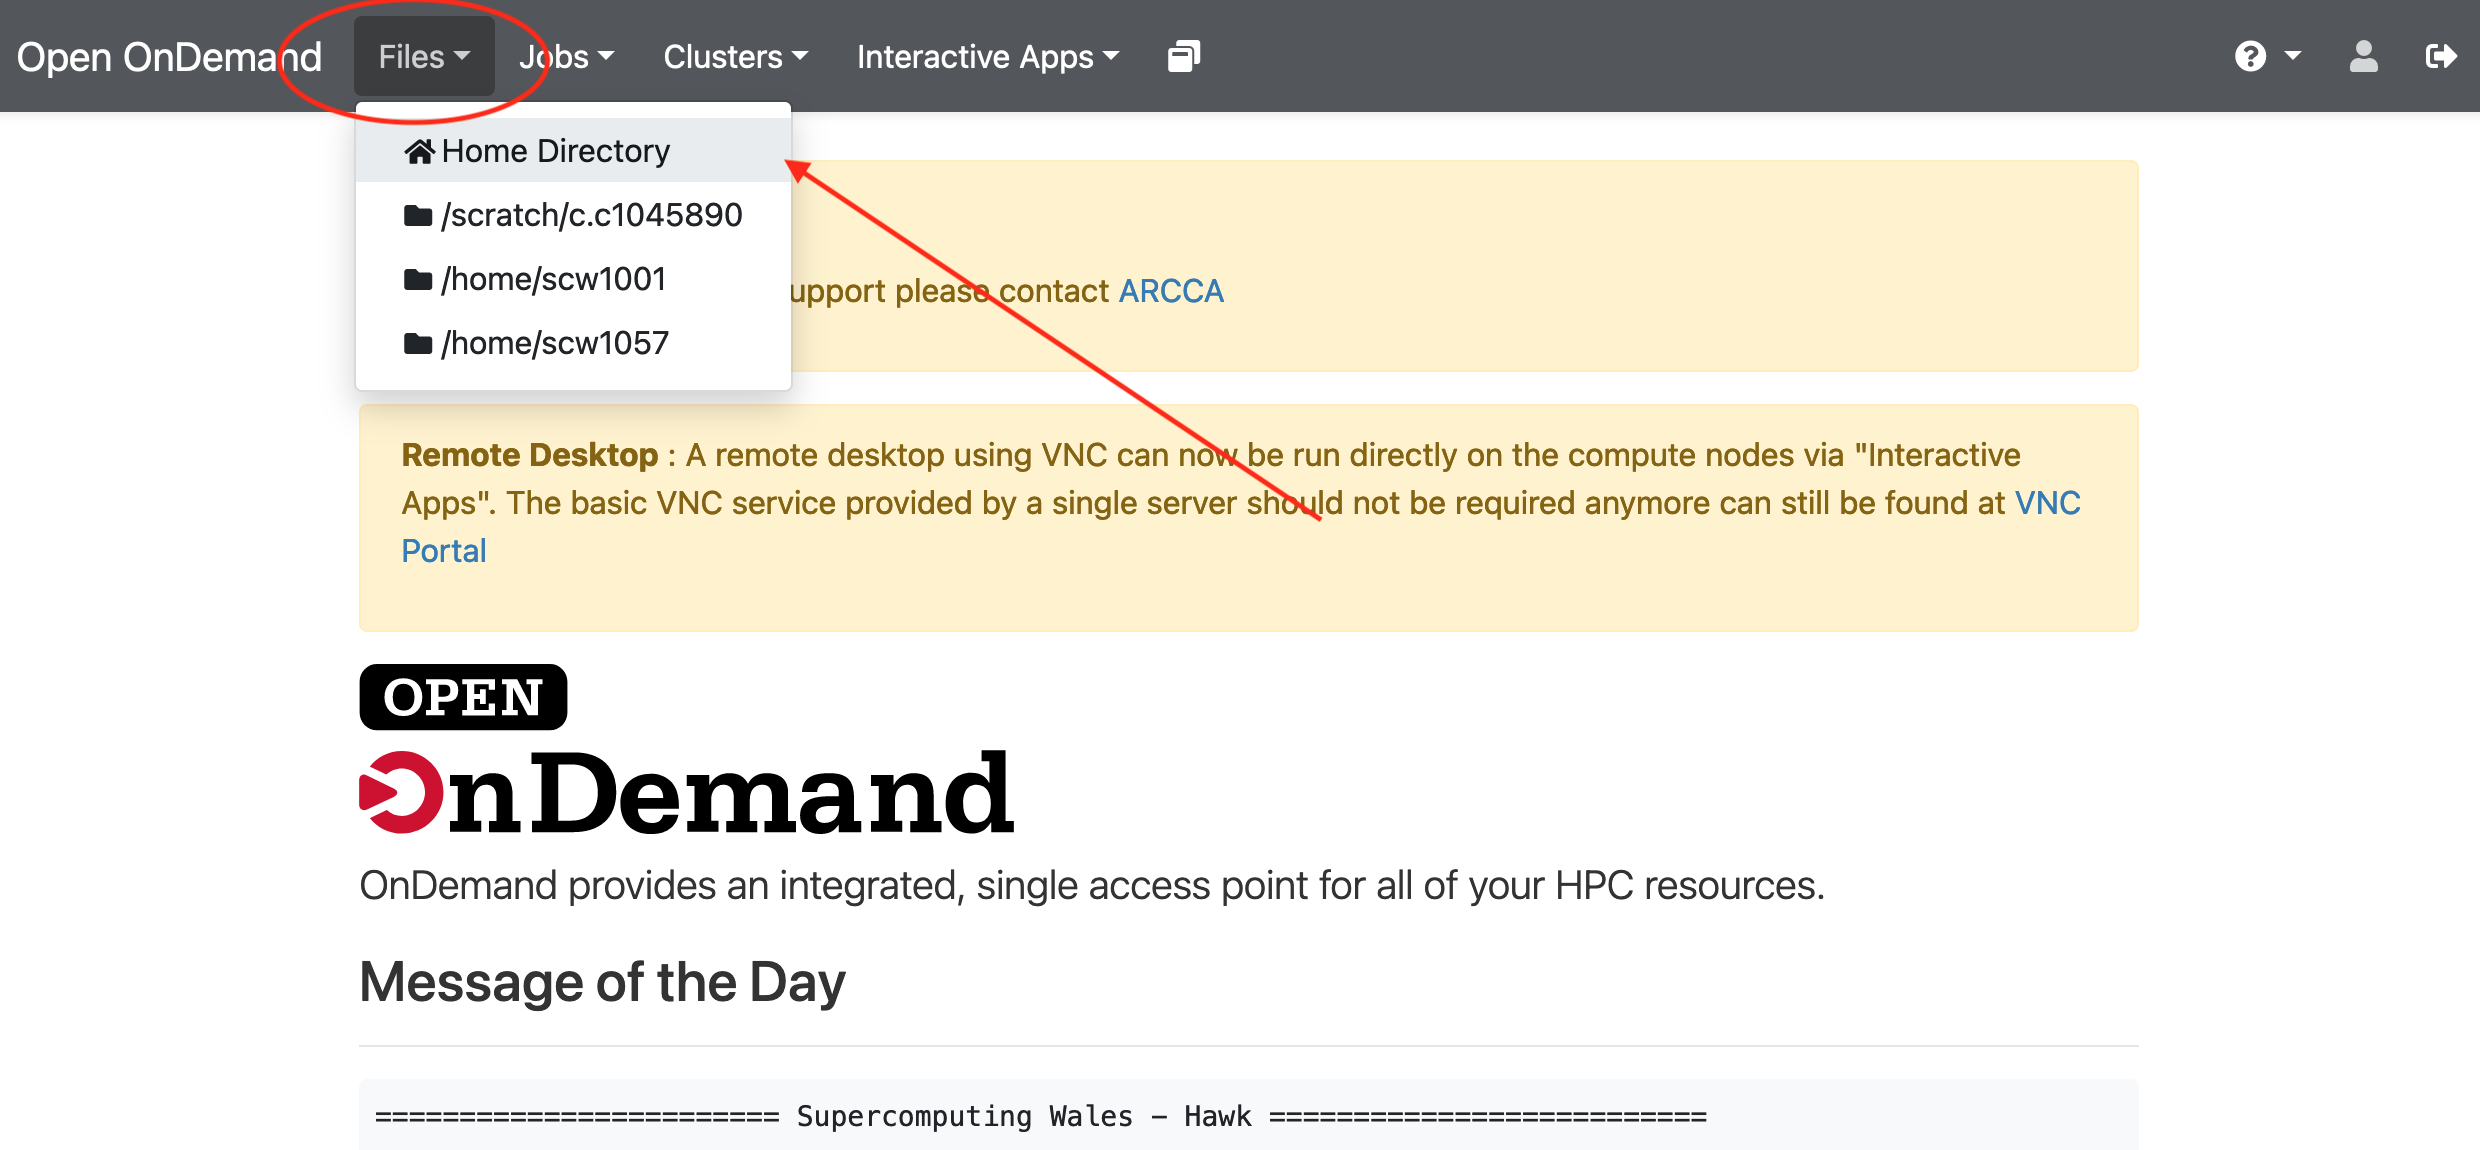
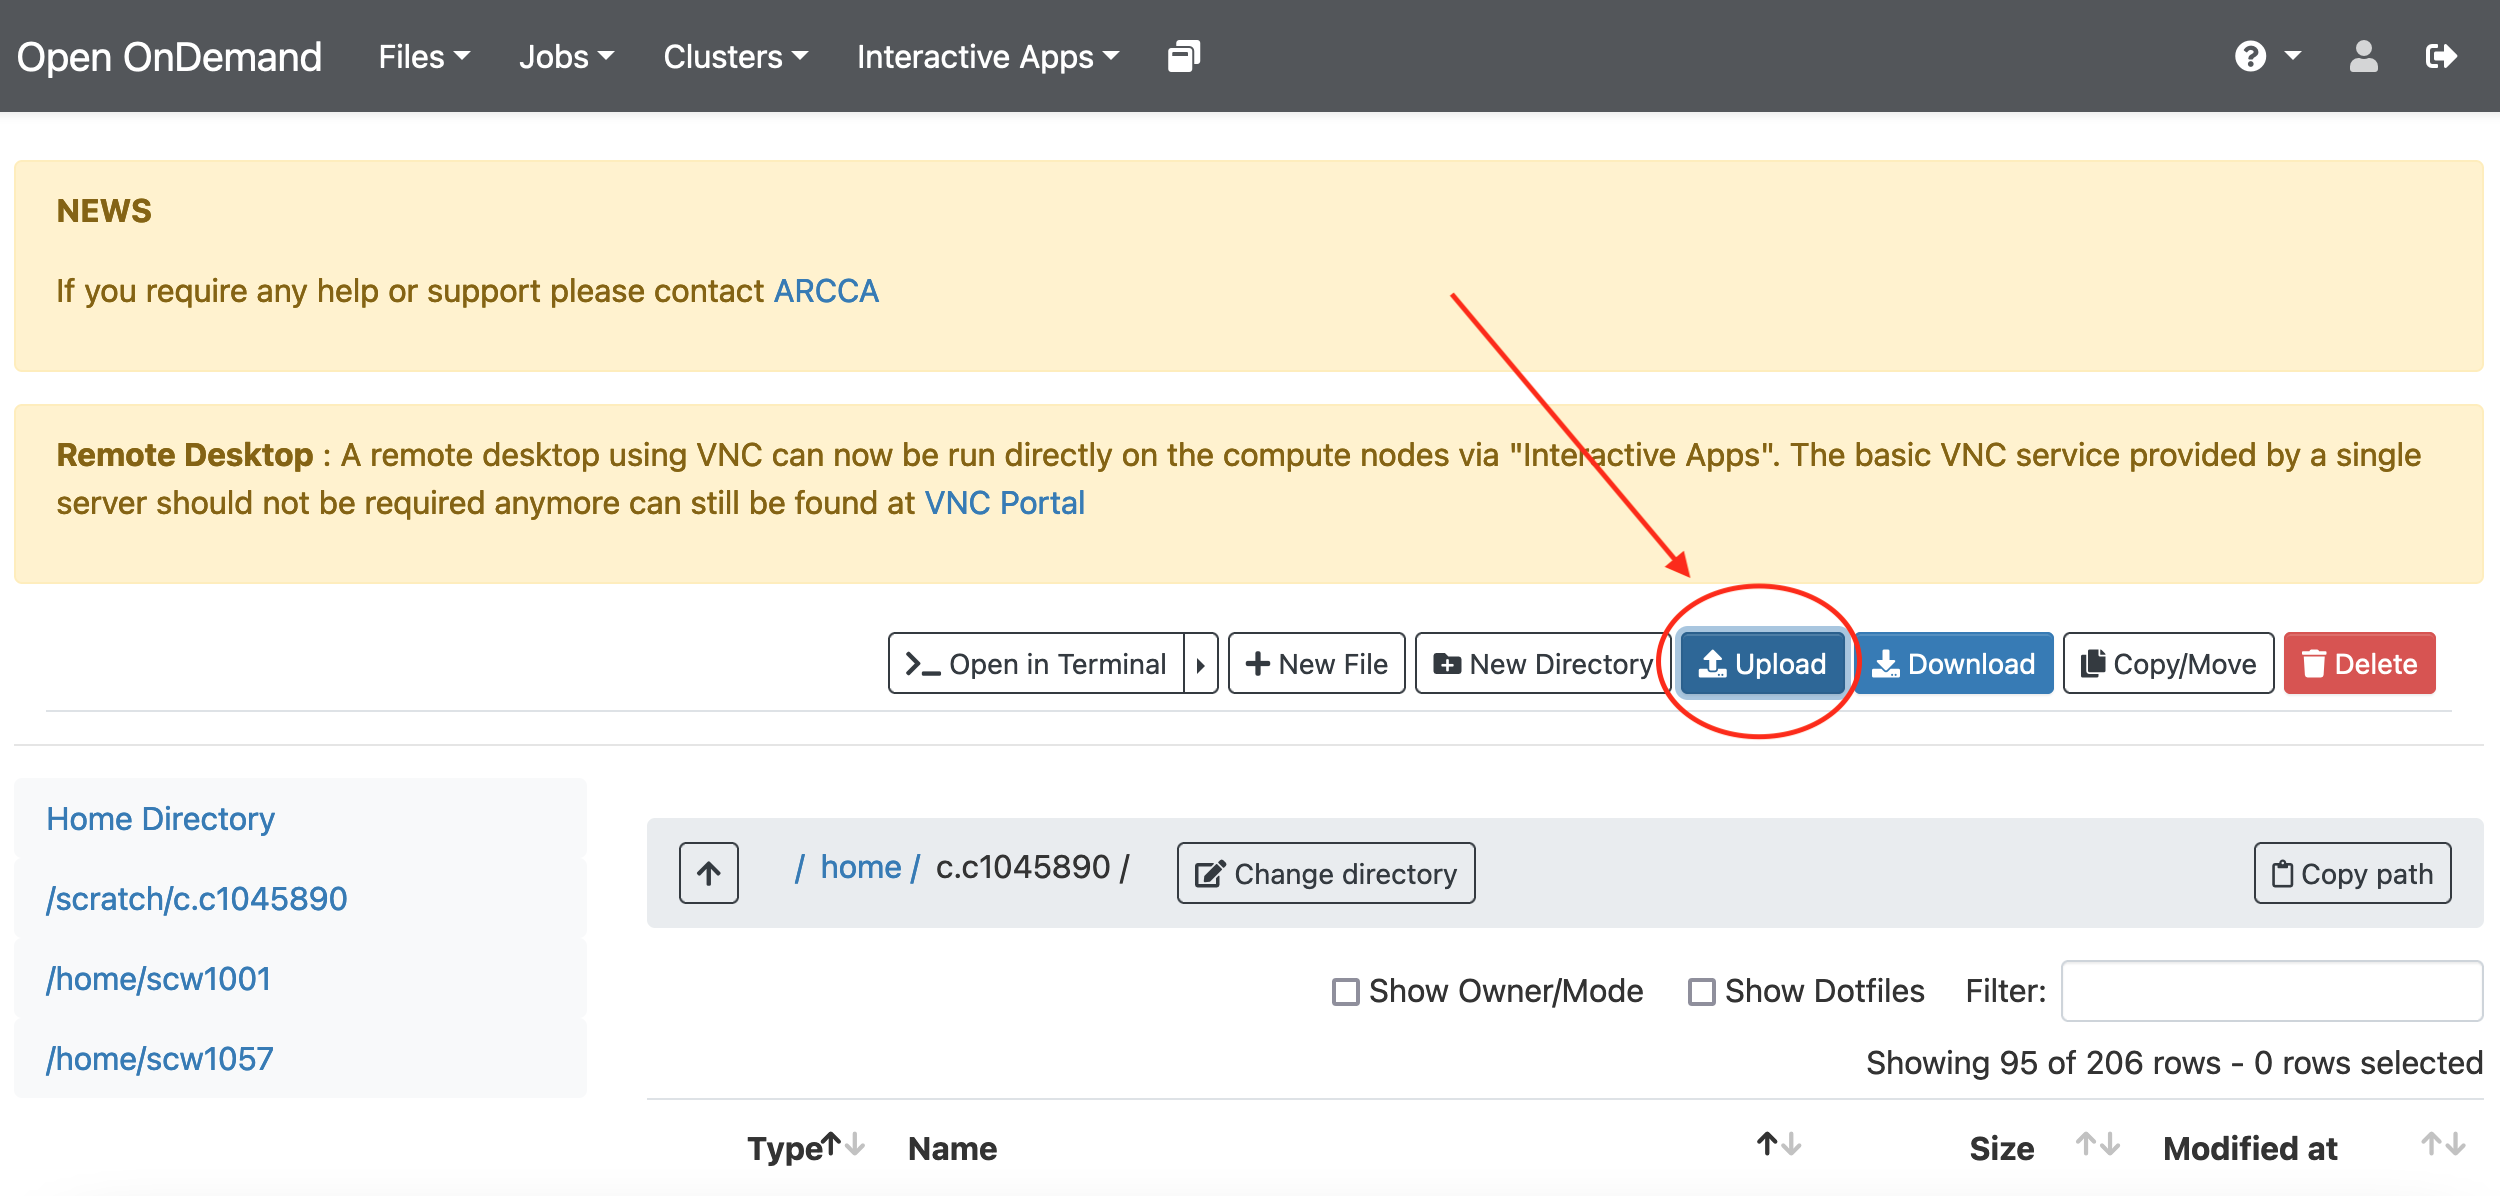
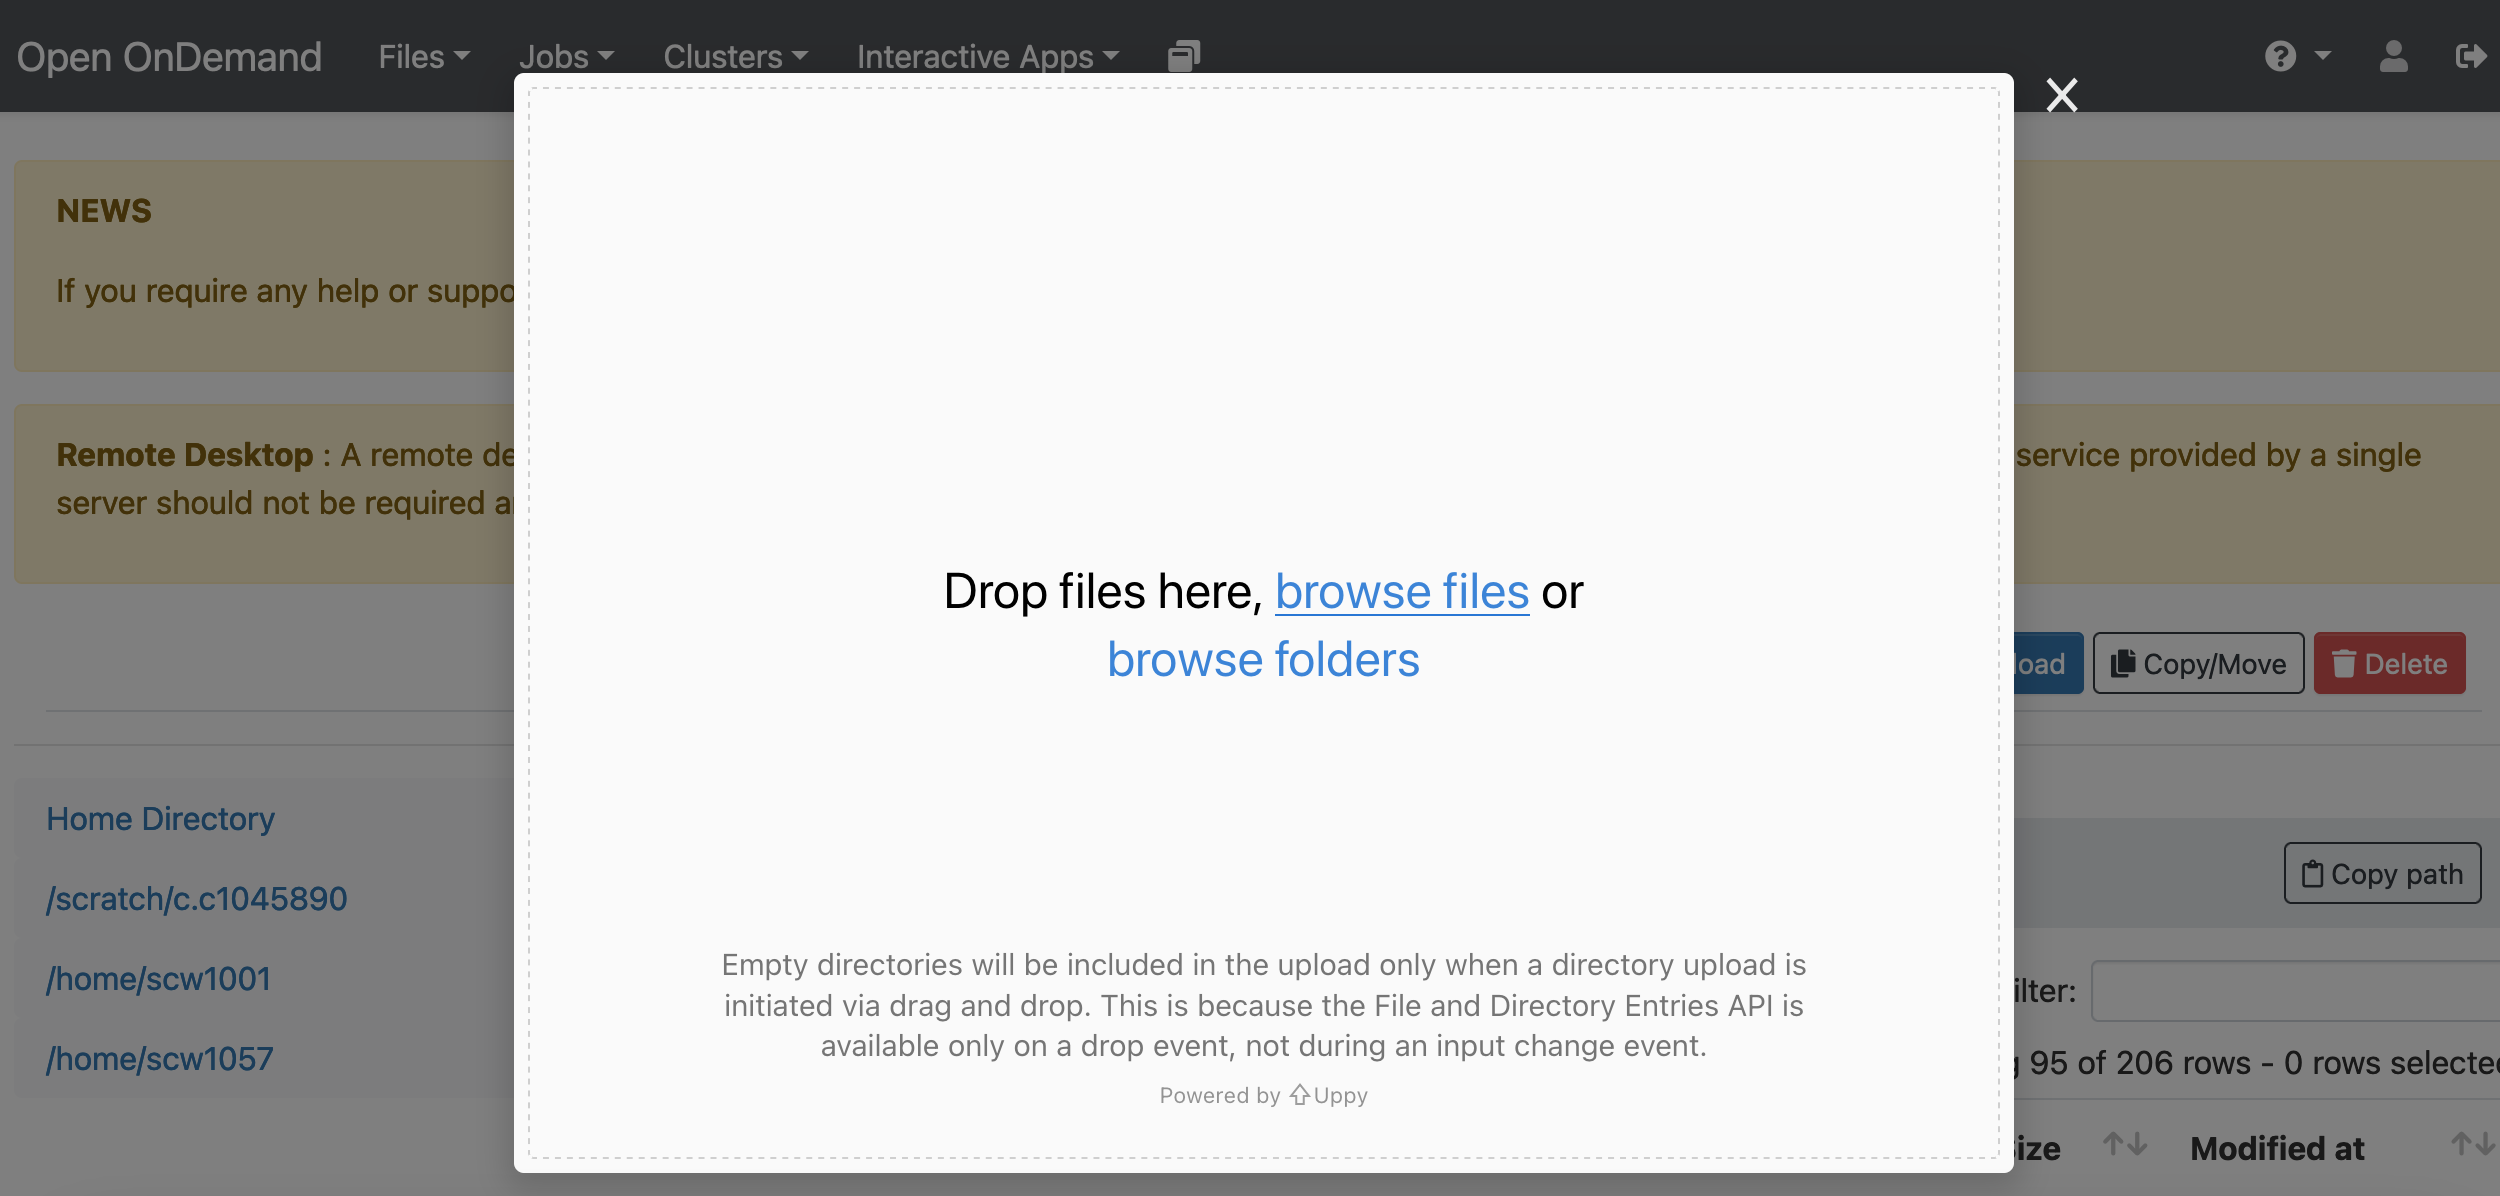
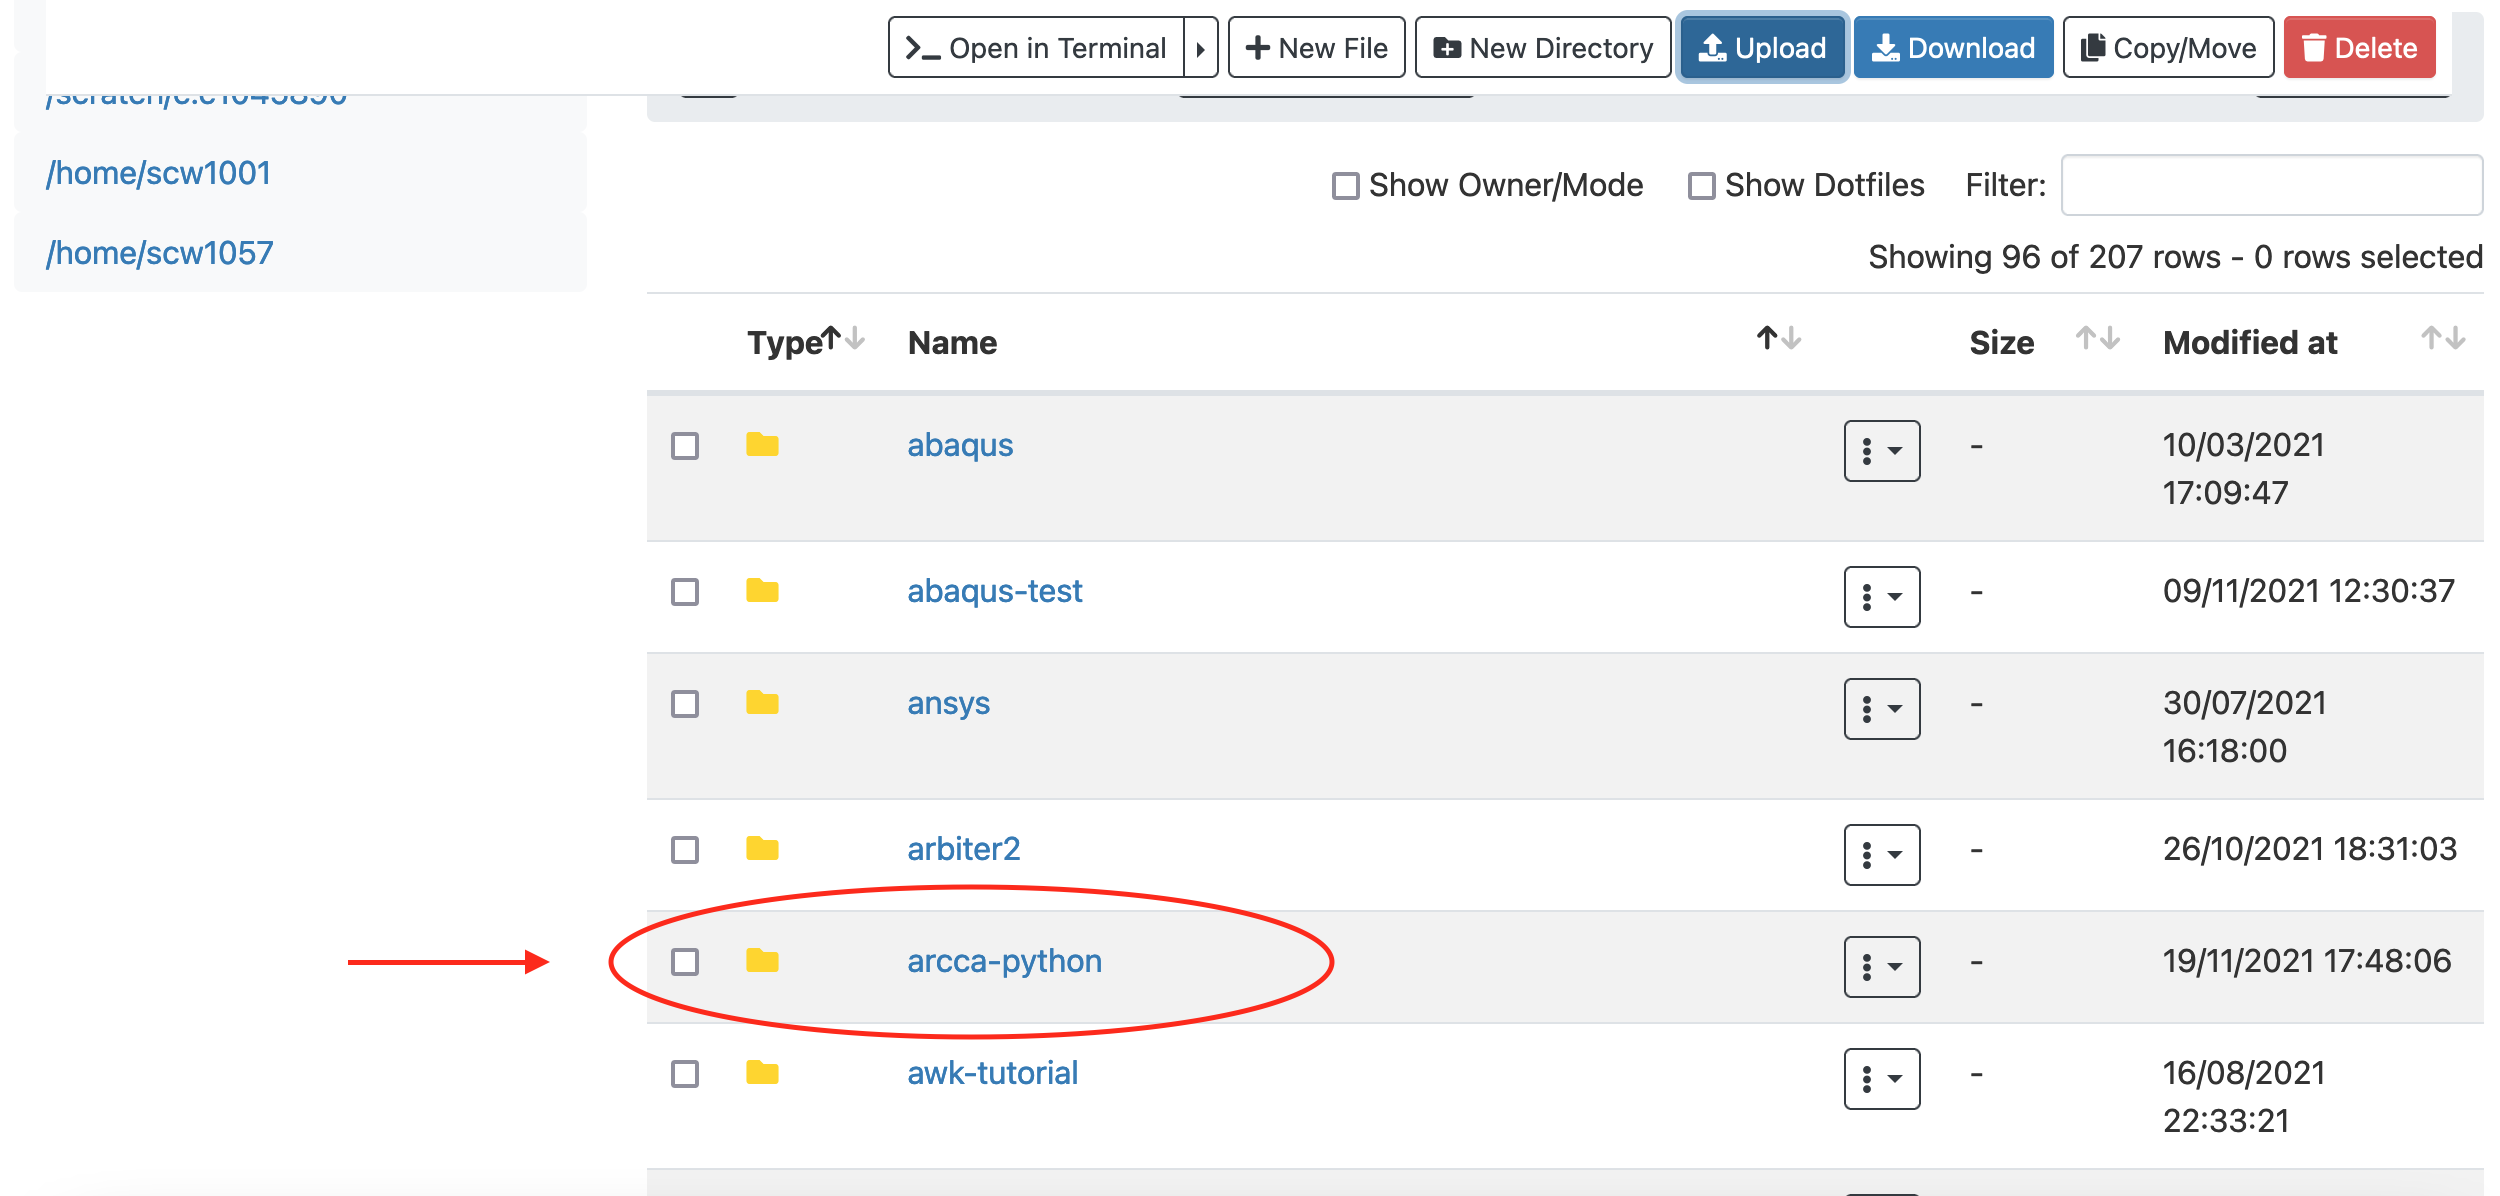
With OnDemand you can also download and upload files to Hawk. In this
example we will upload the directory with the Jupyter Notebooks we have
created so far. Go to Files and select the directory where you wish to
upload the files (our home directory in this case), then select Upload
and locate the directory in your local computer. Once uploaded, the files
should be available on Hawk:
 |
 |
 |
 |
Setup your Jupyter Notebook work environment
Depending on how you started your Jupyter Notebook you should have access to
some default packages. But these are not guaranteed to be the same (this also
applies for the version of Python) between the OnDemand and the ssh tunnel
methods. Moreover, it is unlikely that the remote HPC system would provide
every package you need by default.
Installing Python libraries
The recommended approach is to create a conda virtual environment with a
environemnt.yml file which includes a list of all packages (and versions)
needed for your work. This file can be created and used in your local computer
and then copied to Hawk to reproduce the same environment. An example file is:
name: my-conda-env
dependencies:
  - python=3.9.2
  - numpy
  - pandas
  - ipykernel
The package ipykernel is required here to make the environment reachable from
Jupyter Notebooks. You can find more about creating an environment.yml file
in the Anaconda documentation.
On Hawk you need to first load Anaconda:
$ module load anaconda/2020.02
$ source activate
$ which conda
/apps/languages/anaconda/2020.02/bin/conda
And then proceed to install the virtual environment:
$ conda env create -f environment.yml
...
libffi-3.3           | 50 KB     | ##################################### | 100%
numpy-1.21.2         | 23 KB     | ##################################### | 100%
pandas-1.3.4         | 9.6 MB    | ##################################### | 100%
mkl-2021.4.0         | 142.6 MB  | ##################################### | 100%
six-1.16.0           | 18 KB     | ##################################### | 100%
Preparing transaction: done
Verifying transaction: done
Executing transaction: done
#
# To activate this environment, use
#
#     $ conda activate my-conda-env
#
# To deactivate an active environment, use
#
#     $ conda deactivate
We can then follow the instructions printed at the end of the installation process to activate our environment:
$ conda activate my-conda-env
$ which python
~/.conda/envs/my-conda-env/bin/python
We can further confirm the version of Python used by the environment:
$ python --version
Python 3.9.2
To deactivate the environment and return to the default Python provided by the system (or the loaded module):
$ conda deactivate
$ python --version
Python 3.7.6
Using an Anaconda virtual environment from Jupyter Notebooks
We can access our newly installed Anaconda environment from Jupyter Notebooks
on OnDemand. For this, create a new session and when the resources are granted
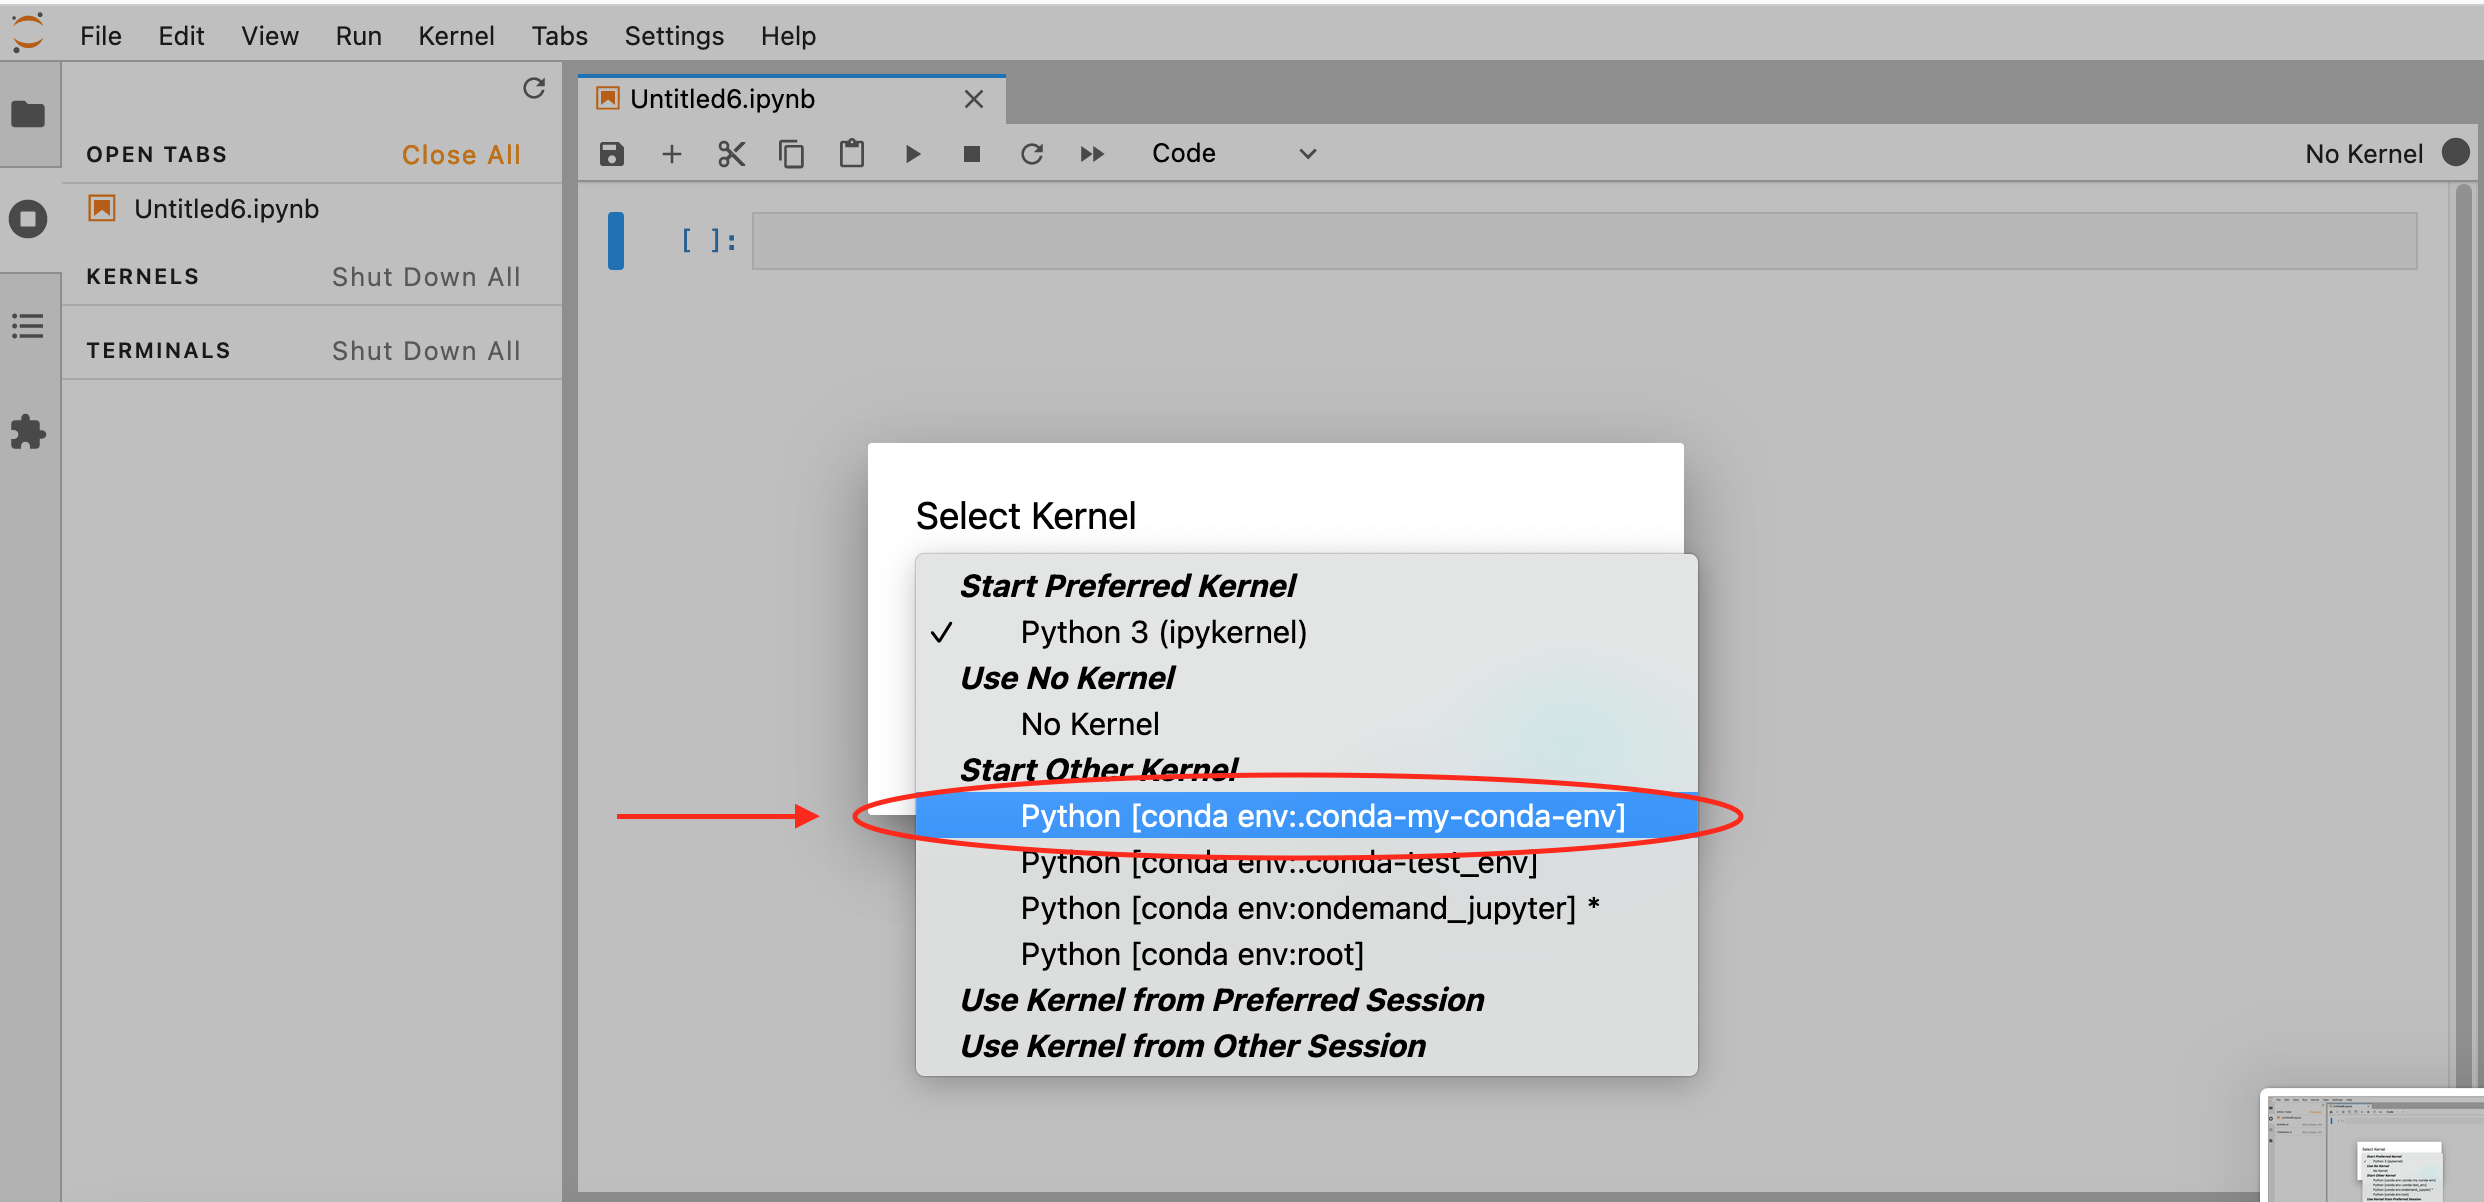
click on Connect to Jupyter. On Jupyter Lab you might be asked to choose
which kernel to start, if so, select the name given to your virtual environment
(my-conda-env) in this example:
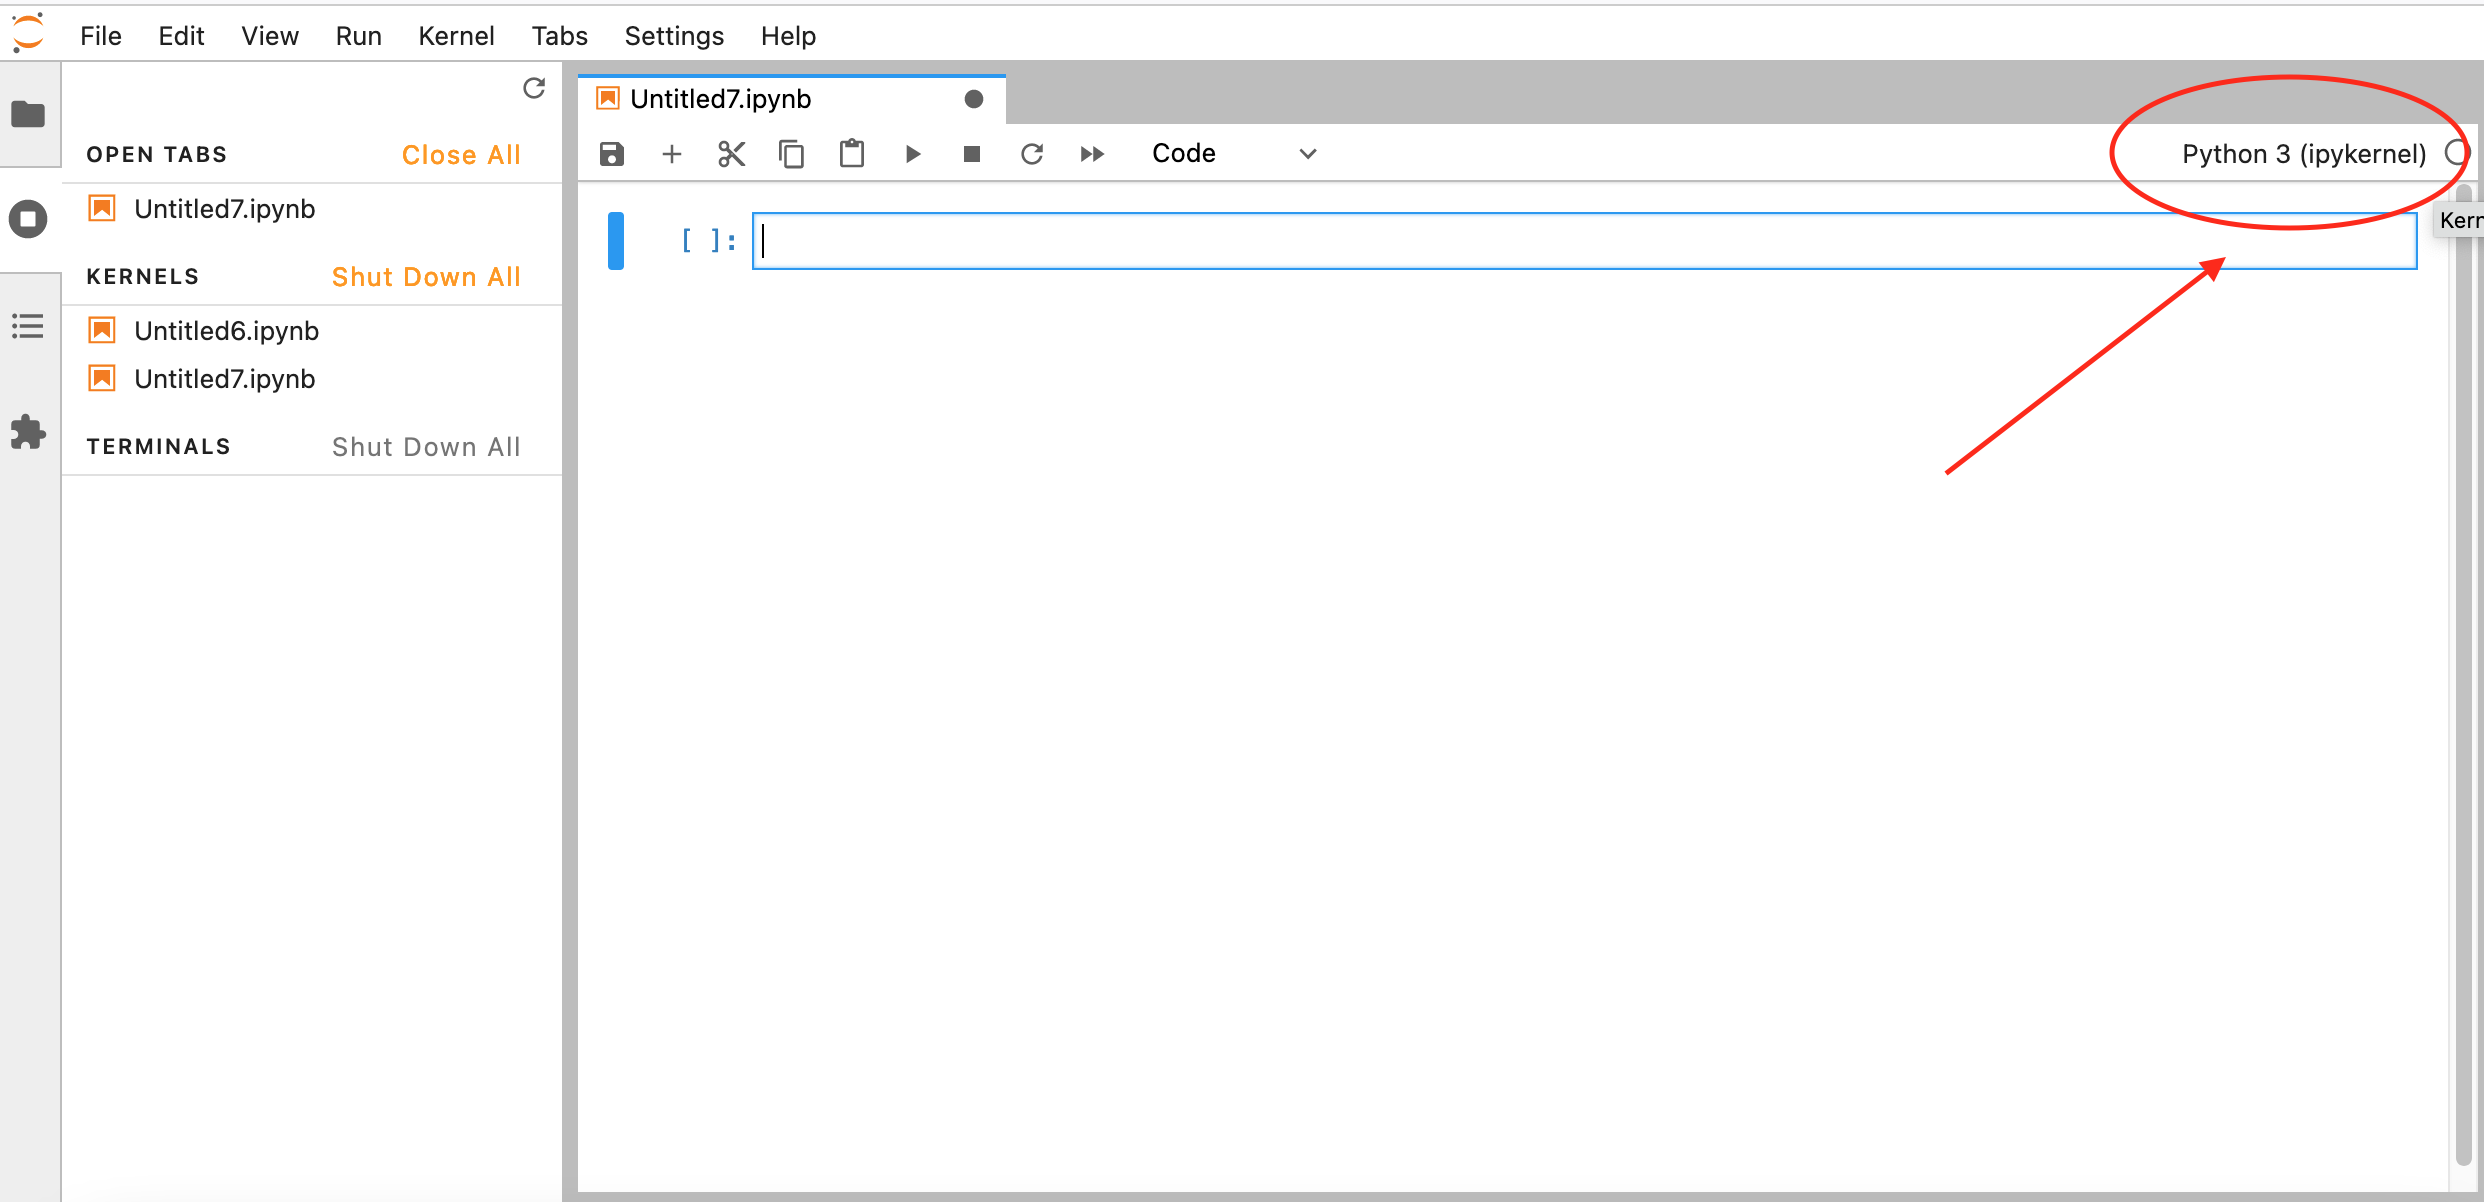
If another kernel is loaded by default, you can still change it by clicking on the top right corner of your Notebook, a similar menu should appear:
 |
|
If all goes well you should be able to confirm the Python versions and path, as well as the location of the installed libraries:
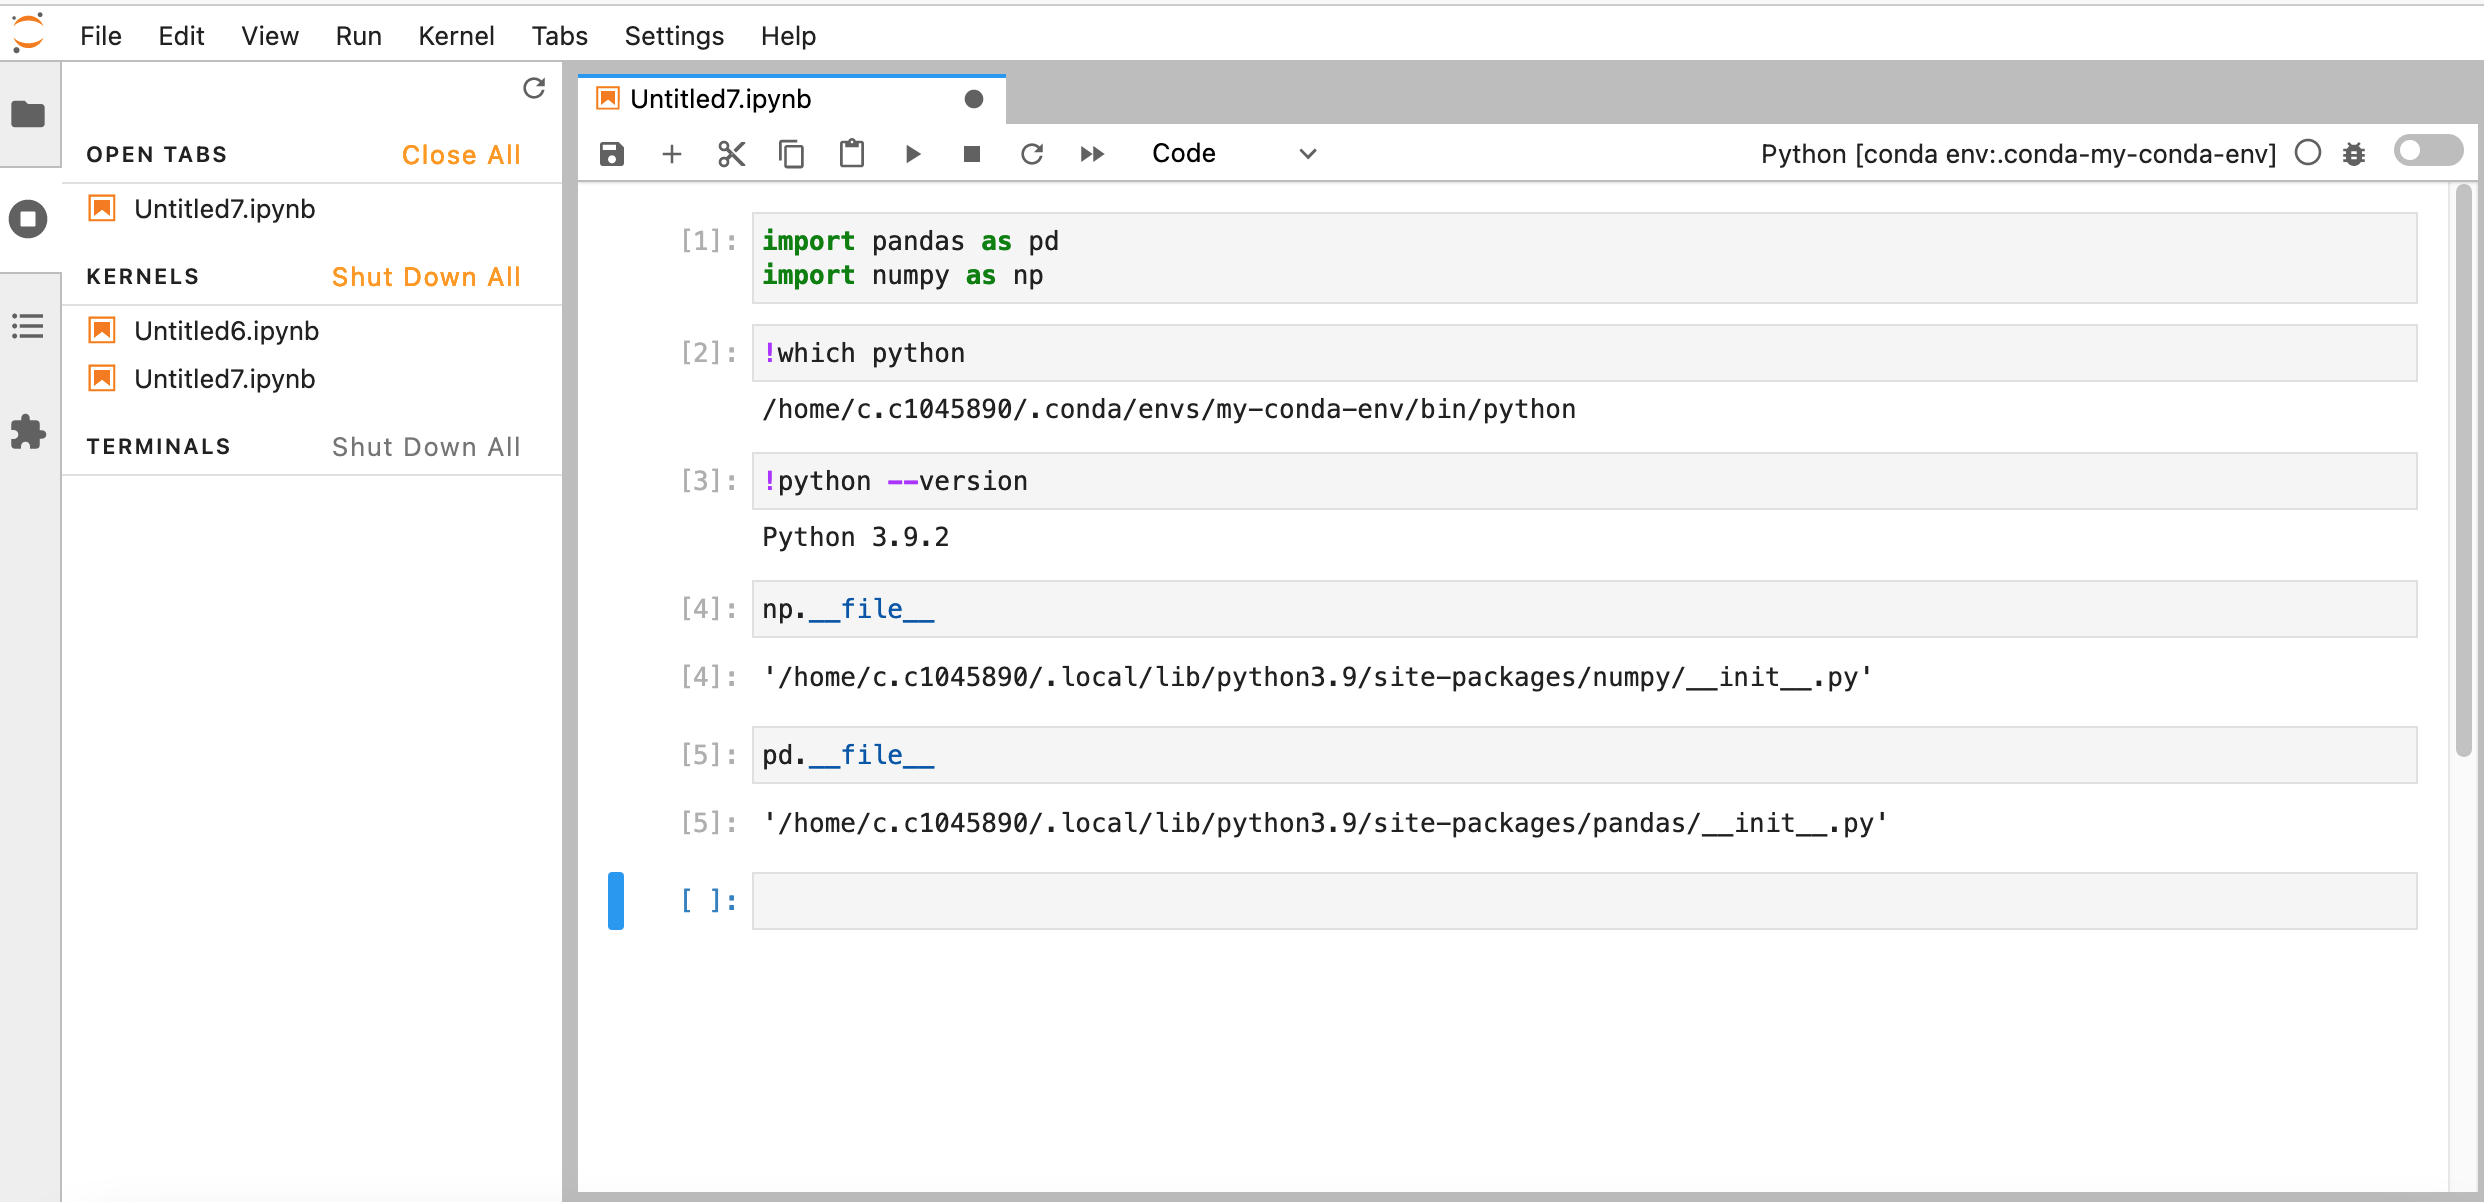
At this point you should have all the packages required to continue working on Hawk as if you were working on your local computer.
A more efficient approach
During these examples we have been requesting only 1 CPU when we launch our Jupyter Notebook and that, hopefully, has caused our request to be fulfilled fairly quickly. However, there will be a point where 1 CPU is no longer enough (maybe the application has become more complex or there is more data to analyse, and memory requirements have increased). At that point you can modify the requirements and increase the number of CPUS, memory, time or devices (GPUs). One point to keep in mind when increasing requirements is that this will impact the time it takes for the system scheduler to deliver your request and allocate you the resources, the higher the requirements, the longer it will take.
When the time spent waiting in queue becomes excessive it is worth considering moving away from the Jupyter Notebook workflow towards a more traditional Python script approach (recommended for HPC systems). The main difference between them is that while Jupyter Notebooks is ideal for the development stages of a project (since you can test things out in real time and debug if needed), the Python script approach is better suited for the production stages where the needed for supervision and debugging is reduced. Python scripts also have the advantage, on HPC systems, of being able to be queued for resources and automatically executed when these are granted without you needing to be logged in the system.
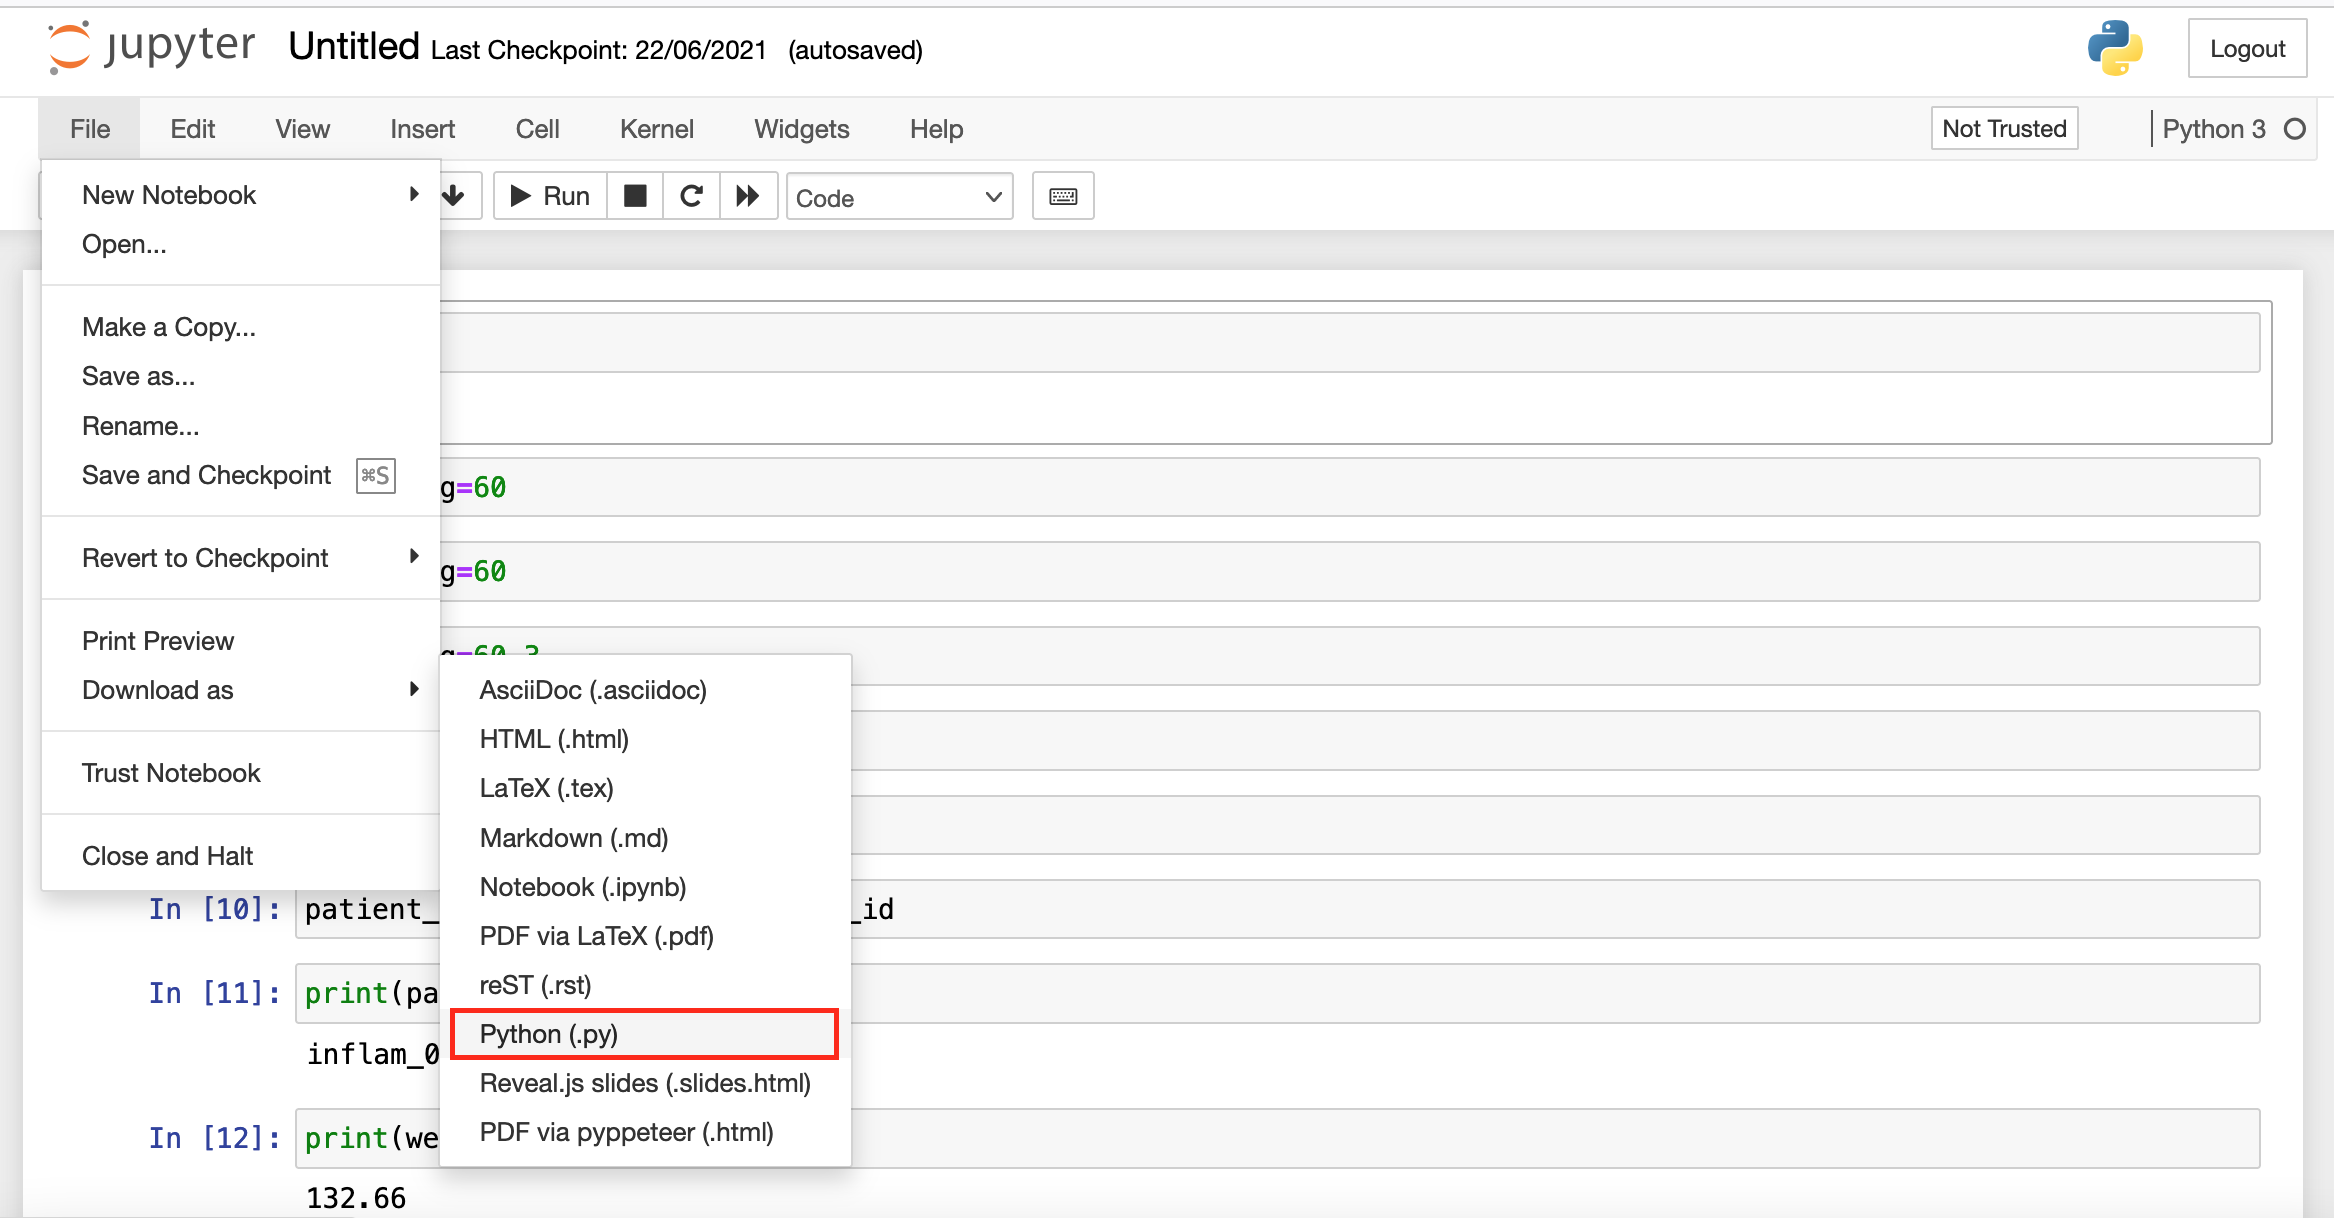
So, how do we actually transfer our Jupyter Notebook to a Python script? Fortunately, Jupyter Notebook developers thought of this requirement and added a convenient export method to the Notebooks (the menus might be different depending on if Jupyter Notebooks or Jupyter Lab was launched from OnDemand):
 |
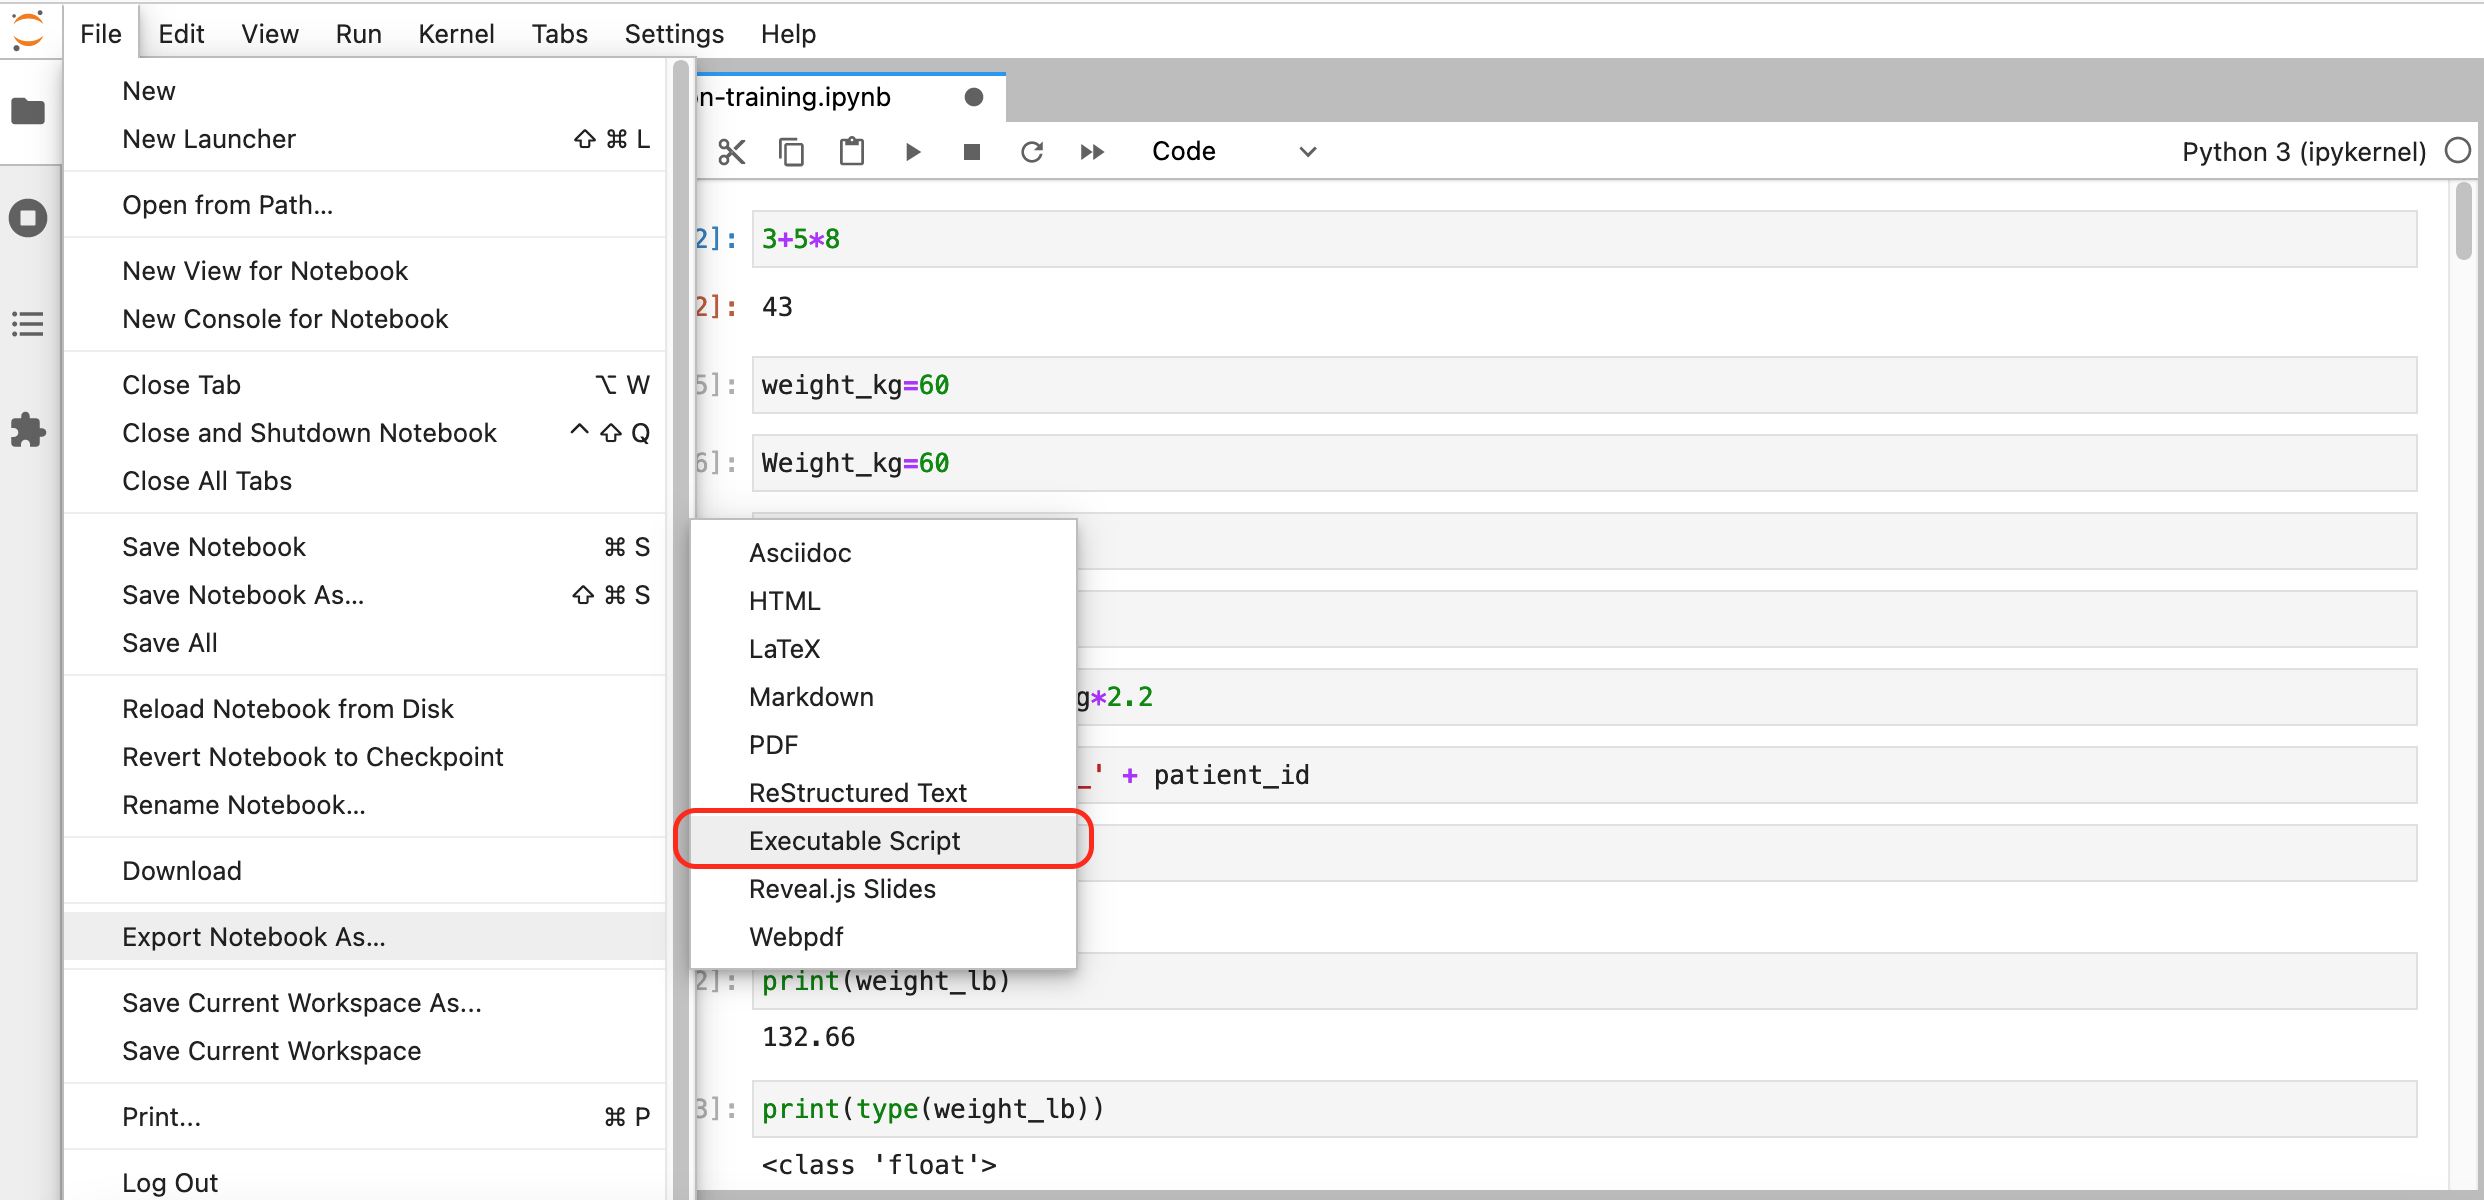 |
| Download from Jupyter Notebook | Download from Jupyter Lab |
After choosing an appropriate name and saving the file, we should have a Python script (a text file) with entries similar to:
#!/usr/bin/env python
# coding: utf-8

# In[1]:


3 + 5 * 8


# In[2]:


weight_kg=60
Notice the # In[X]: that mark the position of corresponding cells in our
Jupyter Notebook and are kept for reference. We can keep them in place, they
won’t cause any trouble as they are included as comments (due to the initial
#), but if we wanted to remove them we could do it by hand or more
efficiently by using the command line tool sed to find and delete lines that
start with the characters # [ and to delete empty lines (^ is used by sed
to indicate the beginning of a line and $ to indicate the end):
(from this point onwards we move away from Jupyter Notebooks and start typing commands on a terminal connected to Hawk)
sed -e '/# In/d' -e '/^$/d' lesson1.py > lesson1_cleaned.py
This will produce the lesson1_cleaned.py file with entries similar to:
#!/usr/bin/env python
# coding: utf-8
3+5+8
weight_kg=60
Now that we have our Python script, we need to create an additional file (job script) to place it in the queue (submit the job). Make sure to remove any commands from the Python script that might need additional confirmation or user interaction as you won’t be able to provide it with this method of execution. The following is the content a job script that is equivalent to how we have been requesting resources through OnDemand:
#!/bin/bash

#SBATCH -J test             # job name
#SBATCH -n 1                # number of tasks needed
#SBATCH -p htc              # partition
#SBATCH --time=01:00:00     # time limit
#SBATCH -A scwXXXX          # account number

set -eu

module purge
module load anaconda/2020.02
module list

# Load conda
source activate

# Load our environment
conda activate my-conda-env

which python
python --version

python my-python-script.py
To submit (put it queue) the above script, on Hawk:
$ sbatch my-job-script.sh
Submitted batch job 25859860
You can query the current state of this job with:
$ squeue -u $USER
    JOBID       PARTITION    NAME    USER      ST    TIME  NODES NODELIST(REASON)
    25860025    htc          test    c.xxxxxxx PD    0:00      1 ccs3004
This particular job might not spend a long time in queue and the above output
might not show it, but on completion there should be a slurm-<job-id>.out
created in the current directory with the output produced by our script.
There is a lot more to know about working with HTC systems and job schedulers, once you are ready to go this route, take a look at our documentation and training courses on these topics:
- Supercomputing for Beginners: Why use HPC? Accessing systems, using SLURM, loading software, file transfer and optimising resources.
- Slurm: Advanced Topics: Additional material to interface with HPC more effectively.
Need help?
If during the above steps you found any issues or have doubts regarding your specific work environment, get in touch with us at arcca-help@cardiff.ac.uk.
Key Points
It is possible to use Jupyter Notebooks on Hawk via OnDemand and ssh tunnels.
The recommended method to setup your work environment (installing libraries) is using Anaconda virtual environments.
Include the library ipykernel to make the environment reachable from Jupyter Notebooks
Use Jupyter Notebooks in the early (development) stages of your project when lots of debugging are necessary. Move towards automated Python scripts in later stages and submit them via SLURM job scripts.