Introduction
Overview
Teaching: 10 min
Exercises: 0 minQuestions
How do I access Hawk?
How do I copy files?
How do I run jobs?
Objectives
Use a SSH terminal
Use a file transfer program
Use Slurm commands to query the system
Training available!
The training course Supercomputing for Beginners and Slurm Advanced Topics may be suitable to learn further.
What is an HPC system?
The words “cloud”, “cluster”, and “high-performance computing” are used a lot in different contexts and with varying degrees of correctness. So what do they mean exactly? And more importantly, how do we use them for our work?
The cloud is a generic term commonly used to refer to remote computing resources of any kind – that is, any computers that you use but are not right in front of you. Cloud can refer to machines serving websites, providing shared storage, providing webservices (such as e-mail or social media platforms), as well as more traditional “compute” resources. An HPC system on the other hand, is a term used to describe a network of computers. The computers in a cluster typically share a common purpose, and are used to accomplish tasks that might otherwise be too big for any one computer.
Registration
An account and membership of a project is required to run code on Supercomputing Wales resources. Please see:
Logging in
Go ahead and log in to the cluster: cl1 at Cardiff University.
[user@laptop ~]$ ssh c.username@hawklogin.cf.ac.uk
Remember to replace c.username with the username supplied by the instructors. You will be asked for
your password. But watch out, the characters you type are not displayed on the screen.
You are logging in using a program known as the secure shell or ssh.
This establishes a temporary encrypted connection between your laptop and hawklogin.cf.ac.uk.
The word before the @ symbol, e.g. c.username here, is the user account name that Lola has access
permissions for on the cluster.
Where are we?
Very often, many users are tempted to think of a high-performance computing installation as one
giant, magical machine. Sometimes, people will assume that the computer they’ve logged onto is the
entire computing cluster. So what’s really happening? What computer have we logged on to? The name
of the current computer we are logged onto can be checked with the hostname command. (You may also
notice that the current hostname is also part of our prompt!)
[c.username@cl1 ~]$ hostname
cl1
Nodes
Individual computers that compose a cluster are typically called nodes (although you will also hear people call them servers, computers and machines). On a cluster, there are different types of nodes for different types of tasks. The node where you are right now is called the head node, login node or submit node. A login node serves as an access point to the cluster. As a gateway, it is well suited for uploading and downloading files, setting up software, and running quick tests. It should never be used for doing actual work.
The real work on a cluster gets done by the worker (or compute) nodes. Worker nodes come in many shapes and sizes, but generally are dedicated to long or hard tasks that require a lot of computational resources.
All interaction with the worker nodes is handled by a specialized piece of software called a scheduler (the scheduler used in this lesson is called ). We’ll learn more about how to use the scheduler to submit jobs next, but for now, it can also tell us more information about the worker nodes.
For example, we can view all of the worker nodes with the sinfo command.
[c.username@cl1 ~]$ sinfo
PARTITION   AVAIL  TIMELIMIT  NODES  STATE NODELIST
compute*       up 3-00:00:00    133  alloc ccs[0001-0080,0082-0134]
compute*       up 3-00:00:00      1   idle ccs0081
compute_amd    up 3-00:00:00      1  fail* cca0057
compute_amd    up 3-00:00:00     61  alloc cca[0001-0020,0023-0056,0058-0064]
compute_amd    up 3-00:00:00      2   idle cca[0021-0022]
highmem        up 3-00:00:00      5    mix ccs[1001,1008-1009,1023-1024]
highmem        up 3-00:00:00     21  alloc ccs[1002-1007,1010-1022,1025-1026]
gpu            up 2-00:00:00      3    mix ccs[2009,2012-2013]
gpu            up 2-00:00:00     10  alloc ccs[2001-2008,2010-2011]
gpu_v100       up 2-00:00:00      4    mix ccs[2102,2106,2110-2111]
gpu_v100       up 2-00:00:00     11  alloc ccs[2101,2103-2105,2107-2109,2112-2115]
htc            up 3-00:00:00     15    mix ccs[1009,1023-1024,2009,2012-2013,2106,2110-2111,3001,3003,3005,3008,3017-3018]
htc            up 3-00:00:00     48  alloc ccs[1010-1022,1025-1026,2008,2010-2011,2103-2105,2107-2109,2112-2115,3002,3004,3006-3007,3009-3016,3019-3026]
dev            up    1:00:00      2  alloc ccs[0135-0136]
There are also specialized machines used for managing disk storage, user authentication, and other infrastructure-related tasks. Although we do not typically logon to or interact with these machines directly, they enable a number of key features like ensuring our user account and files are available throughout the HPC system.
Shared file systems
This is an important point to remember: files saved on one node (computer) are often available everywhere on the cluster!
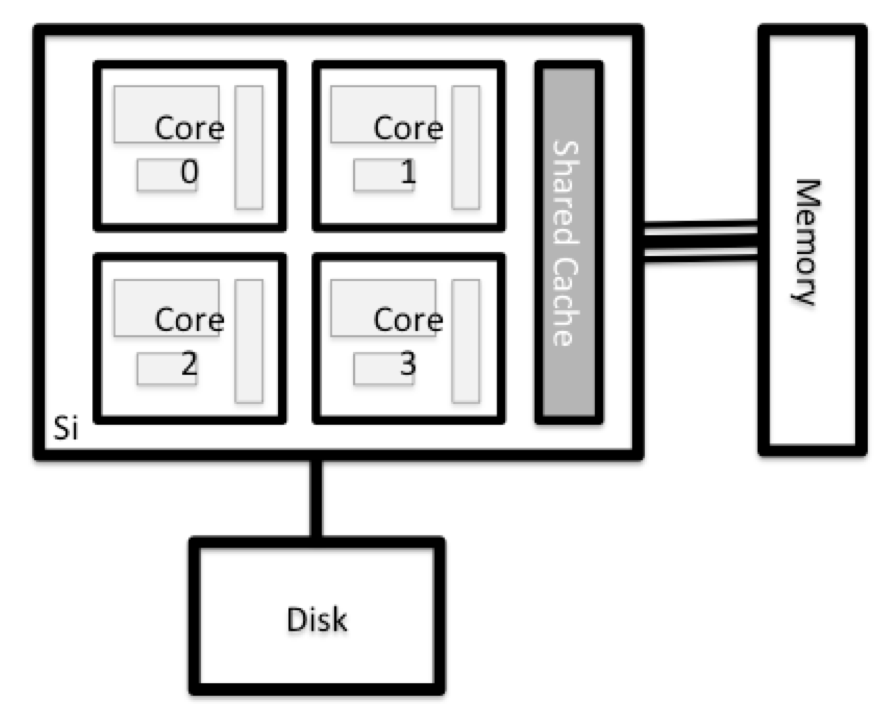
What’s in a node?
All of a HPC system’s nodes have the same components as your own laptop or desktop: CPUs (sometimes also called processors or cores), memory (or RAM), and disk space. CPUs are a computer’s tool for actually running programs and calculations. Information about a current task is stored in the computer’s memory. Disk refers to all storage that can be accessed like a file system. This is generally storage that can hold data permanently, i.e. data is still there even if the computer has been restarted.
Explore Your Computer
Try to find out the number of CPUs and amount of memory available on your personal computer.
Explore The Login Node
Now we’ll compare the size of your computer with the size of the login node: To see the number of processors, run:
[c.username@cl1 ~]$ nproc --allHow about memory? Try running:
[c.username@cl1 ~]$ free -m
Getting more information
You can get more detailed information on both the processors and memory by using different commands.
For more information on processors use
lscpu[c.username@cl1 ~]$ lscpuFor more information on memory you can look in the
/proc/meminfofile:[c.username@cl1 ~]$ cat /proc/meminfo
Explore a Worker Node
Finally, let’s look at the resources available on the worker nodes where your jobs will actually run. Try running this command to see the name, CPUs and memory available on the worker nodes (the instructors will give you the ID of the compute node to use):
[c.username@cl1 ~]$ sinfo -n ccs9002 -o "%n %c %m"
Compare Your Computer, the Login Node and the Worker Node
Compare your laptop’s number of processors and memory with the numbers you see on the cluster login node and worker node. Discuss the differences with your neighbor. What implications do you think the differences might have on running your research work on the different systems and nodes?
Units and Language
A computer’s memory and disk are measured in units called Bytes (one Byte is 8 bits). As today’s files and memory have grown to be large given historic standards, volumes are noted using the SI prefixes. So 1000 Bytes is a Kilobyte (kB), 1000 Kilobytes is a Megabyte, 1000 Megabytes is a Gigabyte etc.
History and common language have however mixed this notation with a different meaning. When people say “Kilobyte”, they mean 1024 Bytes instead. In that spirit, a Megabyte are 1024 Kilobytes. To address this ambiguity, the International System of Quantities standardizes the binary prefixes (with base of 1024) by the prefixes kibi, mibi, gibi, etc. For more details, see here
Differences Between Nodes
Many HPC clusters have a variety of nodes optimized for particular workloads. Some nodes may have larger amount of memory, or specialized resources such as Graphical Processing Units (GPUs).
Job scheduler
An HPC system might have thousands of nodes and thousands of users. How do we decide who gets what and when? How do we ensure that a task is run with the resources it needs? This job is handled by a special piece of software called the scheduler. On an HPC system, the scheduler manages which jobs run where and when.
The following illustration compares these tasks of a job scheduler to a waiter in a restaurant. If you can relate to an instance where you had to wait for a while in a queue to get in to a popular restaurant, then you may now understand why sometimes your job do not start instantly as in your laptop.

Job scheduling roleplay (optional)
Your instructor will divide you into groups taking on different roles in the cluster (users, compute nodes and the scheduler). Follow their instructions as they lead you through this exercise. You will be emulating how a job scheduling system works on the cluster.
The scheduler used in this lesson is SLURM. Although SLURM is not used everywhere, running jobs is quite similar regardless of what software is being used. The exact syntax might change, but the concepts remain the same.
Running a batch job
The most basic use of the scheduler is to run a command non-interactively. Any command (or series of commands) that you want to run on the cluster is called a job, and the process of using a scheduler to run the job is called batch job submission.
Project codes
Project codes allow the resources used to be recorded to a project and provides information on what research is used which resources. It allows for focussing attention on certain projects if issues are spotted.
Can you find your available project codes on mySCW?
In this case, the job we want to run is just a shell script. Let’s create a demo shell script to run as a test.
Creating our test job
Using your favorite text editor, create the following script and run it. Does it run on the cluster or just our login node?
#!/bin/bash --login

echo 'This script is running on:'
hostname
sleep 120
If you completed the previous challenge successfully, you probably realise that there is a
distinction between running the job through the scheduler and just “running it”. To submit this job
to the scheduler, we use the sbatch command.
[[c.username@cl1 ~]$ sbatch -p c_compute_mdi1 -A scw1148 example-job.sh
Submitted batch job 36855
And that’s all we need to do to submit a job. Our work is done – now the scheduler takes over and
tries to run the job for us. While the job is waiting to run, it goes into a list of jobs called
the queue. To check on our job’s status, we check the queue using the command
squeue -u yourUsername.
[c.username@cl1 ~]$ squeue -u yourUsername
             JOBID PARTITION     NAME     USER ST       TIME  NODES NODELIST(REASON)
             36855 c_compute hello.sh c.userna  R       0:43      1 ccs9002
We can see all the details of our job, most importantly that it is in the “R” or “RUNNING” state.
Sometimes our jobs might need to wait in a queue (“PENDING”) or have an error. The best way to check
our job’s status is with squeue. Of course, running squeue repeatedly to check on things can be
a little tiresome. To see a real-time view of our jobs, we can use the watch command. watch
reruns a given command at 2-second intervals. This is too frequent, and will likely upset your system
administrator. You can change the interval to a more reasonable value, for example 60 seconds, with the
-n 60 parameter. Let’s try using it to monitor another job.
[c.username@cl1 ~]$ sbatch -p c_compute_mdi1 -A scw1148 example-job.sh
[c.username@cl1 ~]$ watch -n 60 squeue -u yourUsername
You should see an auto-updating display of your job’s status. When it finishes, it will disappear
from the queue. Press Ctrl-C when you want to stop the watch command.
Customising a job
The job we just ran used all of the scheduler’s default options. In a real-world scenario, that’s probably not what we want. The default options represent a reasonable minimum. Chances are, we will need more cores, more memory, more time, among other special considerations. To get access to these resources we must customize our job script.
Comments in UNIX (denoted by #) are typically ignored. But there are exceptions. For instance the
special #! comment at the beginning of scripts specifies what program should be used to run it
(typically /bin/bash) possibly with switches such as /bin/bash --login to select a certain behaviour of the program. Schedulers like also have a special comment
used to denote special scheduler-specific options. Though these comments differ from scheduler to
scheduler, ‘s special comment is #SBATCH.
Anything following the #SBATCH comment is interpreted as an
instruction to the scheduler.
Let’s illustrate this by example. By default, a job’s name is the name of the script, but the
-J option can be used to change the name of a job.
Submit the following job (sbatch -p c_compute_mdi1 -A scw1148 example-job.sh):
#!/bin/bash --login
#SBATCH -J new_name

echo 'This script is running on:'
hostname
sleep 120
[c.username@cl1 ~]$ squeue -u yourUsername
             JOBID PARTITION     NAME     USER ST       TIME  NODES NODELIST(REASON)
             38759 c_compute new_name c.userna  R       0:43      1 ccs9002
Fantastic, we’ve successfully changed the name of our job!
Setting up email notifications
Jobs on an HPC system might run for days or even weeks. We probably have better things to do than constantly check on the status of our job with
squeue. Looking at the man page forsbatch, can you set up our test job to send you an email when it finishes?
Resource requests
But what about more important changes, such as the number of cores and memory for our jobs? One thing that is absolutely critical when working on an HPC system is specifying the resources required to run a job. This allows the scheduler to find the right time and place to schedule our job. If you do not specify requirements (such as the amount of time you need), you will likely be stuck with your site’s default resources, which is probably not what we want.
The following are several key resource requests:
-
-n <ntasks>- How many tasks (or MPI task) does your job need? -
--ntasks-per-node=<ntasks per node>- How many tasks per node? -
-A <project code>- What project code to use? -
-c <ncpus>- How many CPUs per task does your job need, e.g. OpenMP/MPI hybrid? -
--mem=<megabytes>- How much memory on a node does your job need in megabytes? You can also specify gigabytes using by adding a little “g” afterwards (example:--mem=5g) -
--time <days-hours:minutes:seconds>- How much real-world time (walltime) will your job take to run? The<days>part can be omitted. -
--gres=gpu:<number of cards>- How many GPUs to reserve.
Note that just requesting these resources does not make your job run faster! We’ll talk more about how to make sure that you’re using resources effectively in a later episode of this lesson.
Submitting resource requests
Submit a job that will use 1 full node and 5 minutes of walltime.
Job environment variables
When SLURM runs a job, it sets a number of environment variables for the job. One of these will let us check our work from the last problem. The
SLURM_CPUS_PER_TASKvariable is set to the number of CPUs we requested with-c. Using theSLURM_CPUS_PER_TASKvariable, modify your job so that it prints how many CPUs have been allocated.
Resource requests are typically binding. If you exceed them, your job will be killed. Let’s use walltime as an example. We will request 30 seconds of walltime, and attempt to run a job for two minutes.
#!/bin/bash --login
#SBATCH -t 0:0:30

echo 'This script is running on:'
hostname
sleep 120
Submit the job and wait for it to finish. Once it is has finished, check the log file.
[c.username@cl1 ~]$ sbatch -p c_compute_mdi1 -A scw1148 example-job.sh
[c.username@cl1 ~]$ watch -n 60 squeue -u yourUsername
[c.username@cl1 ~]$ cat slurm-38193.out
This script is running on:
ccs9002
slurmstepd: error: *** JOB 16523604 ON ccs9002 CANCELLED AT 2020-06-05T11:03:23 DUE TO TIME LIMIT ***
Our job was killed for exceeding the amount of resources it requested. Although this appears harsh, this is actually a feature. Strict adherence to resource requests allows the scheduler to find the best possible place for your jobs. Even more importantly, it ensures that another user cannot use more resources than they’ve been given. If another user messes up and accidentally attempts to use all of the cores or memory on a node, SLURM will either restrain their job to the requested resources or kill the job outright. Other jobs on the node will be unaffected. This means that one user cannot mess up the experience of others, the only jobs affected by a mistake in scheduling will be their own.
Cancelling a job
Sometimes we’ll make a mistake and need to cancel a job. This can be done with the scancel
command. Let’s submit a job and then cancel it using its job number (remember to change the
walltime so that it runs long enough for you to cancel it before it is killed!).
[c.username@cl1 ~]$ sbatch -p c_compute_mdi1 -A scw1148 example-job.sh
[c.username@cl1 ~]$ squeue -u yourUsername
Submitted batch job 38759

             JOBID PARTITION     NAME     USER ST       TIME  NODES NODELIST(REASON)
             38759 partition  jobname     user  R 2-09:58:04      1 node
Now cancel the job with it’s job number. Absence of any job info indicates that the job has been successfully cancelled. Note that it might take a minute for the job to disappear from the queue.
[c.username@cl1 ~]$ scancel 38759

[c.username@cl1 ~]$ squeue -u yourUsername
JOBID PARTITION NAME USER ST TIME NODES NODELIST(REASON)
Cancelling multiple jobs
We can also all of our jobs at once using the
-uoption. This will delete all jobs for a specific user (in this case us). Note that you can only delete your own jobs.Try submitting multiple jobs and then cancelling them all with
scancel -u yourUsername.
Other types of jobs
Up to this point, we’ve focused on running jobs in batch mode. SLURM also provides the ability to start an interactive session.
There are very frequently tasks that need to be done interactively. Creating an entire job
script might be overkill, but the amount of resources required is too much for a login node to
handle. A good example of this might be building a genome index for alignment with a tool like
HISAT2. Fortunately, we can run these types of
tasks as a one-off with srun.
srun runs a single command on the cluster and then exits. Let’s demonstrate this by running the
hostname command with srun. (We can cancel an srun job with Ctrl-c.)
[c.username@cl1 ~]$ srun -p c_compute_mdi1 -A scw1148 hostname
ccs9002
srun accepts all of the same options as sbatch. However, instead of specifying these in a
script, these options are specified on the command-line when starting a job. To submit a job that
uses 2 CPUs for instance, we could use the following command:
[c.username@cl1 ~]$ srun -p c_compute_mdi1 -A scw1148 -c 2 echo "This job will use 2 CPUs."
This job will use 2 CPUs.
Typically, the resulting shell environment will be the same as that for sbatch.
Interactive jobs
Sometimes, you will need a lot of resource for interactive use. Perhaps it’s our first time running
an analysis or we are attempting to debug something that went wrong with a previous job.
Fortunately, SLURM makes it easy to start an interactive job with srun:
[c.username@cl1 ~]$ srun -p c_compute_mdi1 -A scw1148 --pty bash
You should be presented with a bash prompt. Note that the prompt will likely change to reflect your
new location, in this case the compute node we are logged on. You can also verify this with
hostname.
Creating remote graphics
To see graphical output inside your jobs, you need to use X11 forwarding. To connect with this feature enabled, use the
-Yoption when you login withsshwith the commandssh -Y username@host.To demonstrate what happens when you create a graphics window on the remote node, use the
xeyescommand. A relatively adorable pair of eyes should pop up (pressCtrl-cto stop). If you are using a Mac, you must have installed XQuartz (and restarted your computer) for this to work.If your cluster has the slurm-spank-x11 plugin installed, you can ensure X11 forwarding within interactive jobs by using the
--x11option forsrunwith the commandsrun -p c_compute_mdi1 -A scw1148 --x11 --pty bash.
When you are done with the interactive job, type exit to quit your session.
Key Points
Understand the system and how it works